Drive Plate, Removing And Installing: Installing
WARNING: This page is about a different variant/trim than selected.
Install in the reverse order of removal while noting the following:
- Replace bolts that were tightened with an additional turn after removing them.
The threads in the crankshaft must be cleaned before continuing assembly.
-- Clean the crankshaft flange, until all of the adhesive residue is completely removed.
- Do not damage the shaft seal when cleaning the flange.
- Remove any loosened adhesive residue with a vacuum cleaner, and do not use compressed air under any circumstances.
-- Remove adhesive residue from one of the old drive plate bolts -2- with the wire brush, and remove oil residue with brake cleaner.
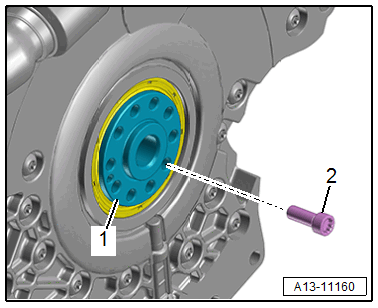
-- Keep inserting and removing the cleaned bolt in the thread on the crankshaft -1- until no more adhesive residue is extracted.
- The bolt must not be inserted too far, so that it does not damage the camshaft timing chains behind it.
-- When adhesive residue is no longer extracted, repeat the procedure on the other crankshaft threads.
- Lastly, remove any loosened adhesive residue with a vacuum cleaner, and do not use compressed air under any circumstances.
-- Clean the crankshaft flange with a cloth.
- The threads in the crankshaft must not have any oil or grease on them.
-- Reposition the Counterhold - Flywheel: 10-201 to tighten the bolts.