Overview - Timing Chain Cover
WARNING: This page is about a different variant/trim than selected.
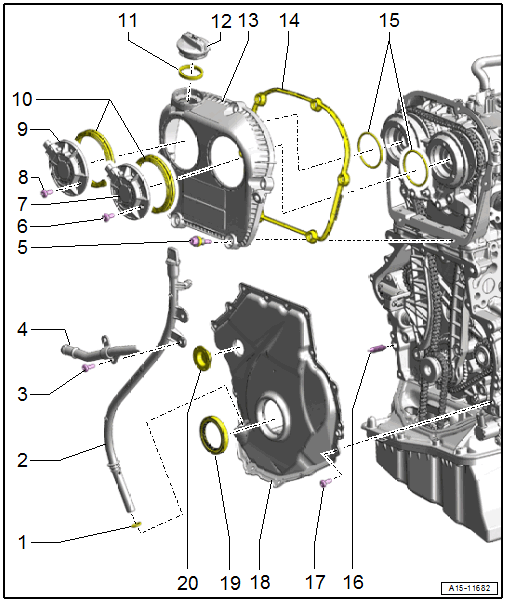
- O-Ring
- Replace after removing
- Lubricate with engine oil
- Oil Dipstick Tube
- Bolt
- 9 Nm
- Replace after removing
- Self-locking
- Clean the threaded hole for the bolt with a thread tap, for example
- Left Coolant Pipe
- Removing and Installing. Refer to LEFT COOLANT PIPE, REMOVING AND INSTALLING .
- Bolt
- Permanent, included in the delivery package -item ) Upper Timing Chain Cover
- Tightening Specifications and Sequence. Refer to Fig 2.
- Bolt
- 8 Nm +45°
- Replace after removing
- Clean the threaded hole for the bolt with a thread tap, for example
- Self-locking
- Camshaft Adjustment Valve 1 -N205-
- Removing and Installing. Refer to Camshaft Adjustment Valve 1 -N205- / Exhaust Camshaft Adjustment Valve 1 -N318-, REMOVING AND INSTALLING .
- Bolt
- 8 Nm +45°
- Replace after removing
- Clean the threaded hole for the bolt with a thread tap, for example
- Self-locking
- Exhaust Camshaft Adjustment Valve 1 -N318-
- Removing and Installing. Refer to Camshaft Adjustment Valve 1 -N205- / Exhaust Camshaft Adjustment Valve 1 -N318-, REMOVING AND INSTALLING .
- Seals
- Replace if damaged or leaking
- Installation position: smaller inner diameter outward
- Remove to replace the upper timing chain cover -item ) Upper Timing Chain Cover
- Lubricate with engine oil
- Seal
- Replace if damaged or leaking
- Cap
- Upper Timing Chain Cover
- Removing and Installing. Refer to UPPER TIMING CHAIN COVER, REMOVING AND INSTALLING .
- Seal
- Replace if damaged or leaking
- O-Rings
- Replace after removing
- Installed depending on the performance class
- Coat with engine oil
- Alignment Pin
- For the lower timing chain cover
- Quantity: 2
- Bolt
- Tightening Specifications and Sequence. Refer to Fig 3.
- Replace after removing
- Clean the threaded hole for the bolt with a thread tap, for example
- Self-locking
- Lower Timing Chain Cover
- Replace after removing
- With gasket
- Removing and Installing. Refer to LOWER TIMING CHAIN COVER, REPLACING .
- Seal
- For the vibration damper
- Replacing. Refer to VIBRATION DAMPER SEAL, REPLACING .
- Plugs
- Replace after removing
Upper Timing Chain Cover - Tightening Specifications and Sequence
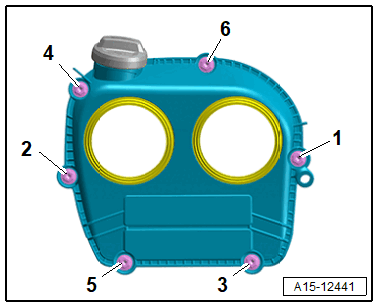
-- Tighten the bolts -1 to 6- in steps in the sequence shown:
| Step | Tightening Specifications |
|---|---|
| 1. | Install all the way by hand |
| 2. | 9 Nm |
Lower Timing Chain Cover - Tightening Specifications And Sequence

- Replace bolts that were tightened with an additional turn after removing them.
-- Tighten the bolts in the steps in the sequence shown:
| Step | Bolts | Tightening Specification/Additional Turn |
|---|---|---|
| 1. | -1 to 15- | Install all the way by hand |
| 2. | -1 to 15- | 8 Nm |
| 3. | -1, 2, 4, 5- and -7 to 15- | 45° additional turn |
| 4. | -3 and 6- | After installation of the vibration damper a 45° additional turn |