Sunroof Frame, Removing And Installing, A4 AVANT: Notes
Special tools and workshop equipment required
- Adjustment Gauge :3371
- To complete the procedure, a second technician is required to be at the following position SUNROOF FRAME, REMOVING AND INSTALLING, A4 AVANT .
Removing
-- Remove the headliner. Refer to HEADLINER, REMOVING AND INSTALLING .
-- Disconnect the connector -1- from the Power Sunroof Control Module -J245-.
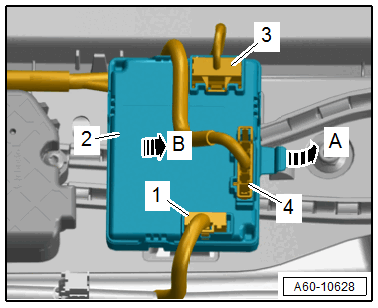
-- Remove the front and rear water drain hoses from the sunroof frame. Refer to WATER DRAIN HOSES, REMOVING AND INSTALLING .
CAUTION:
There is a risk of damaging the roof system if handled incorrectly.
- Only use the side guide rails to support the roof system.
- Before removing the nuts, both technicians must hold the sunroof frame at the front and back.
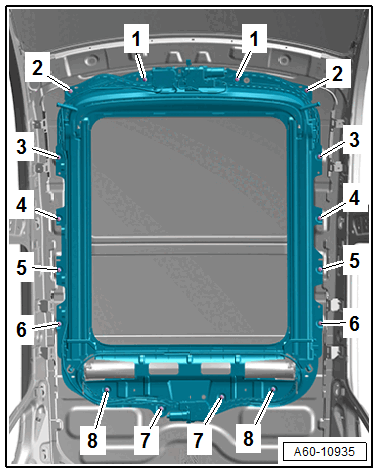
-- Remove the nuts -1, 2, 4, 5, 7 and 8-.
-- Remove the nuts -3 and 6- and then remove the sunroof frame to the rear lid.
-- If the rear sunroof frame is to be replaced, also remove the following components:
- Front glass panel. Refer to GLASS PANEL, REMOVING AND INSTALLING, FRONT, A4 AVANT AND MARKET-SPECIFIC VERSION .
- Rear glass panel. Refer to GLASS PANEL, REMOVING AND INSTALLING, REAR, A4 AVANT AND MARKET-SPECIFIC VERSION .
- Wind Deflector. Refer to WIND DEFLECTOR, REMOVING AND INSTALLING .
- Sunroof Control Module -J245-. Refer to Sunroof Control Module -J245-, REMOVING AND INSTALLING .
- Sunroof Motor -V1-. Refer to Sunroof Motor -V1-, REMOVING AND INSTALLING .
- Remove the sunroof shade. Refer to SUNROOF SHADE, REMOVING AND INSTALLING .
- Sunroof Shade Motor -V260-. Refer to Sunroof Shade Motor -V260-, REMOVING AND INSTALLING .