Seat Position Sensor, Removing And Installing
Special tools and workshop equipment required
- Gauge - Gap Adjustment: 3371 or
- Gauge - Eos Roof: VAS6448
The seat position sensor is available as a replacement part with the wiring harness and connector. The following wires with connectors are incorporated in the wiring harness:
- Driver Seat Position Sensor -G553- : wire with connector for seat belt latch coupling.
- Front Passenger Seat Position Sensor -G554- : wire with connector for seat belt latch coupling, passenger occupant detection sensor and passenger occupant detection system control module (market-specific).
Removing
-- Disconnect the modular wiring routing. Refer to MODULAR WIRING ROUTING, DISCONNECTING AND CONNECTING .
-- Open the corrugated tube, remove the wire for the Driver Seat Position Sensor -G553- / Front Passenger Seat Position Sensor -G554- with the connector and free up.
-- Remove the cable ties or cable clips for the wire on the seat pan lower frame.
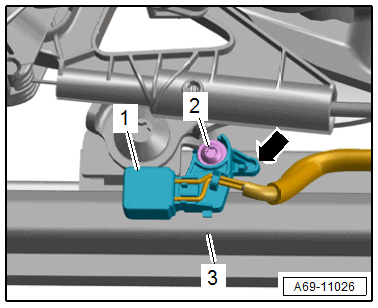
-- Remove the bolt -2-, unclip the seat position sensor -1- from the seat pan lower frame -3- and disengage it -arrow-.
Driver Seat:
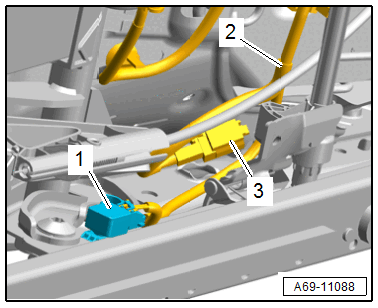
-- Free up the connector -3- for the seat belt latch and disconnect.
-- Remove the seat position sensor -1- with the wires -2-.
Front Passenger Seat:
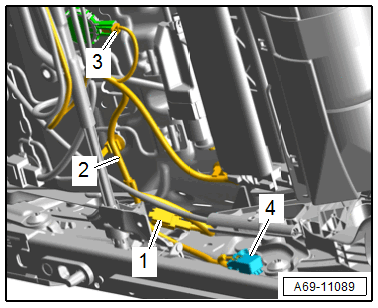
-- Free up the connector -1- for the seat belt latch and disconnect.
-- Disconnect the connector -3- on the Front Passenger Occupant Detection Sensor -G128-.
-- Remove the seat position sensor -4- with the wires -2-.
Installing and Adjusting
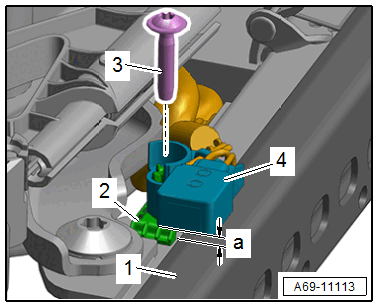
Standard/Sport Seat/Super Sport Seat:
-- Hook the bracket -2- into the upper seat rail and clip it in.
-- Slide the seat position sensor -4- on the bracket and position at a distance -a- = 4.0 mm to the lower seat rail -1-.
-- To do this, position the : 3371 / : VAS6448 / 4 mm between the seat position sensor and the lower seat rail and tighten the screw -3-.
Check the seat position sensor with the Vehicle Diagnostic Tester.
Further installation is the reverse order of removal.