OVERVIEW - A/C COMPRESSOR BELT PULLEY WITH A/C CLUTCH -N25-, "Denso"
-- Perform the preparatory work. Refer to PRELIMINARY WORK FOR REPLACING BELT PULLEY .
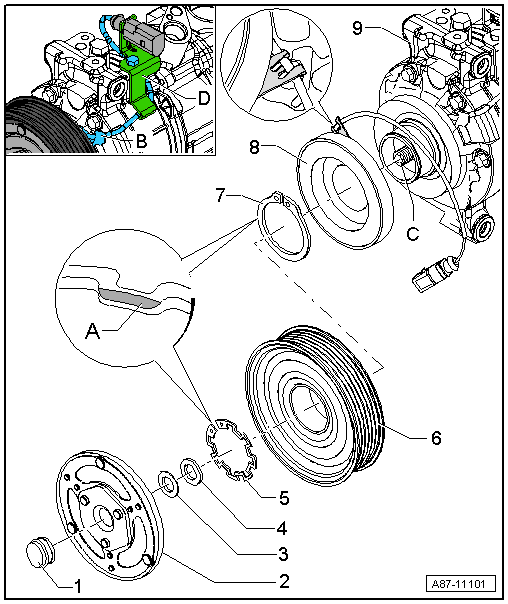
- Closure Cap
- Not always present
- Clutch Plate
- Tightening specification: 30 Nm
- Replace
- Removing and installing. Refer to CLUTCH PLATE, REMOVING AND INSTALLING, A/C COMPRESSOR "Denso" (WITH A/C Clutch -N25-) .
- Attached to the A/C compressor input shaft
- There are different versions. Refer to the Parts Information.
- The overload protection takes over when the torque is excessive (for example, if the A/C compressor runs with resistance) and the belt pulley runs freely without driving the A/C compressor with the A/C Clutch -N25- switched on.
- Washer
- Spacer
- For adjusting the gap dimension between the clutch and belt pulley.
- Check the gap dimension. Refer to GAP DIMENSION BETWEEN BELT AND CLUTCH PLATE, CHECKING, "Denso" A/C COMPRESSOR, WITH A/C Clutch -N25- .
- Circlip
- Replace
- install on correct side (flat side toward A/C compressor)
- Be careful not to bend the circlip more than necessary when installing it.
-- Insert the circlip on correct side, the side with beveled insertion edge -A- faces away from A/C compressor (install the flat side facing the A/C compressor).
- Belt Pulley
- The belt pulley is sensitive to impact, therefore handle it carefully.
- Clean the flange on the A/C compressor flange before installing the belt pulley.
- There are different versions (depending, for example, on the type of engine). Refer to the Parts Information.
- Refer to BELT PULLEY, REMOVING, WITH A/C Clutch -N25- if it is not possible to remove the belt pulley from the flange on the A/C compressor by hand.
- Circlip
- Replace
- install on correct side (flat side toward A/C compressor)
- Be careful not to bend the circlip more than necessary when installing it.
-- Insert the circlip on correct side, the side with beveled insertion edge -A- faces away from A/C compressor (install the flat side facing the A/C compressor).
- Solenoid Coil
- Make sure the bracket for the cable -B- is installed correctly.
- The connector -D- may be attached to the A/C compressor with a bracket, depending on the version.
- On an A/C compressor where the wires for activating the A/C Clutch -N25- and the A/C Compressor Regulator Valve -N280- are combined in a 3-pin connector, remove the wire to the A/C Clutch -N25- from the connector using an appropriate release tool from the Wiring Harness Repair Set :VAS1978B . Refer to CONNECTOR HOUSINGS, RELEASING AND DISASSEMBLING .
- A/C Compressor
- There are different versions installed depending on the engine and the vehicle market. Refer to the Parts Information.
- Clean the A/C compressor flange before installing the belt pulley.
- Clean the compressor shaft thread and then coat the thread lightly with grease.