RIGHT ADJUSTMENT MOTOR BRACKET, REMOVING AND INSTALLING, "High" A/C SYSTEM: Removing
-- Adjust the airflow direction on the Front A/C Display Control Head -E87- to "DEF" (to the windshield).
-- Set the temperature preset on the Front A/C Display Control Head -E87- for the right side to "warm".
-- Move the right front seat all the way to the rear.
-- Switch off the ignition.
-- Remove the glove compartment. Refer to GLOVE COMPARTMENT, REMOVING AND INSTALLING .
-- Remove the right footwell vent. Refer to FRONT PASSENGER SIDE FOOTWELL VENT, REMOVING AND INSTALLING .
-- If equipped, remove the air duct for the glove compartment cooling. Refer to AIR DUCT FOR GLOVE COMPARTMENT COOLING, REMOVING AND INSTALLING .
-- Remove the air duct to the instrument panel vent. Refer to OVERVIEW - AIR ROUTING AND AIR DISTRIBUTION IN VEHICLE INTERIOR FRONT .
TIP
- On RHD vehicles, the Fresh Air Blower -V2- does not need to be removed to remove the Defroster Door Motor :V107 . The instrument panel must be removed to do this. Refer to INSTRUMENT PANEL, REMOVING AND INSTALLING .
-- Remove the following adjustment motors.
- Remove the Right Side Vent Motor :V300 . Refer to Right Side Vent Motor -V300-, REMOVING AND INSTALLING .
- Remove the Right Temperature Control Door Motor :V159 . Refer to Right Temperature Control Door Motor -V159-, REMOVING AND INSTALLING .
- Remove the Defroster Door Motor :V107 . Refer to Defroster Door Motor -V107-, REMOVING AND INSTALLING (only on RHD vehicles).
-- Remove the bolts -B-.
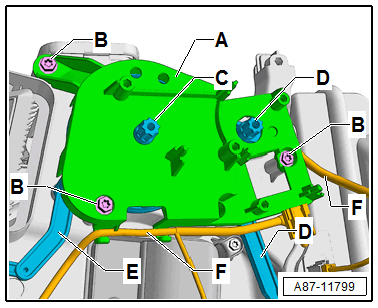
-- Detach the wiring harness -F- from the bracket -A-.
-- Hold the curved washer -C- and remove the bracket -A-.
TIP
- On RHD vehicles remove the gear to the actuator for the Defroster Door Motor :V107 with it. Refer to LEFT ADJUSTMENT MOTOR BRACKET, REMOVING AND INSTALLING, "Low" A/C SYSTEM (OR A HEATHER WITHOUT A/C SYSTEM) .