Overview - Evaporator Housing
- Currently the evaporator is delivered with the evaporator housing as a replacement part, for this reason do not disassemble the evaporator. If the evaporator is delivered later as a replacement part, then disassemble the evaporator housing. Refer to the Parts Information.
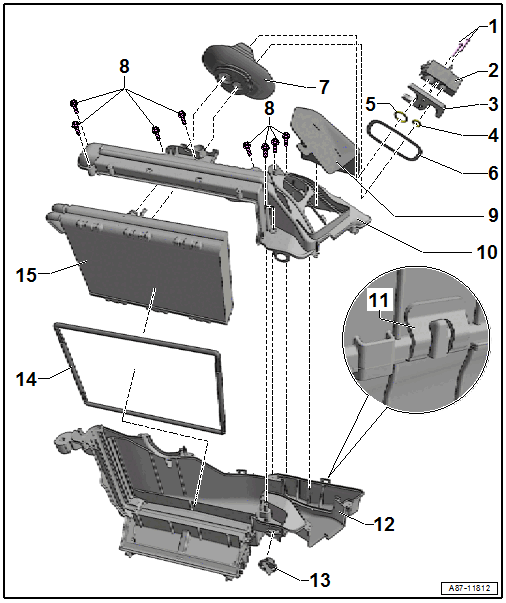
- Screw
- 5.5 Nm
- Quantity: 2
- Removing and Installing. Refer to FRONT EXPANSION VALVE, REMOVING AND INSTALLING .
- Expansion Valve
- Removing and Installing. Refer to FRONT EXPANSION VALVE, REMOVING AND INSTALLING .
- Cover for the expansion valve (vehicles with heater without an A/C system)
- The connections on the expansion valve (for the A/C system refrigerant lines) are connected on vehicles without an A/C system with a closure cap (tightening specification of the nut 8 Nm). Refer to HEATER, DISASSEMBLING AND ASSEMBLING and the Parts Information.
- The expansion valve is installed on a vehicle without an A/C system only to seal the pass-through in the grommet to the vehicle interior.
- Retaining Pate
- Removing and Installing. Refer to EVAPORATOR IN HEATER AND A/C UNIT, REMOVING AND INSTALLING .
- O-Ring
- Replacing. Refer to REFRIGERANT CIRCUIT SEALS .
- Refer to the Parts Information for the allocation.
- O-Ring
- Replacing. Refer to REFRIGERANT CIRCUIT SEALS .
- Refer to the Parts Information for the allocation.
- Support Ring
- The support ring increases the pressure of the grommet on the plenum chamber rear panel
- Check the seating of the support ring in the grommet. Refer to REFRIGERANT LINES, DISCONNECTING FROM FRONT EXPANSION VALVE AND RECONNECTING .
- Boot
- For sealing the holes through the plenum chamber rear panel for the refrigerant lines
- With support ring for sealing in the plenum chamber rear panel. Refer to REFRIGERANT LINES, DISCONNECTING FROM FRONT EXPANSION VALVE AND RECONNECTING .
- Currently a component of the "evaporator housing" replacement part. Refer to Parts Information.
- Screw
- 1 Nm
- Insulation
- Installed between the air duct in the air distribution housing and in the resonator chamber in the air distribution box.
- Evaporator Housing Upper Section
- Catch
- Open carefully
- Evaporator Housing Lower Section
- Both housing halves are held together via the bolts -Item 8- and the catches -Item 6-.
-- Check for debris and if necessary clean before assembling both housing halves.
-- Check the groove and spring connection to the evaporator housing upper section for damage.
- Damaged or incorrectly joined connections can result in noises during operation.
- Both housing halves are held together via the bolts -Item 8- and the catches -Item 6-.
- Cap
- For the connection to the glove compartment cooling
- Only installed on vehicles without the "glove compartment cooling" optional equipment. Refer to AIR DUCT FOR GLOVE COMPARTMENT COOLING, REMOVING AND INSTALLING .
- Seal
- Check for damage and the correct assembly on the evaporator.
- Evaporator
- Delivered as replacement evaporator part with various components needed for installation (evaporator housing, O-ring seals, expansion valve etc.). Refer to the Parts Information.
- Inspect the bonded foam seals for damage and that it is correctly bonded
- Removing and Installing. Refer to EVAPORATOR IN HEATER AND A/C UNIT, REMOVING AND INSTALLING .
- On a vehicle without an A/C system (only with a heater) the evaporator installed in the heater does not function, it is only works a place holder and to reduce noise.