Cleaning The Refrigerant Circuit, Preliminary Work (Flushing With Refrigerant R1234YF)
-- Discharge the refrigerant circuit. Refer to REFRIGERANT CIRCUIT, DISCHARGING .
-- Remove the A/C compressor. Refer to Refrigerant Circuit .
Vehicle with Restrictor and Reservoir
-- Remove the restrictor (vehicle-specific) and connect the lines back together. Refer to Refrigerant Circuit .
-- Remove the reservoir (vehicle-specific) and connect the lines back to each other (to do so use the adapter and the Filler Hose from the Passenger Vehicle Adapter Set VW/Volkswagen/Audi). Refer to ADAPTER FOR ASSEMBLING FLUSHING CIRCUIT and Refrigerant Circuit .
The reservoir could be flushed but because of its large internal volume it will take too much refrigerant, the reservoir would ice-up too much when extracting the refrigerant, the refrigerant would evaporate too slowly and extraction would be extended too much.
Vehicle with expansion valve and receiver/dryer
-- If on this refrigerant circuit it is possible and necessary (see the notes) to remove the receiver/dryer of the dryer cartridge from the receiver/dryer (vehicle-specific) and connect the lines back with each other (to do so use the adapter and the Filler Hose from the Passenger Vehicle Adapter Set Volkswagen/Audi). Refer to ADAPTER FOR ASSEMBLING FLUSHING CIRCUIT and Refrigerant Circuit .
The receiver/dryer can be flushed depending on the version (remove the dryer cartridge installed inside of it if necessary). Refer to ADAPTER FOR ASSEMBLING FLUSHING CIRCUIT and Refrigerant Circuit .
The receiver/dryer attached to the condenser remains installed during flushing (it can be flushed due to its design and is only replaced after flushing). Refer to ADAPTER FOR ASSEMBLING FLUSHING CIRCUIT and Refrigerant Circuit .
If the receiver/dryer or dryer cartridge is integrated in the condenser, then they cannot be replaced separately or are not available as a single part, and the condenser must be replaced after flushing. In this case, replace the condenser with the receiver/dryer on these vehicles. Refer to Refrigerant Circuit and the Parts Information .
Depending on the version receivers/dryers where it is possible to replace the dryer cartridge separately have an additional filter element, which must also be replaced with the dryer cartridge if necessary.
-- On vehicles with a dryer cartridge in the receiver/dryer on the condenser (vehicle-specific), remove the dryer cartridge and seal off the opening on the receiver/dryer. Refer to Refrigerant Circuit .
-- Remove the expansion valve (vehicle-specific) and an adapter from the Passenger Vehicle Adapter Set Volkswagen/Audi may be installed. Refer to ADAPTER FOR ASSEMBLING FLUSHING CIRCUIT and Refrigerant Circuit .
If there is no adapter suitable for the expansion valve in the Passenger Vehicle Adapter Set Volkswagen/Audi, the removed expansion valve can also be drilled open (the old expansion valve must be replaced in most cases and is therefore no longer required).
-- The sealing surfaces of the expansion valve must not be damaged. By damaging the sealing surfaces refrigerant can leak out.
-- Drill a hole for the expansion valve.
Before drilling open, remove the regulating element and drill open the expansion valve for example using a suitable drill (drill bit diameter for example 6.0 mm).
Before drilling depending on the version some individual parts of the expansion valve must be removed.
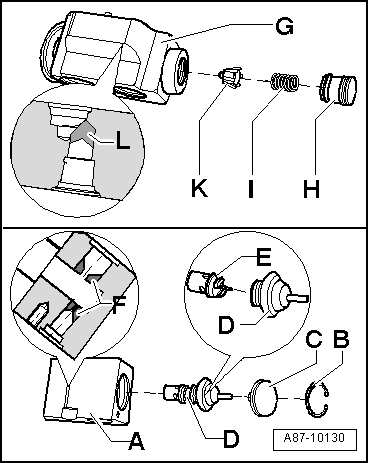
Expansion valves are available in various versions and with different constructions. For version -A-, for example. parts -B, C and D- must be removed. Separate part -E- (regulating element) from component -D-. Then drill open the expansion valve in area -F- using a suitable drill.
For version -G- for example, parts -H-, -I- and -K- must be removed and then drill the open area -L- using a suitable drill.
-- Clean the drilled open expansion valve of residue from the work (shavings).
-- Install the parts -B, C and D- for version -A-, or the part -H- for version -G-.
For vehicles with two evaporators, the circuit to the second evaporator must be disconnected from the circuit of the first evaporator and must be flushed in a separate work procedure. Refer to ADAPTER FOR ASSEMBLING FLUSHING CIRCUIT and Refrigerant Circuit .
- Clean the refrigerant circuit (flush). Refer to REFRIGERANT CIRCUIT, CLEANING .