Adjusting Shims Available for "S 3 " and "S 4 "
| Shim thickness (mm) | ||||
|---|---|---|---|---|
| 0.45 | 0.81 | 1.17 | 1.53 | 1.89 |
| 0.49 | 0.85 | 1.21 | 1.57 | 1.93 |
| 0.53 | 0.89 | 1.25 | 1.61 | 1.97 |
| 0.57 | 0.93 | 1.29 | 1.65 | 2.01 |
| 0.61 | 0.97 | 1.33 | 1.69 | 2.05 |
| 0.65 | 1.01 | 1.37 | 1.73 | 2.09 |
| 0.69 | 1.05 | 1.41 | 1.77 | 2.13 |
| 0.73 | 1.09 | 1.45 | 1.81 | |
| 0.77 | 1.13 | 1.49 | 1.85 | |
Tolerance variations make it possible to find the exact shim thickness required.
-- Remove the pinion with the old shims "S 3 *" and "S 4 *". Refer to PINION, REMOVING AND INSTALLING .
- Warm the transmission housing with the Hot Air Blower in the area of the bearing seat -arrows- to approximately 100 °C (212 °F).
- If necessary slightly cool the double angular contact ball bearing on the pinion for example with commercially available cooling spray.
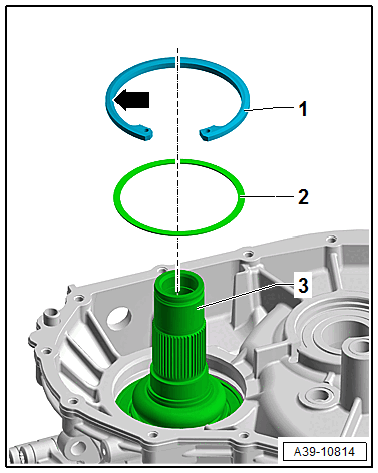
-- Insert the determined shim "S 3 *" -1- for example 0.97 mm in the transmission housing.
-- Then insert the pinion -3- quickly without tilting all the way in the transmission housing.
Determining the Thickness of the Shim "S 4 "
Formula: "S 4 " = 2.54 mm - "S 3 "
| Example: | ||
|---|---|---|
| Constant value | 2.54 mm | |
| - | Shim thickness "S 3 " | 0.97 mm |
| = | Thickness of the Shim "S 4 " | 1.57 mm |
Determine the shim "S 4 " according to the table. Refer to Adjusting Shims Available for "S 3 " and "S 4 " .
-- Place the determined shim "S 4 " -2- of for example 1.57 mm on the double angular contact ball bearing.
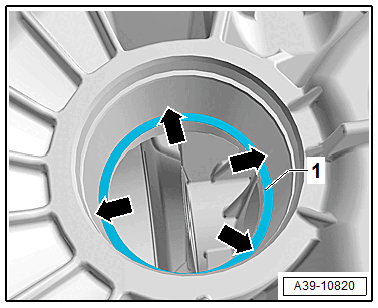
- Installation position of the circlip -1- : the bevel -arrow- points upward and the flat side points to the double angular contact ball bearing.
-- Install the circlip -1- in the transmission housing groove all around.
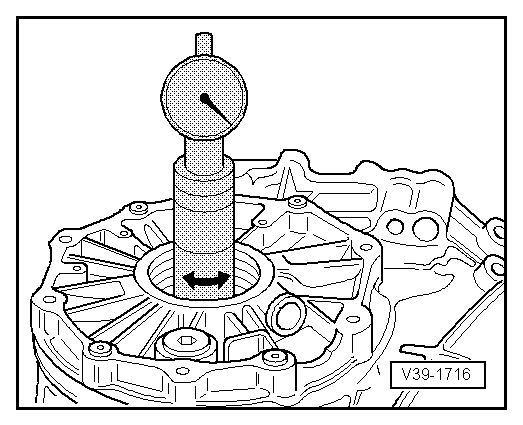
Performing the measurement check, checking dimension "R"
-- Pinion installed with shims "S 3 " and "S 4 ".
-- Install the Universal Mandrel and perform measurement check.
 Courtesy of AUDI OF AMERICA, LLC
-- Read out the measured value.
- If adjustment shims were determined correctly, dimension "R" must have a clearance of ± 0.05 mm.
Tip:
- Check one more time after removing the Universal Mandrel if the dial gauge, with the 2 mm pre-tension, is at "0" with the Measuring Set - Adjustable Master Gauge: VW 385/30 installed.