Oil Pressure/Temperature Sensor -G437- OR Oil Pressure/Temperature Sensor 2 -G640-, REMOVING AND INSTALLING, 0D3 AND 0BX: Installing
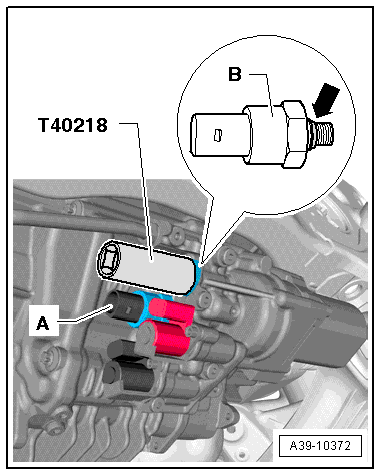
-- Install the new Sensor -- with a new O-ring -arrow- and tighten to the tightening specification -item : Oil Pressure/Temperature Sensor -G437- or -item : Oil Pressure/Temperature Sensor 2 -G640-.
-A- = Oil Pressure/Temperature Sensor 2 -G640- - black connector
-B- = Oil Pressure/Temperature Sensor -G437- - brown connector
-- Connect the connector -1- to the Oil Pressure/Temperature Sensor 2 -G640- and the connector -2- to the Oil Pressure/Temperature Sensor -G437-.

- Connect connectors -3- and -4- if they were disconnected earlier.
-- Attach the wiring harness bracket to the rear final drive if it was removed earlier. Refer to Final Drive, Installing: - Attach the bracket -1- to the rear final drive .
-- Connect the Vehicle Diagnostic Tester and turn on the ignition.
-- Select the function 0032 - Adapt Sensor in the vehicle diagnostic tester under Guided Functions in the directory 0032- Locking Electronics .
- Follow all the instructions given by the Vehicle Diagnostic Tester exactly.
The new sensor is adapted to the Differential Lock Control Module -J187- using the Vehicle Diagnostic Tester.
- A system check will take place when the 0032 - Sensor Programing function is complete. If malfunctions appear, then use "Guided Fault Finding" to correct them.
-- Fill the ATF in the rear final drive. Refer to ATF, FILLING, 0D3 AND 0BX "quattro sport" .
-- Install the rear section of the exhaust system on the body and align it so it is free of tension. Refer to OVERVIEW - MUFFLER - 2.0L (DMSA) , OVERVIEW - MUFFLER - 2.0L (DPAA) or OVERVIEW - MUFFLER - 3.0L .