All-Wheel Drive Clutch, Removing And Installing: Removing
- The transmission is installed.
- The ignition is off.
- Pay attention to the general repair information. Refer to REPAIR INFORMATION .
- If the all-wheel drive clutch was replaced, it must be activated under Guided Functions in the 22 - AWD electronics folder with the function 22 - Replace control module . Refer to ADDITIONAL WORK WHEN REPLACING ALL-WHEEL DRIVE CLUTCH .
-- Remove the rear noise insulation. Refer to NOISE INSULATION, REMOVING AND INSTALLING .
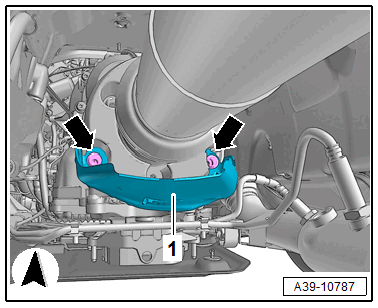
-- Remove the bolts -arrows- and remove the driveshaft heat shield -1- (if equipped).
-- Remove the driveshaft. Refer to DRIVESHAFT, REMOVING AND INSTALLING .

Risk of injury due to falling components.
- The Engine and Gearbox Jack: VAS 6931 must not be lowered during assembly and must not sit unsupervised under the vehicle.
-- Mount the plate for the Engine and Gearbox Jack : VAS 6931 with the attached Engine/Gearbox Jack - Gearbox Support: T10337 at the bottom of the transmission.
-- Lift the transmission slightly using the Engine and Gearbox Jack: VAS 6931 .
-- Remove the bolts from the tunnel crossmember -arrows-.
-- Lower the transmission evenly so that the transmission does not rest on the subframe crossbrace.
-- If equipped, remove the bolts -1- and remove the heat shield -2-.

-- Remove the connector -3- from the All-Wheel Drive Control Module -- -4-.
-- Unclip the cable on the all-wheel drive clutch -arrow- and move it to the side.
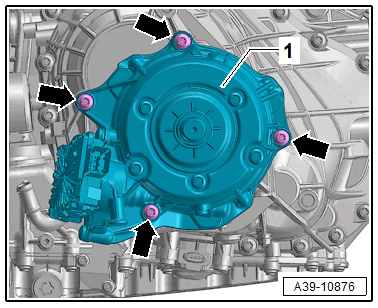
-- Remove the bolts -arrows- and then remove the all-wheel drive clutch from the transmission.