Brake Pads, Removing And Installing: Removing
-- Release the parking brake.
-- Switch off the ignition.
- Label the brake pads when removing if they are going to be used again. Install in the same position, otherwise the braking effect will be uneven.
- Do not disconnect the connectors from the parking brake motors.
-- Remove the rear wheel. Refer to WHEEL, CHANGING .
If the brake pads are replaced, use the Vehicle Diagnostic Tester to press back the parking brake motor.
-- Drive back the parking brake motors:
-- Connect the Vehicle Diagnostic Tester to the vehicle diagnostic connection when the ignition is switched off.
-- Switch the ignition on.
-- Select Diagnostic and start.
-- Select the Test plan tab.
-- Select Individual tests and select the following tree structures one after the other:
- Chassis
- Brake System
- 0001 - OBD-capable systems
- 0003 - ABS Control Module -J104-, integrated parking brake
- 0003 - Electronic parking brake functions
- 0003 - Removing brake pads
-- Start the selected program and follow the instructions on the Vehicle Diagnostic Tester display.
-- Free up the wire by removing the protective cap -3- from the bleed screw and the clip -4-.
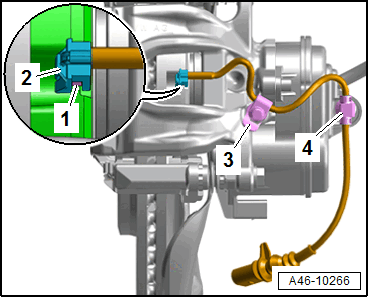
-- Carefully remove the contact -1- for the brake pad wear indicator using pliers while paying attention to the clip -2-.
- If the clips go missing, the brake pad wear indicator wire must be replaced.
-- Remove the bolts -arrows- by counterholding the guide pins -1 and 2-.
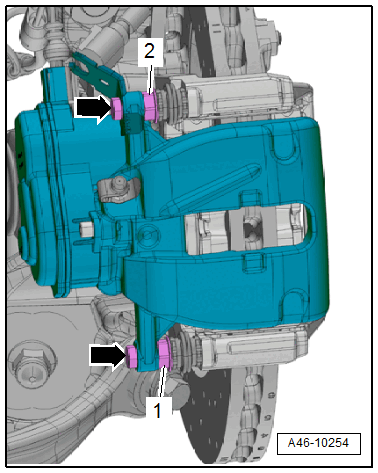
-- Remove the brake caliper and guide the brake pad wear indicator wire out at the same time.
There is a risk of damaging the brake hose due to the weight of the brake caliper.
- Never let the brake caliper hang on the brake hose.
-- Hang the brake caliper using a suitable wire.
There is a risk of damaging the brake caliper pistons if handled incorrectly.
- Never operate the brakes when the brake caliper is removed.
-- Remove the brake pads.