Glove Compartment, Removing And Installing
Market-Specific/Vehicle Versions, Removing:
Risk of injury due to involuntary deployment.
- Pay attention to the safety precautions when working with pyrotechnic components. Refer to SAFETY PRECAUTIONS WHEN WORKING WITH PYROTECHNIC COMPONENTS .
- Observe the disposal regulations for pyrotechnic components. Refer to AIRBAG, BELT TENSIONER AND BATTERY CUT-OUT UNITS, STORING, TRANSPORTING AND DISPOSING (PYROTECHNIC COMPONENTS) .
-- Disconnect the battery ground cable with the ignition turned on. Refer to BATTERY, DISCONNECTING AND CONNECTING .
Continuation for All Vehicles:
-- Remove the front passenger side instrument panel side cover. Refer to INSTRUMENT PANEL SIDE COVER, REMOVING AND INSTALLING .
-- Remove the footwell lamp. Refer to COMPONENT LOCATION OVERVIEW - INSTRUMENT PANEL LAMPS .
-- Open the glove compartment lid and remove the screws -arrows-.
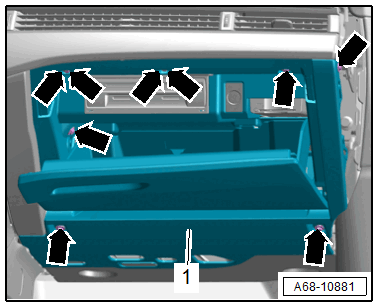
-- Carefully remove the glove compartment -1- slightly, and disconnect the connector.
-- Equipped on some models: remove the connection for the glove compartment cooling.
Market-Specific for North America:
-- Carefully remove the glove compartment -1-, until the connector can be disconnected.
Risk of injury due to involuntary deployment.
- Before handling pyrotechnic components (for example, disconnecting the connector), the person handling it must "discharge static electricity". For example, this can be done by briefly touching the door striker.
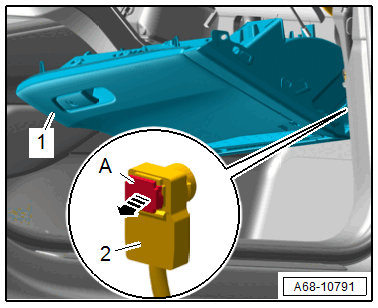
-- Open the connector lock -A- with a small screwdriver -arrow- and disconnect the connector -2-.
Market-Specific/Vehicle Versions, Installing
Risk of injury due to involuntary deployment.
- Pay attention to the safety precautions when working with pyrotechnic components. Refer to SAFETY PRECAUTIONS WHEN WORKING WITH PYROTECHNIC COMPONENTS .
- Before handling pyrotechnic components (for example, connecting a connector), the person handling it must "discharge static electricity". For example, this can be done by briefly touching the door striker.
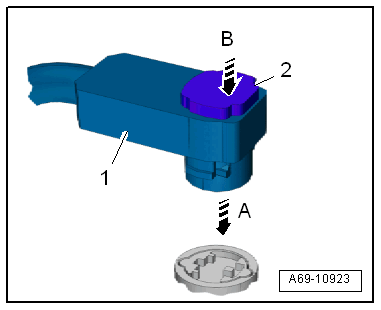
-- Connect the connector -1- to the airbag igniter in direction of -arrow A-.
 Courtesy of AUDI OF AMERICA, LLC
-- Press in the connector lock -2- in direction of -arrow B-. While doing this, the connector is pushed into the airbag igniter all the way and locks into place.
There is a risk of damaging the surface of the knee airbag from mechanical stress.
- After completing a procedure, perform a visual inspection to make sure that the surface of the knee airbag is not damaged.
Repairing pyrotechnic components (for example the airbag and seat belt tensioner) incorrectly increases the risk of injuries due to unintentional deployments when the battery is connected.
- The ignition must be on when connecting the battery.
- Make sure that no one is inside the vehicle at the time when the battery is connected.
-- Connect the battery ground cable with the ignition switched on. Refer to BATTERY, DISCONNECTING AND CONNECTING .
Repairing pyrotechnic components (for example the airbag and seat belt tensioner) incorrectly increases the risk of injuries due to unintentional deployments when the ignition is switched on.
- If the ignition is not switched on after the battery is reconnected - >>indicator lamps in the instrument cluster do not light up<< - the ignition (key/button) may only be switched on when the driver seat is positioned all the way back.
If the Airbag Indicator Lamp -K75- indicates a fault after installing, check the DTC memory, erase it and check it again using the Vehicle Diagnostic Tester.
Continuation for All Vehicles:
Further installation is performed in reverse order of removal, while noting the following:
Make sure the connectors are pushed in all the way and that they engage audibly.
Make sure the wires are not pinched.