Side Sill Trim Panel, Removing And Installing, A5: Installing
Install in reverse order of removal and note the following:
-- Check the chafe protection -2- for damage.
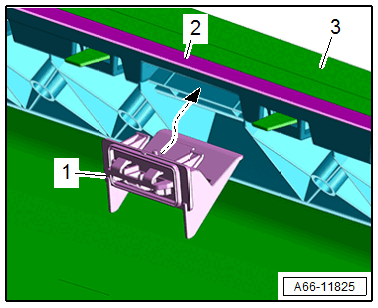
-- Insert the rear bracket -1- in the side sill trim panel cut-out -3-.
A5 Coupe:
-- Position the side sill trim panel and press on until the rear bracket audibly engages in the clips.
A5 Sportback:
- The vehicle and the trim panel must be at room temperature.
- The adhesive surfaces must be free of dirt and grease.
Installation Preparation for Reinstallation:
-- Remove adhesive residue from the trim panel.
-- Clean the plastic side of the adhesive surface with Cleaning Solution: D 009 401 04 and let dry.
-- Apply Plastic Primer: D 366 PR1 A1 on the plastic side of the adhesive surface and let dry until the solvent has completely evaporated.
-- Apply double-sided tape to the same location. Refer to Parts Information.
- Apply the adhesive tape within 60 minutes.
Continuation:
-- Remove the adhesive residue from the body.
-- Clean the painted side of the adhesive surface with Cleaning Solution: D 009 401 04 and let dry.
-- Apply Bonding Agent: D 355 205 A2 -1- on the painted side of the adhesive surface -2- using the Applicator: D 009 500 25 -3- and let it dry for ten minutes.
 Courtesy of AUDI OF AMERICA, LLC
- If the Bonding Agent: D 355 205 A2 dries longer than two hours, then it must be primed again.
-- Fold back the end of the protective film, or attach a pulling aid to the protective film.
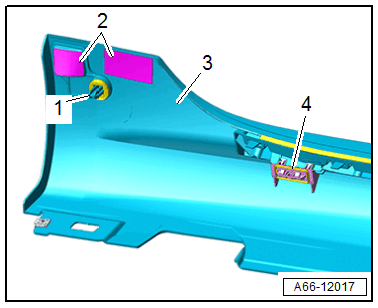
-- Position the side sill trim panel -3- at the same time place the cut-out -1- on the cut-out.
-- Remove the protective film on the pulling aids from the adhesive tape -2-.
-- Press on the side sill trim panel until the rear bracket -4- engages audibly.
-- Push on the adhesion area with the : 3356 .
- Resting time approximately 30 minutes at room temperature