Overview - Windshield, A4, A5 Coupe And A5 SPORTBACK
The following dimensions represent the distances at the marked points. This must also be oriented to the layout of the original adhesive bead on the removed component.

- Windshield
- Equipment versions with windshield defogger: Windshield Defogger Relay -J47-. Refer to the appropriate Wiring Diagram.
- Removing and Installing. Refer to WINDSHIELD, REMOVING AND INSTALLING .
- Distance to roof: dimension -c- = 2.5 mm
- Distance to A-pillars: dimension -e- = greater than 3 mm; center if necessary
- Adhesive Bead
- Observe minimum curing times. Refer to MINIMUM CURING TIMES FOR BONDED WINDOWS .
- Different distances to window edge:
A4:
- Dimension -a- = 7 mm
- Dimension -b- = 7.5 mm
- Dimension -d- = 9 mm
A5:
- Dimension -a- = 7.6 mm
- Dimension -b- = 7.2 mm
- Dimension -d- = 11.3 mm
- Adhesive bead thickness. Refer to Adhesive Application: .
- Windshield Frame
- Plenum Chamber Cover Frame
- Windshield component
- With a new windshield, remove the protective molding before installing the cowl panel trim. Refer to Fig 2.
- Plenum Chamber Cover
- Insert in the frame -item 4-.
- Only press on until it stops after the minimum curing time for the adhesive.
- Cover Profile
- Replace if reusing an undamaged windshield
- Cover Profile, Mounting on Undamaged Windshield. Refer to Cover Profile, Mounting on Undamaged Windshield: .
- Clamping Strip
- For the drip rail
- Drip Rail
- Removing and Installing. Refer to DRIP RAIL, REMOVING AND INSTALLING .
Protective Molding, Removing
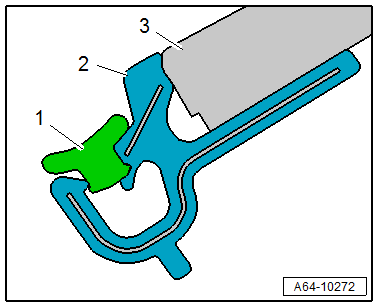
-- For a new windshield -3-, the protective molding -1- must first be removed from the frame -2- before assembling the plenum chamber cover.