Preparations For Checking The Lumbar Support Air Cushion For Leaks
Special tools and workshop equipment required
- Vehicle Diagnostic Tester
- Pneumatic Repair Set: VAS6618A
When an appropriate entry is made in the event memory, there is a prompt in "Guided Fault Finding" to replace the faulty lumbar support air cushion using the : VAS6618/10 using the Vehicle Diagnostic Tester.
Then the preparations for this leak test are described that must be carried out directly in the seat.
Connection diagram with assignment of the pneumatic lines to the air cushions. Refer to CONNECTION DIAGRAM - PNEUMATIC SYSTEM .
Procedure
- The backrest cover is removed. Refer to FRONT BACKREST, REMOVING AND INSTALLING .
-- Before disconnecting, mark the allocation of the pneumatic lines to each other using a waterproof felt-tip pen.
-- Disconnect the pneumatic line to the corresponding lumbar support air cushion at the following locations. Refer to PNEUMATIC LINES, DISCONNECTING AND CONNECTING .
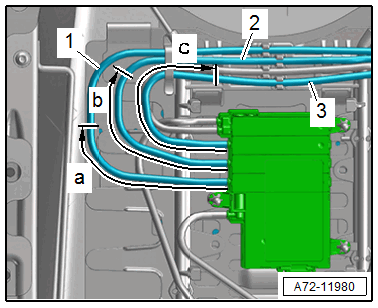
1 - Pneumatic Line to Upper Air Cushion
- -a- = 100 mm
2 - Pneumatic Line to Center Air Cushion
- -b- = 100 mm
3 - Pneumatic Line to Lower Air Cushion
- -c- = 100 mm
-- To connect, attach the connecting sleeves from the : VAS6618 to the pneumatic lines.
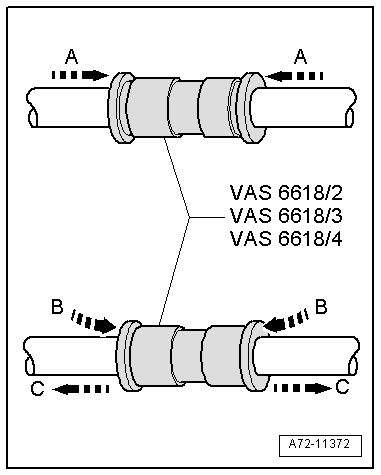
To connect, insert the pneumatic lines in the : VAS6618/2 from both sides in direction of -A arrows-.
To release, push the release rings in direction of -B arrows- and simultaneously remove pneumatic lines in direction of -C arrows-.
-- Connect the : VAS6618/10 on the pneumatic line -1- to the lumbar support air cushion.
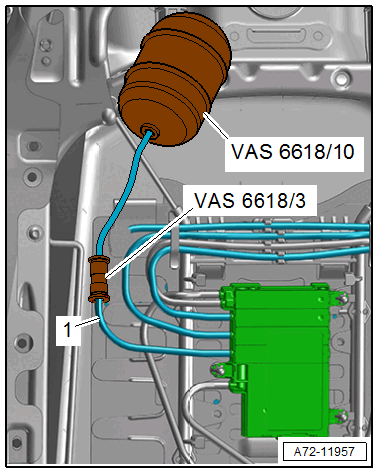
The illustration shows the pneumatic line to the lumbar support upper air cushion.
-- Connect the pneumatic lines following the leak test. Refer to PNEUMATIC LINES, DISCONNECTING AND CONNECTING .