Overview - Rear Heat Shields
CAUTION:
There is a risk of explosions and fatal injuries due to damaged natural gas tanks.
- The natural gas tank must be checked for damage if components in the rear side or rear area are removed due to damage, such as the bumper cover, rear lid, underbody trim panels, longitudinal members, rear lid end piece, etc.
- Check for damage on fuel tanks. Refer to the appropriate Service Information .
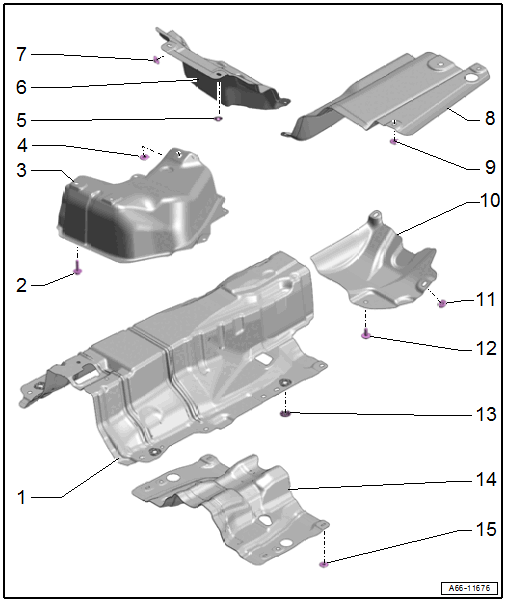
- Heat Shield
- For the transmission tunnel
- Removing and Installing. Refer to TRANSMISSION TUNNEL HEAT SHIELD, REMOVING AND INSTALLING .
- Bolt
- 20 Nm
- g-tron: quantity 2
- Heat Shield
- For the center of the exhaust system
- FWD versions: removing and installing. Refer to CENTER EXHAUST SYSTEM HEAT SHIELD, REMOVING AND INSTALLING, FWD VERSION .
- g-tron: removing and installing. Refer to CENTER EXHAUST SYSTEM HEAT SHIELD, REMOVING AND INSTALLING, G-TRON .
- Nut
- 2 Nm
- Nut
- 2 Nm
- Quantity: 2
- Heat Shield
- For the luggage compartment recessFor the spare tire well
- Removing and Installing. Refer to LUGGAGE COMPARTMENT RECESS HEAT SHIELD, REMOVING AND INSTALLING .
- Nut
- 2 Nm
- Heat Shield
- For the rear muffler
- Removing and Installing. Refer to REAR MUFFLER HEAT SHIELD, REMOVING AND INSTALLING .
- Nut
- 2 Nm
- Left heat shield: quantity 4
- Right heat shield: quantity 3
- Heat Shield
- For the center of the exhaust system
- AWD versions:
- Removing and Installing. Refer to CENTER EXHAUST SYSTEM HEAT SHIELD, REMOVING AND INSTALLING, AWD VERSION .
- Nut
- Tightening specification and sequence. Refer to Fig 2.
- Quantity: 2
- Bolt
- Tightening specification and sequence. Refer to Fig 2.
- Lock Washer
- Quantity: 4
- Heat Shield
- For the driveshaft
- Removing and Installing. Refer to DRIVESHAFT HEAT SHIELD, REMOVING AND INSTALLING .
- Nut
- 2 Nm
- Quantity: 4
Heat Shield - Tightening Specification and Sequence, Version with AWD
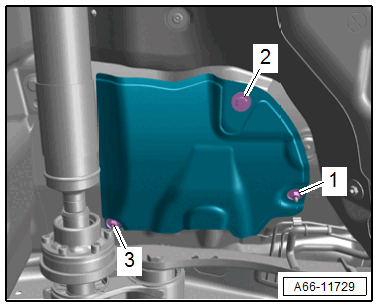
-- Tighten the bolts and nuts in the order shown.
| Bolts/Nuts | Tightening Specification |
|---|---|
| -1 and 3- | 2 Nm |
| -2- | 20 Nm |