Instrument Panel CROSSMEMBER, Removing And Installing: Removing
-- Remove the windshield wiper motor. Refer to WINDSHIELD WIPER MOTOR -V- , REMOVING AND INSTALLING .
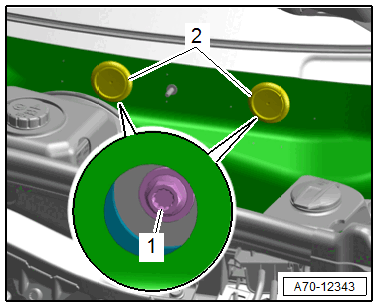
-- Remove the plugs -2- and remove the bolt -1- for the crossmember on the plenum chamber bulkhead.
-- Remove the windshield. Refer to WINDSHIELD, REMOVING AND INSTALLING .
-- Remove the instrument panel. Refer to INSTRUMENT PANEL, REMOVING AND INSTALLING .
-- Equipped on some models on driver side: remove the knee airbag with igniter. Refer to KNEE AIRBAG WITH IGNITER, REMOVING AND INSTALLING, DRIVER SIDE .
-- Equipped on some models: remove the Windshield Projection Head Up Display Control Module -J898- . Refer to INSTRUMENT CLUSTER WITH INSTRUMENT CLUSTER CONTROL MODULE -J285- , REMOVING AND INSTALLING .
-- Remove the air guide and air duct to the instrument panel vent from the instrument panel crossmember. Refer to OVERVIEW - AIR ROUTING AND AIR DISTRIBUTION IN VEHICLE INTERIOR .
-- Remove the air duct center piece to the center defroster vent. Refer to OVERVIEW - AIR ROUTING AND AIR DISTRIBUTION IN VEHICLE INTERIOR .
-- Remove the left A-pillar fuse panel from the instrument panel crossmember. Refer to COMPONENT LOCATION OVERVIEW - RELAY PANELS, FUSE PANELS AND E-BOXES .
-- Remove the Access/Start System Antenna 1 in Vehicle Interior -R138- . Refer to ACCESS/START SYSTEM ANTENNA 1 IN VEHICLE INTERIOR -R138- , REMOVING AND INSTALLING .
-- Equipped on some models: remove the rear air duct. Refer to OVERVIEW - AIR ROUTING AND AIR DISTRIBUTION IN VEHICLE INTERIOR .
-- Cut through the carpet connecting piece -1- at the position shown in the illustration -arrow A- using scissors.
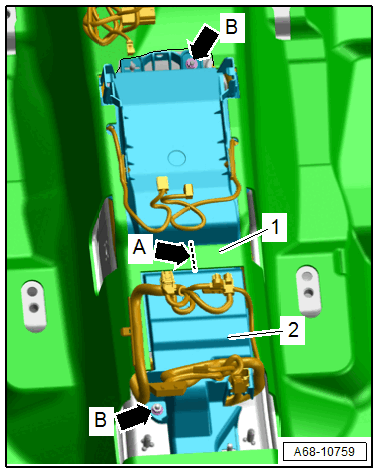
-- Remove the nuts -B arrows- .
-- Unclip the control module cover -2- from the threaded pins.
-- Unclip the wiring harness from the cover using the :80-200 and free it up.
-- Pull the control module cover out from under the carpet and remove it.
-- Push the carpet in the threaded connection area to the side, remove the nut -1- and free up the ground wires.
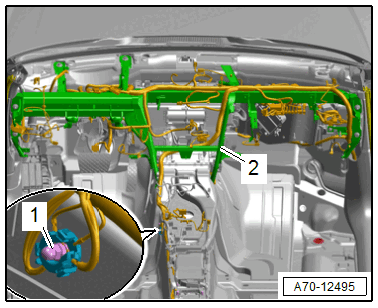
-- Unclip the wiring harness from the center tunnel and free it up.
-- Unclip the wiring harness from the instrument panel crossmember -2- and free it up.
-- Remove the steering column from the instrument panel crossmember and lay it on the floor of the vehicle. Refer to STEERING COLUMN, REMOVING AND INSTALLING .
-- Remove the bolts -arrows- .
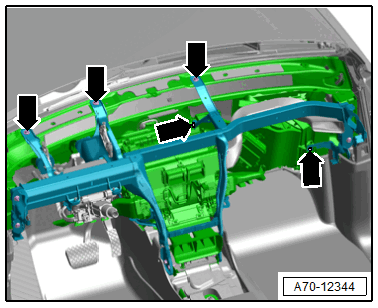
-- Remove the bolt -1- .
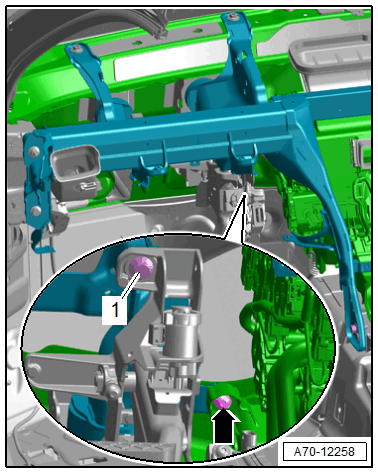
-- Remove the bolt -arrow- for the A/C unit.
For reinstallation, mark the vertical and lengthwise position on the instrument panel crossmember.
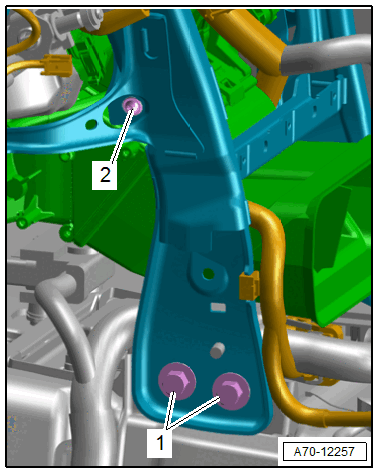
-- Push the carpet in the threaded connection area to the side and remove the bolts -1- .
-- Remove the bolt -2- for the A/C unit.
-- Repeat the procedure on the opposite side.
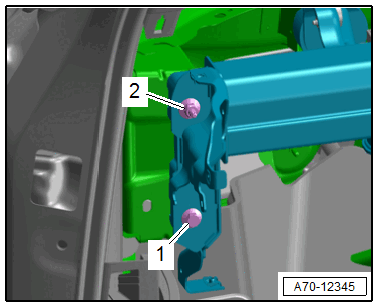
-- Remove the bolt -1- and nut -2- for the instrument panel crossmember.
-- Repeat the procedure on the opposite side.
-- Unclip the wires from the instrument panel crossmember, disengage and free them up.
Two technicians are needed to remove the instrument panel crossmember.
-- Disengage the instrument panel crossmember from the A/C unit and remove from the vehicle interior toward the rear.