Instrument Panel CROSSMEMBER, Removing And Installing: Installing
-- Carefully insert the instrument panel crossmember in the body.
-- Align the instrument panel crossmember according to the marks applied to the A-pillar during removal.
-- Tighten the nuts and bolts for the instrument panel crossmember near the A-pillar on both the driver and front passenger sides.
Further installation is performed in reverse order of removal, while noting the following:
-- Install the steering column. Refer to STEERING COLUMN, REMOVING AND INSTALLING .
-- Mounting bracket for pedal assembly. Refer to MOUNTING BRACKET, REMOVING AND INSTALLING .
Installation Position of Instrument Panel Crossmember, Checking
-- Insert the instrument panel to test.
-- Secure the instrument panel on the left and right side to the instrument panel crossmember.
-- Close the doors.
-- Check whether the gap dimension between the instrument panel and the left and right door is even.
-- Check whether the height of instrument panel aligns with the moldings in the door trim panels.
-- If the adjustment is incorrect, note lateral and/or vertical deviation.
-- Loosen the instrument panel crossmember threaded connections.
-- Adjust the instrument panel crossmember according to the noted differences.
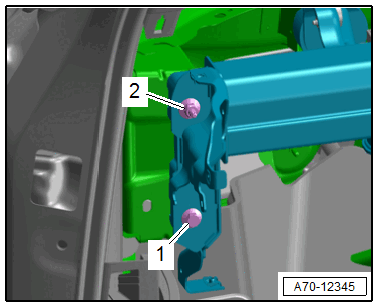
-- Tighten the bolt -1- and nut -2- for the instrument panel crossmember near the A-pillar on both the driver and front passenger sides.
Repairing pyrotechnic components (for example the airbag and seat belt tensioner) incorrectly increases the risk of injuries due to unintentional deployments when the battery is connected.
- The ignition must be on when connecting the battery.
- Make sure that no one is inside the vehicle at the time when the battery is connected.
-- Equipped on some models: install the Windshield Projection Head Up Display Control Module -J898- . Refer to WINDSHIELD PROJECTION HEAD UP DISPLAY CONTROL MODULE, REMOVING AND INSTALLING .
-- Install the windshield. Refer to WINDSHIELD, REMOVING AND INSTALLING .
-- Connect the battery ground cable with the ignition switched on. Refer to BATTERY, DISCONNECTING AND CONNECTING .
Repairing pyrotechnic components (for example the airbag and seat belt tensioner) incorrectly increases the risk of injuries due to unintentional deployments when the ignition is switched on.
- If the ignition is not switched on after the battery is reconnected - >>indicator lamps in the instrument cluster do not light up<< - the ignition (key/button) may only be switched on when the driver seat is positioned all the way back.
If the Airbag Indicator Lamp -K75- indicates a fault, check the DTC memory, erase it and check it again using the Vehicle Diagnostic Tester .