Front Axle Camber, Centering
Camber cannot be adjusted.
Camber can be centered evenly within specified tolerance range by shifting subframe.
Procedure
-- Remove the noise insulation. Refer to NOISE INSULATION, REMOVING AND INSTALLING .
-- Remove the left and right wheel spoilers. Refer to FRONT WHEEL HOUSING LINER, REMOVING AND INSTALLING .
There is a risk of damaging the threads on the subframe threaded connection to the body.
- The subframe bolts on the body must not be loosened or tightened with an impact wrench.
- Always install all bolts by hand for the first few turns.
-- Remove the left and right bolts -1 and arrows- for the subframe one after the other and replace.
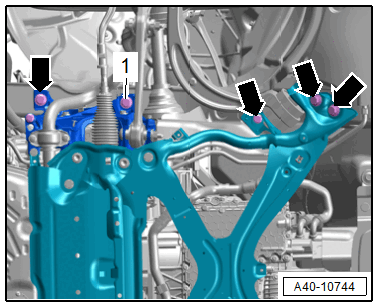
-- Install the new bolts all the way by hand.
If the subframe is moved, the front of the vehicle must be lifted at the jack points using an axle lift.
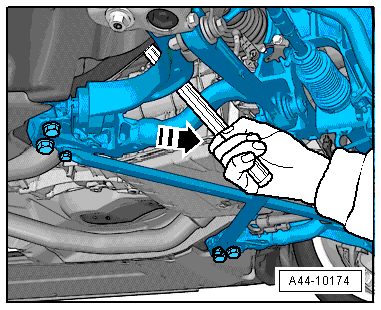
-- Move the subframe with a plastic-coated pry bar into the corresponding position in direction of -arrow-.
 Courtesy of AUDI OF AMERICA, LLC
-- To do so place the pry bar in the center of the subframe near the control arm between the subframe and the body longitudinal member.
If no plastic-coated pry bar is available, wrap a conventional pry bar with adhesive tape.
-- The vehicle must be bounced several times at the front axle before checking the camber values.
- Axle alignment specified values. Refer to AXLE ALIGNMENT SPECIFIED VALUES, SEDAN / AVANT .
Risk of accident!
- Replace the subframe bolts one after the other.
-- Tighten the left and right subframe bolts diagonally in stages, and check the camber value again. Refer to AXLE ALIGNMENT SPECIFIED VALUES, SEDAN / AVANT .
There is a risk of adjustment errors.
- All axle alignment values must be checked after every camber correction.
Tightening Specifications
- Refer to OVERVIEW - SUBFRAME
- Refer to OVERVIEW - FRONT WHEEL HOUSING LINER .
- Refer to OVERVIEW - NOISE INSULATION .