91 Rear Parking Sensor Sometimes Does Not Work, Rear Parking Sensor Loose, Rear Parking Sensor Fault Message (GROUP 91, NO. 24-92)
Reference number: GROUP 91, NO. 24-92
Supersedes refnos: 2068573/1, 2068573/3, 2068573/4, GROUP 91, NO. 22-52, GROUP 91, NO. 24-46
91 REAR PARKING SENSOR SOMETIMES DOES NOT WORK, REAR PARKING SENSOR LOOSE, REAR PARKING SENSOR FAULT MESSAGE
TECHNICAL SERVICE BULLETIN
| AUDI: | 2019-2024 All Audi Vehicles |
| GROUP: | 91 - Radio, Telephone, Board Computer, Multi-Function Indicator (MFI) |
SERVICE INFORMATION
91 24 92 2068573/4 December 9, 2024. Supersedes Technical Service Bulletin Group 91 number 24-46 dated August 30, 2024, for reasons listed below.
| Model(s) | Year | VIN Range | Vehicle-Specific Equipment |
|---|---|---|---|
| All Audi Vehicles | 2019 - 2024 | All | Not Applicable |
CONDITION
| Revision | Date | Purpose |
|---|---|---|
| 4 | - | Revised Service (Adjusted customer statement and service instructions) |
| 3 | 08/30/2024 | Revised Service
(Adjusted customer statement and service instructions) Revised Warranty (Updated warranty table) |
| 2 | 06/12/2023 | Revised header (Included all current models 2019-2024) Revised Parts and Tools (Adjusted epoxy quantity to 1 and removed mixing nozzle) |
Customer states:
Rear parking sensor sometimes not working, rear parking sensor is loose, fault message for rear parking sensor.
Workshop findings:
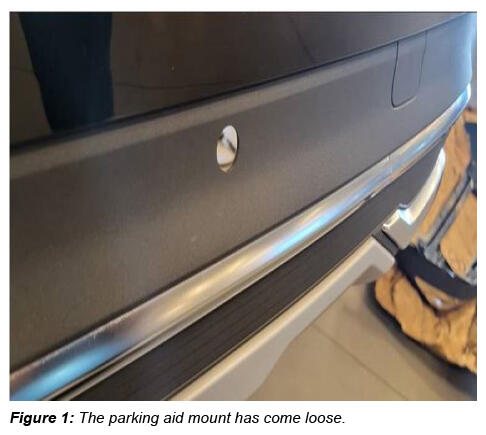
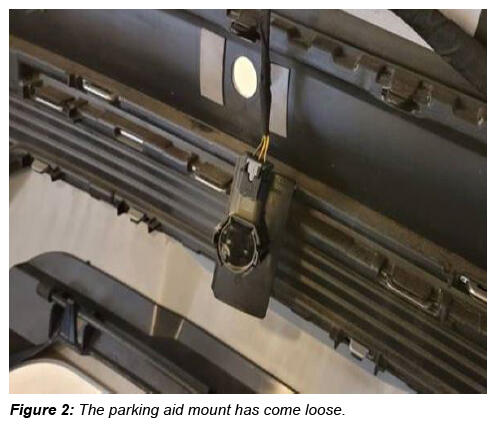
The retaining plate for the parking sensor has come loose from the rear apron.
TECHNICAL BACKGROUND 1
The adhesive strength of the parking aid bracket is not sufficient.
Over time, one or more of the sensor mounts may separate from the rear apron.
It is possible for the parking aid sensor(s) to issue false warnings when the mounts start to separate.
For a customer concern relating to false detection of obstacles it is important to check each of the sensors on the rear apron for correct installation.
PRODUCTION SOLUTION
Process optimized for vehicles currently in production.
SERVICE
If one or more of the sensor brackets has come loose from the rear bumper, use the steps below to re-attach the mounts.
When billing, please always attach photos/videos that clearly shows the complaint to DOC-IT. To ensure a reference to the vehicle, the image/video must:
- Include the VIN and date.
- Must not be edited.
- Should be in focus and taken with sufficient light. A high resolution is not necessary.
If appropriate, please mark the location of the problem so that parts analysis has a clear reference to the complaint. Please ensue that the photo documentation does not show any persons and/or face, license plates, or customer data.
Prep work:
- Remove the rear bumper cover according to the repair manual.
- Remove old adhesive tape from bonding surfaces on inside of rear apron/spoiler and on affected brackets.
- Lightly sand/scuff the bonding surfaces of the apron and mount(s).
- Clean the rear apron and mount(s) thoroughly with plastic cleaner D 009 401 04 or equivalent (isopropyl alcohol) and allow to dry for 5 minutes.
- Apply a thin coating of primer for plastic components D 822 150 A1 to rear apron and bracket, allow to dry for 10 minutes.
- Prepare all affected brackets up to this step prior to bonding.
Tool Setup:
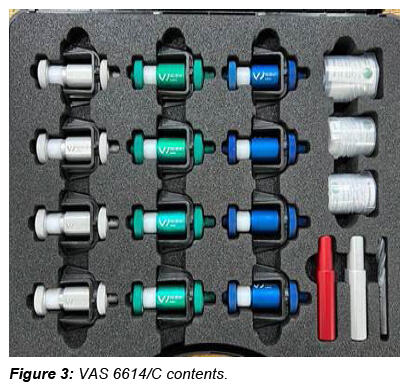
- Special tool VAS 6614/C will be used to complete this repair.
- Inside there are 3 sets of holders in various diameters to accommodate different size PDC sensors.
- Use the appropriately sized holder to center and clamp the mounts.
- Depending on the installation depth of the parking sensor mounting, it may be necessary to place a backing in the gap between the bracket and the bumper cover.
- Check the installation depth of the parking sensor in the bumper cover for protrusion.
- In the event of protrusion, a backing must be used (e.g. double-sided adhesive tape as a spacer).
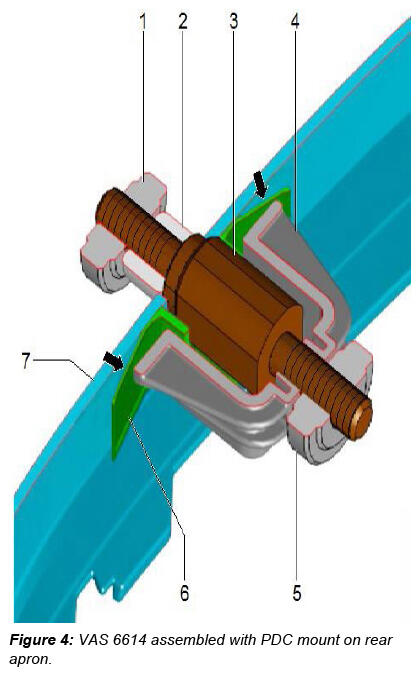
- Slide bracket -6- onto centering pin -3- (VAS 6614) and push through rear apron/spoiler.
- Slide on counter hold tool -2- from outside and tighten knurled nut slightly.
- Align bracket -6- in correct position and according to markings on rear apron/spoiler.
- Slide on clamp -4- and screw in knurled nut -5- but do not tighten yet.
- Prepare all affected brackets up to this step prior to bonding.
Bonding the mount(s):
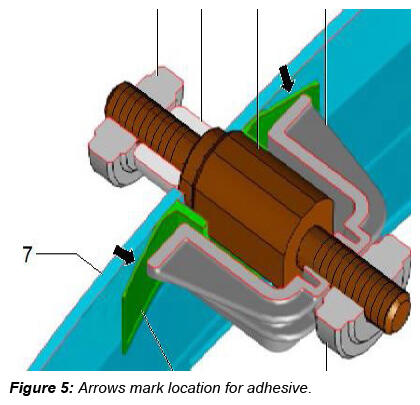
Apply plastic adhesive D 180 KU2 A1 to areas marked by arrows between the parking aid bracket and rear apron (Figure 5).
- The first 3-5 cm of adhesive from the mixing nozzle may not be properly mixed and must therefore be discarded.
- The adhesive must not be allowed to run into the groove on the bonding surface on the bracket.
- Tighten knurled nut -3- at centering pin -1-.
- This results in clamp -2- pushing tabs of bracket -4- flat onto rear apron/spoiler -5-.
- Perform this step for all affected brackets.
- After minimum drying time of 30 minutes for 2-component plastic adhesive D 180 KU2 A1 , remove all centering pins.
- The rear apron must be left undisturbed during this period and must not be moved.
- Re-Install the rear bumper cover and confirm system operation.

WARRANTY
| Claim Type: |
|
||
| Service Number: | 9175 | ||
| Damage Code: | 0018 | ||
| Labor Operations: | Remove and install rear bumper cover | 6369 19xx | See SRT with associated operations |
| Modify/bond on 1 sensor/bracket | 9175 4999 | 50 TU | |
| Modify/bond on all other sensors/brackets | 9175 5099 | 20 TU | |
| Claim Comment: | As per TSB 2068573/4 | ||
All warranty claims submitted for payment must be in accordance with the Audi Warranty Policies and Procedures Manual . Claims are subject to review or audit by Audi Warranty.
REQUIRED PARTS AND TOOLS
| The part numbers mentioned in this TSB are different from the ones listed in ETKA. Only use parts listed in this TSB, this includes superseding part numbers! | ||
|---|---|---|
| Part Number | Part Description | Quantity |
| See ETKA | Fasteners, Bolts, Nuts, and Screws as needed per the Repair Manual | See ETKA/ELSA |
| D180KU2A1 | Plastic adhesive | 1 |
| D822150A1 | Primer | 0.1 |
| D 00940104 | Plastic cleaner or equivalent (isopropyl alcohol) | 0.1 |
| Tool Number | Tool Description |
|---|---|
| VAS 6614C | PDC holder tool set |
| VAS 5155 | Hand cartridge gun |
| VAS 6160/VAS 6150 | VAS tester with the current version of ODIS (Windows 10) |
ADDITIONAL INFORMATION
All parts and service references provided in this TSB (2068573 ) are subject to change and/or removal.
©2024 Audi of America, Inc. All rights reserved. The information contained in this document is based on the latest information available at the time of printing and is subject to the copyright and other intellectual property rights of Audi of America, Inc., its affiliated companies, and its licensors. All rights are reserved to make changes at any time without notice. No part of this document may be reproduced, stored in a retrieval system, or transmitted in any form or by any means, electronic, mechanical, photocopying, recording, or otherwise, nor may these materials be modified or reposted to other sites without the prior expressed written permission of the publisher.