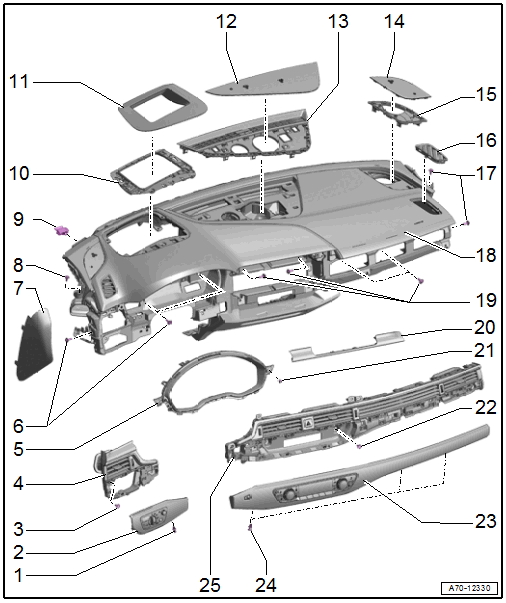
Overview - Instrument Panel
- Screw/Expanding Clip
- 1.5 Nm
- Light Switch Trim
- Removing and installing. Refer to LIGHT SWITCH TRIM, REMOVING AND INSTALLING .
- Press on until it engages audibly
- Bolts
- 3 Nm
- Quantity: 2
- Driver Side Outer Instrument Panel Vent
- Removing and installing. Refer to OUTER INSTRUMENT PANEL VENT, REMOVING AND INSTALLING .
- Press on until it engages audibly
- Instrument Cluster Trim
- Removing and installing. Refer to INSTRUMENT CLUSTER TRIM, REMOVING AND INSTALLING .
- Bolt
- 3 Nm
- Quantity: 3
- Instrument Panel Side Cover
- Removing and installing. Refer to INSTRUMENT PANEL SIDE COVER, REMOVING AND INSTALLING .
- Press on until it engages audibly
- Bolt
- 3 Nm
- Rubber Buffer
- Insert into the instrument panel mount at the bottom of the windshield frame
- Quantity: 3
- Windshield Projection Frame
- Equipped on some models
- Removing and installing. Refer to OVERVIEW - WINDSHIELD PROJECTION (HEAD-UP DISPLAY) .
- Windshield Projection Cover
- Equipped on some models
- Removing and installing. Refer to OVERVIEW - WINDSHIELD PROJECTION (HEAD-UP DISPLAY) .
- Trim for Speaker in Center
- Always replace if removed
- Removing and installing. Refer to SPEAKER TRIM, REMOVING AND INSTALLING .
- Press on until it engages audibly
- Front Center Defroster Vent
- Removing and installing. Refer to FRONT CENTER DEFROSTER VENT, REMOVING AND INSTALLING .
- Press on until it engages audibly
- Outer Speaker Trim
- Removing and installing. Refer to SPEAKER TRIM, REMOVING AND INSTALLING .
- Press on until it engages audibly
- Speaker Mount
- Removing and installing. Refer to SPEAKER MOUNT, REMOVING AND INSTALLING .
- Side Defroster Vent
- Removing and installing. Refer to SIDE DEFROSTER VENT, REMOVING AND INSTALLING .
- Press on it until it locks
- Bolts
- 3 Nm
- Instrument PanelWARNING:
Risk of injury due to involuntary deployment.
- Pay attention to the safety precautions when working with pyrotechnic components. Refer to SAFETY PRECAUTIONS WHEN WORKING WITH PYROTECHNIC COMPONENTS .
- Removing and installing. Refer to INSTRUMENT PANEL, REMOVING AND INSTALLING .
- Bolt
- 3 Nm
- Quantity: 4
- MMI Screen Cover
- Removing and installing. Refer to MMI SCREEN COVER, REMOVING AND INSTALLING .
- Press on until it engages audibly
- Bolt
- 3 Nm
- Quantity: 2
- Bolt
- 3 Nm
- Quantity: 6
- A/C Display Control Head Trim
- Removing and installing. Refer to DISPLAY CONTROL HEAD TRIM, REMOVING AND INSTALLING .
- Press on until it engages audibly
- Screw/Expanding Clip
- 1.5 Nm
- Quantity: 3
- Center Vent / Outer Front Passenger Side Instrument Panel Vent
- Removing and installing. Refer to CENTER VENT, REMOVING AND INSTALLING .
- Press on until it engages audibly