Overview - Rear Lid Lower Trim Panel, Sedan
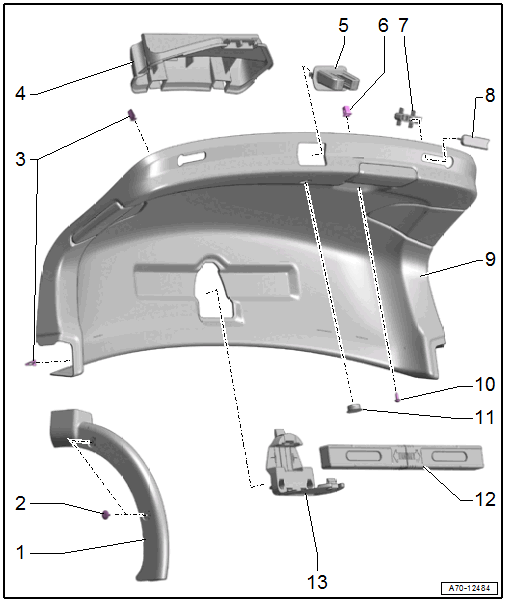
- Rear Lid Hinge Trim Panel
- Removing and installing. Refer to REAR LID LOWER TRIM PANEL, REMOVING AND INSTALLING, SEDAN .
- Quantity: 2
- Expanding Clip
- Quantity: 4
- Clip
- Replace damaged or deformed clips
- Insert in the trim panel
- Remove any clips remaining in the rear lid mounting points using the Omega Clip Tool:T40280 . To install, insert into the trim panel.
- Quantity: 10
- Anti-Theft Protection
- Clip into rear lid
- Removing and installing. Refer to REAR LID LOWER TRIM PANEL, REMOVING AND INSTALLING, SEDAN .
- Rear Lid Latch Trim Panel
- Removing and installing. Refer to REAR LID LOWER TRIM PANEL, REMOVING AND INSTALLING, SEDAN .
- Press on until it engages audibly
- Expanding Nut
- Clip into rear lid
- Stop Strip Bracket
- Clip into rear lid
- Quantity: 2
- Stop Strip
- Removing and installing. Refer to REAR LID LOWER TRIM PANEL, REMOVING AND INSTALLING, SEDAN .
- Clip to the bracket
- Quantity: 2
- Rear Lid Trim Panel
- Removing and installing. Refer to REAR LID LOWER TRIM PANEL, REMOVING AND INSTALLING, SEDAN .
- Press on until it engages audibly
- Bolt
- 2 Nm
- Emergency Release Cover
- Equipped on some models: emergency release. Refer to Fig 2
- Unclip using a screwdriver
- Clipped in the rear lid trim panel
- Emergency Triangle
- Emergency Triangle Bracket
- Insert in the rear lid and press on it until it engages audibly
Equipment Versions with Emergency Release
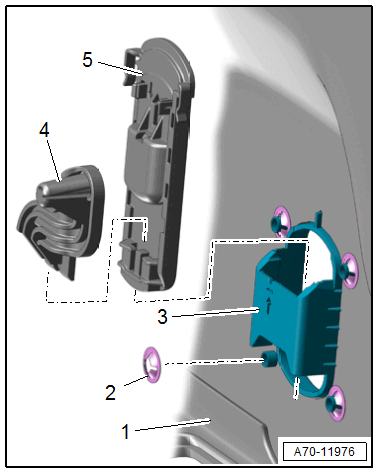
1 -
Rear Lid Trim Panel
2 -
Lock Washer - Quantity: 4
3 -
Emergency Release Trim
4 -
Emergency Release Lever
5 -
Emergency Release Actuator