Overview - Front Brakes, 1LC/1LD/1LE/1LF/1LH
Install complete repair set
When extracting brake fluid, always use a bleeder bottle that is used exclusively for brake fluid. Brake fluid is poisonous, and must never be siphoned by mouth under any circumstances!
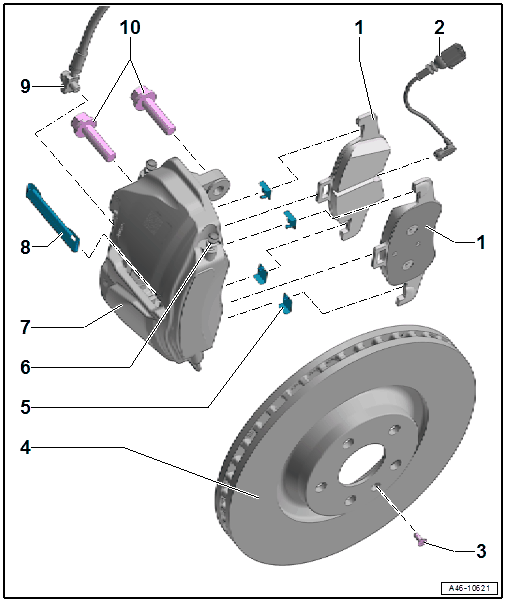
- Brake Pads
- Always replace on both axles.
- Check the brake pad thickness. Refer to BRAKE PADS, CHECKING THICKNESS
& MAINTENANCE SCHEDULES (USA AND CANADA)NOTE:
Depending on the model, there are two vibration dampers installed on each brake pad. These vibration dampers must face out of the brake caliper.
Removing and installing. Refer to BRAKE PADS, REMOVING AND INSTALLING
- Brake Pad Wear Indicator Sensor
- Refer to BRAKE PAD WEAR SENSOR, REMOVING AND INSTALLING NOTE:
The sensor for the brake pad wear indicator is installed at the left front and the right front.
- Refer to BRAKE PAD WEAR SENSOR, REMOVING AND INSTALLING
- Bolt
- 5 Nm
- For the brake rotor
- Brake Rotor
- Wear limit. Refer to TECHNICAL DATA, BRAKES
- Always replace on both axles.
- Remove the brake caliper before removing
- Removing and installing. Refer to BRAKE ROTOR, REMOVING AND INSTALLING
- Anti-Friction Plate
- Quantity: Four installed in the brake caliper
- Make sure it is in the correct installation position. Refer to BRAKE PAD ANTI-FRICTION PLATES AND CLAMPS, 1LC/1LD/1LE/1LF/1LH .
- Bleed Screws
- 10 Nm
- Quantity: Two installed in the brake caliper
- Bleed at both screws
- Brake Caliper
Removing and installing. Refer to BRAKE CALIPER, REMOVING AND INSTALLING
Replacing. Refer to BRAKE CALIPER, REPLACING
- Clip
- For brake pads
- One installed in every brake caliperNOTE:
Make sure the clamp is seated correctly. Refer to BRAKE PAD ANTI-FRICTION PLATES AND CLAMPS, 1LC/1LD/1LE/1LF/1LH .
- Brake Line
- 45 Nm
- With banjo bolt
- Permanent with gaskets
- Clean any corrosion from the sealing surface on the brake caliper
- Bolts
- 200 Nm
- Replace if damaged.
- For the brake caliper on the stub axle carrier
- Clean before the next use