Overview - Front Brakes 1LJ, 1LL, 1ZA And 1ZC
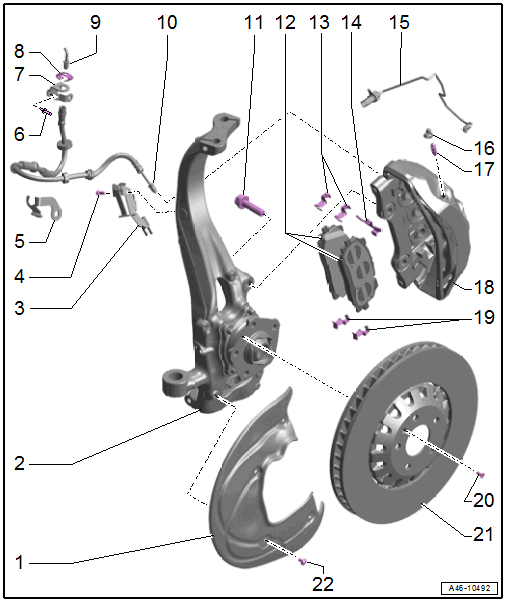
- Brake Shield
- Wheel Bearing Housing
- Bracket
- For brake hose
- Bolt
- 10 NmNOTE:
Clean bolts before reusing.
Replace damaged bolts.
Always replace self-locking bolts.
- 10 Nm
- Bracket
- For brake hose
- Rivet
- Bracket
- For the brake line/hose
- On the body
- Spring
- Replace if damaged
- Brake Line
- 14 Nm: Brake line to brake hose tightening specificationCAUTION:
Do not bend the brake line; a damaged brake line must be replaced.
- 14 Nm: Brake line to brake hose tightening specification
- Brake Hose
- Tightening specification: brake hose to brake caliper. Refer to Fig 3.
- Allocation. Refer to the Parts Information.
- Make sure the brake hose is routed correctly. Make sure the brake hose is not blocked, bent, twisted or rubbing against the vehicle.
- Replace if damaged
- Make sure that tabs are properly seated in the grooves on the bracket.CAUTION:
Do not damage the brake hose; a damaged brake hose must be replaced.
- Bolt
- 196 NmNOTE:
Clean bolts before reusing.
Replace damaged bolts.
Always replace self-locking bolts.
- 196 Nm
- Brake Pads
- Checking pad thickness. Refer to BRAKE PADS, CHECKING THICKNESS for the wear limit.
- Always replace on both axles.
- Allocation. Refer to the Parts Information.
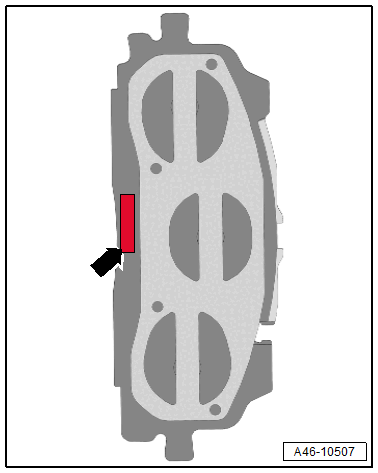
- Installation position. Refer to Fig 4.
- Removing and Installing. Refer to BRAKE PADS, REMOVING AND INSTALLING .
- Brake Pad Retaining Plate
- Replace when pads are replaced.
- Check for proper seating
- Brake Pad Spring
- Replace when pads are replaced.
- Check for proper seating
- Wire for Brake Pad Wear Indicator Sensor
- With
- Left Front Brake Pad Wear Sensor -G34-
- Right Front Brake Pad Wear Sensor -G35-
- For inner brake pad
- Replace when replacing the brake pads.
- With
- Protective Cap
- Bleed Screw
- 20 Nm
- Before installing, thinly coat with Assembly Paste :G 052 150 A2 .
- Brake Caliper
- Allocation. Refer to the Parts Information.
- Do not loosen the brake caliper/brake carrier bolted connections. Refer to Fig 2.
- Refer to BRAKE CALIPER, REMOVING AND INSTALLING
- Refer to BRAKE CALIPER, REPLACING
- Brake Pad Retaining Plate
- Replace when pads are replaced.
- Check for proper seating
- Bolt
- 10 NmNOTE:
Clean bolts before reusing.
Replace damaged bolts.
Always replace self-locking bolts.
- 10 Nm
- Brake Rotor
- Allocation. Refer to the Parts Information.
- Always replace on both axles.
- Do not use excessive force to separate the brake rotor from the wheel hub. Use rust remover, if necessary, otherwise the brake rotor could be damaged.
Refer to BRAKE ROTOR, REMOVING AND INSTALLING
- Bolt
- 10 NmNOTE:
Clean bolts before reusing.
Replace damaged bolts.
Always replace self-locking bolts.
- 10 Nm
Do not loosen the caliper/brake carrier bolted connections
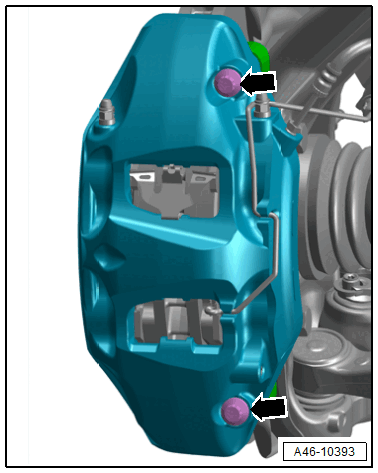
Risk of malfunction.
- Do not loosen the bolts -arrows- on the brake caliper.
Brake hose on brake caliper - tightening specification
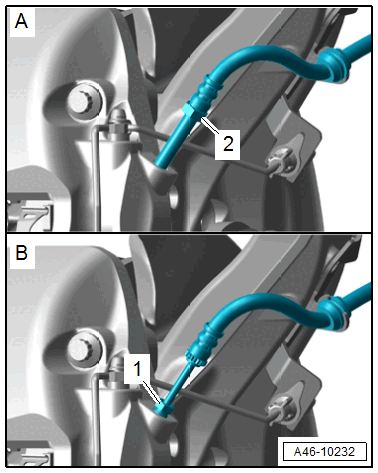
- Version -A- without union bolt: tighten the brake hose -2- to 20 Nm.
- Version -B- without union bolt, tighten the brake hose -1- to 14 Nm.
Brake pads installation position
Version 1:
-- Pay attention to the labeling -arrow- on the brake pads.
- LEFT OUTER
- LEFT INNER
- RIGHT OUTER
- RIGHT INNER
Version 2:

-- Pay attention to the labeling -2- on the brake pads.
- LEFT OUTER
- LEFT INNER
- RIGHT OUTER
- RIGHT INNER
- In installed position, the arrow -1- on the backing plate of the brake pads must point upward.