Brake Pads, Removing And Installing, 1LC/1LD/1LE/1LF/1LH: Installing
If old brake pads are being replaced with new ones, then it is necessary to check the brake rotor thickness for wear. Pay attention to the wear specifications for the brake rotor. Refer to TECHNICAL DATA, BRAKES .
Install in reverse order of removal and note the following:
Depending on the model, there are two vibration dampers installed on each brake pad. These vibration dampers mast face out of the brake caliper.
Always replace brake pads on the same axle at the same time.
Use the complete repair kit when installing new brake pads.
Health Risk.
- Do not blow out brake system with compressed air.
Use only mineral spirits to clean the brake caliper.
Check the protective caps of the brake caliper pistons for damage and install the complete repair kit, if necessary.
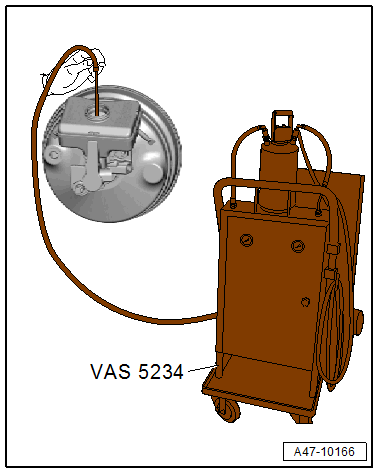
If necessary extract overflowing brake fluid with :VAS5234
There is a risk of contamination and paint damage from escaping brake fluid.
- If the brake pads are worn out and unnecessary brake fluid was filled, the brake fluid may overflow, when the brake caliper pistons in the brake cylinders are pressed back.
- Check the brake fluid level before pressing back the brake caliper pistons. If there is brake fluid up to the "MAX" mark, some brake fluid will need to be extracted.
- Use the :VAS5234 to extract brake fluid from the brake fluid reservoir.
-- Use the :T10145 to press the brake caliper piston completely back into the brake caliper.
-- If equipped, remove the protective film from the backing plate of the brake pad.
-- If reusing the old brake pads, install the labeled brake pads in the same location.
-- Insert the anti-friction plates -A- in the brake caliper.
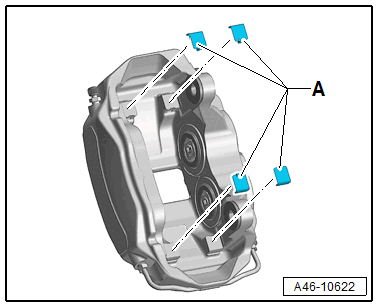
There are four anti-friction plates -A- installed in every brake caliper.
All four anti-friction plates must be installed on the brake pad contact surfaces as shown.
Note the correct installation position for the anti-friction plates.
The narrow small tab points to the inside of the brake caliper.
Refer to BRAKE PAD ANTI-FRICTION PLATES AND CLAMPS, 1LC/1LD/1LE/1LF/1LH
Depending on the model, there are two vibration dampers installed on each brake pad. These vibration dampers must face out of the brake caliper.
-- Insert the brake pads -image B: 2- in the brake caliper.
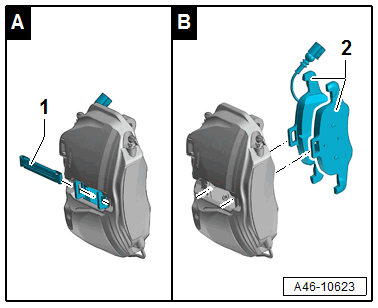
-- Push the clamp -image A: 1- completely through the brake pad mounts.
The clamp spring -image A: 1- is inserted at the bottom and engages in the brake caliper mount.
The clamp must be pushed through the mounts on both brake pads -image B: 2-.
The clamps must lock audibly and noticeably in the mount in the brake caliper.
Note the correct installation position of the clamp.
Refer to BRAKE PAD ANTI-FRICTION PLATES AND CLAMPS, 1LC/1LD/1LE/1LF/1LH
Clean bolts before reusing.
Replace the damaged bolts. Refer to the Parts Information.
-- Install the brake caliper with the brake pads installed.
-- Tighten the brake caliper with bolts -1-.
Check the clip and brake pads again for correct seating after installing.
Make sure the brake hose is routed correctly.
Make sure the brake hose is not blocked, bent, twisted or rubbing against the vehicle.
-- Insert the brake hose -1- in the bracket -2- and secure using the clamp.
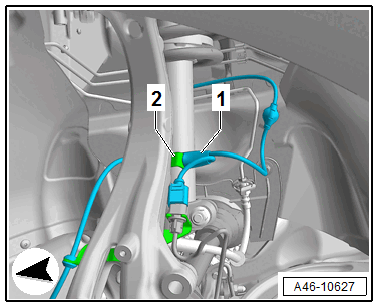
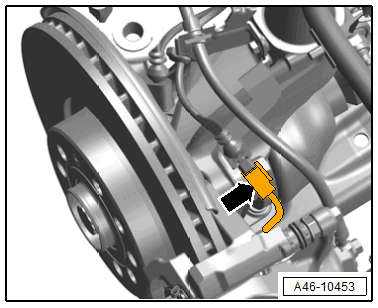
-- Connect the connector -arrow- for the brake pad wear indicator sensor contact to the brake caliper.
Risk of accident!
- With the vehicle stationary, firmly press the brake pedal several times so that the brake pads in the operating condition properly sit in their respective position.
- Make sure the brakes are working correctly before driving the vehicle for the first time.
-- Check brake fluid level, and fill if necessary.