Overview - Shock Absorber
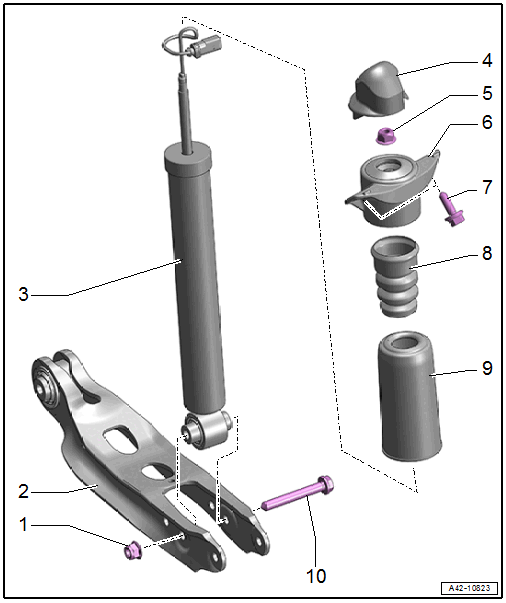
- Nut
- 70 Nm + 180°
- Always replace after removing
- Tighten in the curb weight position. Refer to WHEEL BEARING IN CURB WEIGHT POSITION, LIFTING VEHICLES WITH COIL SPRING .
- Rear Lower Transverse Link
- Shock Absorber
- There are different versions. Refer to the Parts Information for the allocation.
- Removing and installing. Refer to SHOCK ABSORBER, REMOVING AND INSTALLING .
- Vent and discharge faulty shock absorbers before disposal. Refer to REAR GAS-FILLED SHOCK ABSORBERS, VENTING AND DRAINING
- Shock absorber, checking. Refer to SHOCK ABSORBERS, CHECKING WHEN REMOVED .
- For equipment versions with electronic damping: "Adapt new control position" using the Vehicle Diagnostic Tester after replacing.
- Cover
- For equipment with electronic damping: with wire retainer
- Nut
- 35 Nm
- Always replace after removing.
- Shock Absorber Mount
- Removing and installing. Refer to Fig 2.
- Bolt
- 50 Nm + 90°
- Always replace after removing
- Additional Spring
- Protective Cover
- Installed in the groove on the additional spring
- Bolt
- Always replace after removing
Shock Absorber Mount, Removing and Installing
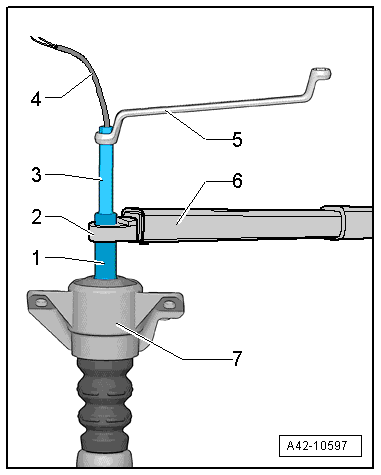
- Shock absorber is removed.
Equipment Versions with Electronic Damping
-- Free up the wire on the cover.
-- Unlock the contacts and remove the connector housing from the wire. Refer to CONNECTOR HOUSINGS, RELEASING AND DISASSEMBLING .
-- Remove the wiring guide from the nut.
Continuation for All Versions
-- Arrange the special tools as shown.
- :T10001/1 or :T10001/3
- :VAG1332/7
- : T40255 or :T10001/10
- Wire
- Wrench
- :VAG1331
- Shock Absorber Mount
Tightening Specifications
- Refer to OVERVIEW - SHOCK ABSORBER