Installing the vibration damper
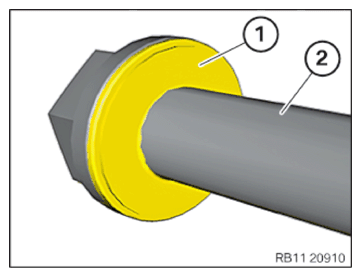
- Clean the contact surface of the central bolt (7).
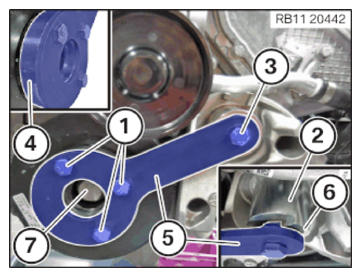
- Align and position vibration damper for the Woodruff key of the sprocket wheel.
- Position shim (4).
- Position fitting sleeve (2).
The notches (6) of the fitting sleeve (2) must point to the counter support (5).
- Position counter support (5).
- Tighten the screws (1) and (3) hand-tight.
- Replace central bolt (2).
Parts : Central bolt
- Treat the contact surface (1) of the central bolt (2) with lubricating grease.
CONSUMABLE - LUBRICATING GREASE DESCRIPTION
| Lubricating grease | 100 g, | 83239407778 |
| SYNTHESO GLEP 1 | Tube |
- Tighten central bolt (7).
TIGHTENING TORQUES SPECIFICATION
| Central bolt | ||
|---|---|---|
| Screw M18x1.5x122 Replace screw. Replace screws grease screw head see Consumables 4.8 |
Joining torque | 100 Nm |
| 1. Angle of rotation | 60° | |
| 2. Angle of rotation | 60° | |
| 3. Angle of rotation | 60° | |
- Release the counter support (5) and shim (4) with the screws (1).
- Release the fitting sleeve (2) and counter support (5) with the screw (3).
- Remove the counter support (5) from the vibration damper.
- Remove the fitting sleeve (2).
Follow-up work
- Refer to INSTALLING THE BELT PULLEY ON THE TORSIONAL VIBRATION DAMPER .
- Refer to INSTALLING THE BELT TENSIONER .
- Refer to INSTALL DRIVE BELT .
- Refer to PARTLY FASTENING THE COOLANT EXPANSION TANK FOR THE LOW-TEMPERATURE COOLANT CIRCUIT .
- Refer to INSTALLING FAN COWL .
- Refer to INSTALL THE REAR TOP CROSS CONNECTION .
- Refer to INSTALL FRONT CROSS CONNECTION .
- Refer to INSTALLING THE RIGHT INTAKE FILTER HOUSING WITH THE RIGHT FRONT-END STRUT .
- Refer to INSTALLING LEFT INTAKE FILTER HOUSING WITH LEFT FRONT-END STRUT .
- Refer to INSTALLING THE COVER ON THE LEFT AND RIGHT IN THE ENGINE COMPARTMENT AT THE TOP