Installing the head-up display
- Connect the associated connector to the Head-Up Display.
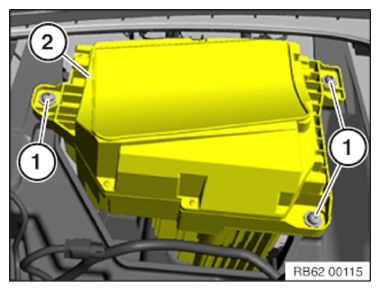
- Guide the Head-Up Display (2) into the support.
- Tighten the screws (1) .
TIGHTENING TORQUES SPECIFICATION
| Head-Up Display to support | ||
|---|---|---|
| M6x25 screw | Tightening torque | 13 Nm |
Follow-up Work
- Install instrument PANEL TRIM .
- Install the INSTRUMENT CLUSTER (KOMBI).
- Install the steering column SWITCH CLUSTER (SZL).
- Fit steering upper section COLUMN SHROUD .
- Install lower section steering COLUMN SHROUD
- Install the STEERING WHEEL .
- Install the steering wheel or sports steering wheel AIRBAG UNIT .
- Install the M sports steering wheel AIRBAG UNIT .
- Install the left fold-down COMPARTMENT .
- Install the CENTRAL INFORMATION DISPLAY (CID).
- Install the left instrument PANEL FINISHER .
- Install the light OPERATING UNIT .
- Install the left instrument panel SIDE PANEL .
- Install the left and right a-pillar TRIM PANEL .
- Install right a-pillar footwell side TRIM PANEL .
- Install the left a-pillar footwell side TRIM PANEL .
- Install both inner front door sill COVER STRIPS .
- Install the instrument panel MID-RANGE SPEAKERS .
- Install the instrument panel SPEAKER TRIM .
- Install the HEAD UNIT HIGH (HU-H).
- Install radio operating unit and air conditioning CONTROL PANEL .
- Install the right instrument PANEL FINISHER .
- Install the right instrument panel SIDE PANEL .
- Install the CENTER CONSOLE .
- Install the wireless CHARGING STATION .
- Install the right footwell TRIM PANEL .
- Install the pedal mechanism TRIM PANEL .
- Install the CUP HOLDER .
- Install the center console TRIM .
- Install front storage compartment TRIM .
- Install the center ARMREST .
- Install the center armrest STORAGE COMPARTMENT .
- Install the rear center CONSOLE TRIM .
- Install rear VENTILATION GRILLE .
- Install the rear VENTILATION GRILLE (air conditioning with 4-zone control).
- Install the CONTROL PANEL of the rear passenger compartment air conditioning (integrated automatic heating/air conditioning system with 4-zone control).
- Connect all battery EARTH LEADS .
- ENCODE/PROGRAM control unit(s).
- Activate the 48 v ELECTRICAL SYSTEM .