Mount the fuel supply line
NOTE:
RISK OF DAMAGE
Contaminant or foreign body.
Contamination can result in malfunctions, loss of function or leaks.
Contaminant or foreign body.
Contamination can result in malfunctions, loss of function or leaks.
- Adhere to the utmost cleanliness.
- Protect components from contamination e.g. by covering.
- Close off line connections with seal plugs.
NOTE:
TECHNICAL INFORMATION
When assembling, it is essential to observe screwing sequences and tightening torques.
Failure to comply with the regulations can lead to leaks and damage.
When assembling, it is essential to observe screwing sequences and tightening torques.
Failure to comply with the regulations can lead to leaks and damage.
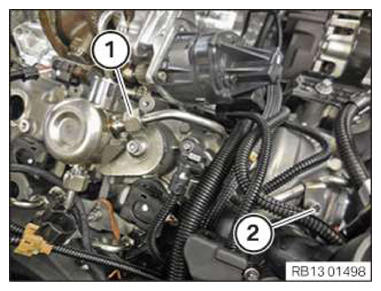
- Remove special tool 0 496 565 (13 5 160).
- Position the fuel delivery line.
- Connect the fuel line (1) to the fuel supply line and lock it audibly.
- Hand-tighten the nut (2) on left high pressure pump.
- Hand-tighten the bolt (3).
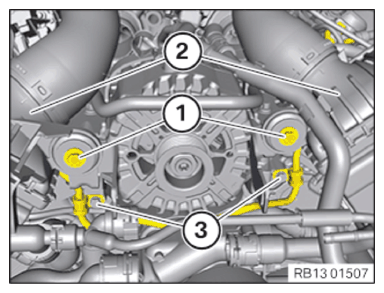
- Hand-tighten the nut (1) on right high pressure pump.
- Hand-tighten the bolt (2).NOTE: To provide a better overview: Diagram with removed coolant expansion tank for the charge air cooler.
- Hand-tighten the bolts (3).
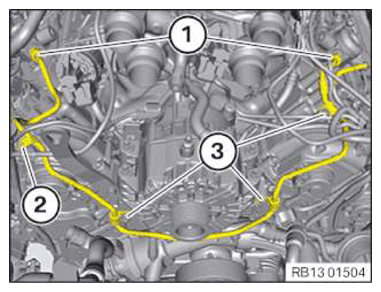
- Position the charge air cooler (2) and tighten the screws (1).TIGHTENING TORQUES SPECIFICATION
Charge air cooler to holder M6x35 tightening torque 8 Nm NOTE: To provide a better overview: Diagram with removed charge air coolers. - First, tighten the nuts (1) of the fuel supply line on the high pressure pumps.TIGHTENING TORQUES SPECIFICATION
Fuel delivery line to high pressure pump M14 Joining torque 10 Nm Tightening torque 30 Nm - Next, tighten the bolt (2) on the right cylinder head cover.TIGHTENING TORQUES SPECIFICATION
Fuel supply line to cylinder head cover/cylinder head M6x16 tightening torque 10 Nm - Next, tighten the bolts (3).TIGHTENING TORQUES SPECIFICATION
Fuel supply line to cylinder head cover/cylinder head M6x16 tightening torque 10 Nm