Installing the complete exhaust system
CAUTION:
Component with heavy weight.
Injury hazard!
Injury hazard!
- Note component's center of gravity.
- Support component using a jack.
- Secure component against falling off the jack.
CAUTION:
Heavy component.
Heavy components can lead to injury or damage.
Heavy components can lead to injury or damage.
- Remove and install heavy components with the aid of another person/other persons.
CAUTION:
Grinding dust from grinding of components.
Hazardous to health!
Hazardous to health!
- Directly draw off the grinding dust.
- Ensure adequate ventilation.
- Conduct all work in appropriate personal protective equipment only.
NOTE:
TECHNICAL INFORMATION
Check the exhaust system for tightness after installation.
Check the exhaust system for tightness after installation.
NOTE:
TECHNICAL INFORMATION
Mount the EXHAUST SYSTEM in a de-energized state, following the TIGHTENING SEQUENCE from the rear silencer towards the exhaust manifold.
Mount the EXHAUST SYSTEM in a de-energized state, following the TIGHTENING SEQUENCE from the rear silencer towards the exhaust manifold.
CAUTION:
Shavings resulting from sawing or grinding components.
Injury hazard!
Injury hazard!
- Conduct all work in appropriate personal protective equipment only.
- Wear safety goggles and hand protection.
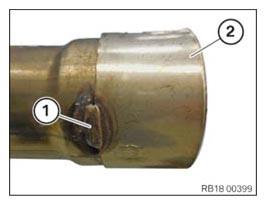
- Version with ribbon clamp:
Open the weld seam (1) with a conventional tool.
- Remove ribbon clamp (2).
- Replace the (2) ribbon clamp.
Parts: Ribbon cable clamp
NOTE:
Schematic diagram is for example purposes. Some parts may differ in certain details.
- Check all rubber mounts (1) of the exhaust system for damage and replace, if necessary.
NOTE:
TECHNICAL INFORMATION
Conduct the following operation with the assistance of a second person.
Conduct the following operation with the assistance of a second person.
- Insert and install the exhaust system with the help of another person.
- Replace nuts (1).
Parts: Nuts
- Tighten nuts (1).
TIGHTENING TORQUE SPECIFICATIONS
| Rear silencer to body/bumper support | ||
| M8 Replace nuts. |
Tightening torque | 19 Nm |
- Replace nuts (2).
Parts: Nuts
- Tighten nuts (2).
TIGHTENING TORQUE SPECIFICATIONS
| Rear silencer to body/bumper support | ||
| M8 Replace nuts. |
Tightening torque | 19 Nm |
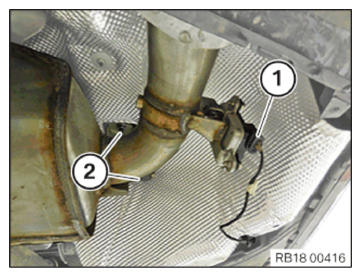
- Connect and lock the connector (1).
The connector (1) must engage audibly.
NOTE:
The following step(s) must be performed if the listed component(s) is/are installed.
- Replace the screw (1).
Parts: Screw
- Tighten the bolt (1) on the rear axle support.
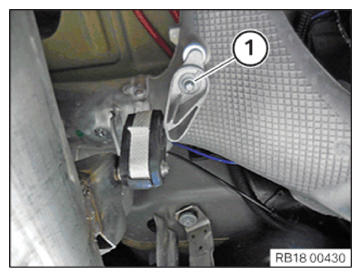
TIGHTENING TORQUE SPECIFICATIONS
| Exhaust system to rear axle carrier | ||
| M8x25 Replace screw. |
Tightening torque | 28 Nm |
NOTE:
The following step(s) must be performed if the listed component(s) is/are installed.
- Replace the screw (3).
Parts: Screw
- Tighten the screw (3) on the rear axle support.

TIGHTENING TORQUE SPECIFICATIONS
| Exhaust system to rear axle carrier | ||
| M8x25 Replace screw. |
Tightening torque | 28 Nm |
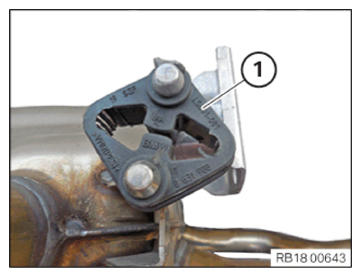
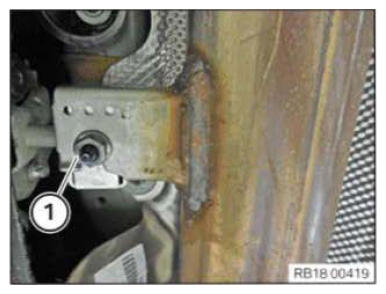
- Mount the ground strap (2) and tighten the screw (1).
- Replace nut (1).
Parts: Nut
- Tighten nut (1).
TIGHTENING TORQUE SPECIFICATIONS
| Front pipe/front silencer/gasoline particulate filter to the transmission holder | ||
| M8 Replace nut. |
Tightening torque | 19 Nm |
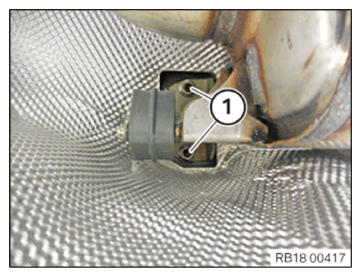
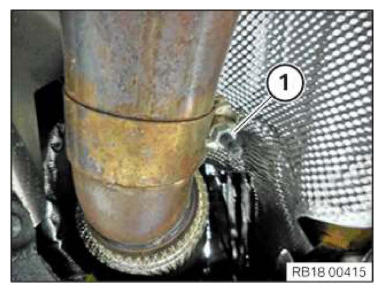
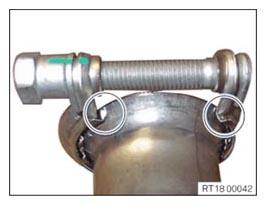
- Tighten the ribbon clamp (1).
TIGHTENING TORQUE SPECIFICATIONS
| Exhaust system to catalytic converter | ||
| Ribbon clamp nut M8 Replace the ribbon clamp. |
Tightening torque | 26 Nm |
| Ribbon clamp nut M10 Replace the ribbon clamp. |
Tightening torque | 55 Nm |
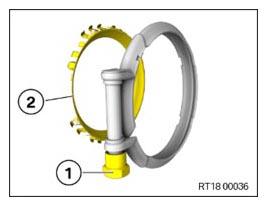
- Version with V ribbon clip:
Replace V-band clamp.
Parts: V-band clamp
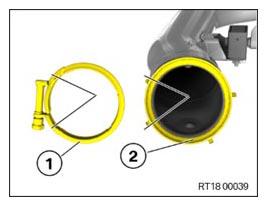
Unscrew the nut (1) and remove the sealing ring (2).
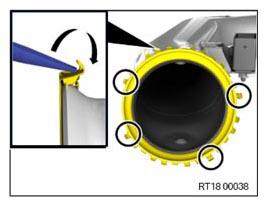
- Bend all sheet metal tabs around their entire perimeter (apart from those in the marked areas) with a suitable tool.
- Mount the V-clip (1) on the sealing ring (2).
- Make sure that the V-ribbon clip is (1) correctly positioned on the sealing ring (2).
- Make sure that, after mounting, the V-ribbon clip is on the sheet metal tabs in the marked areas.
- Connect the exhaust system (1) with the catalytic converter (2) and position it correctly (arrow).
- Make sure that V-clip (1) is fitted correctly.
- Tighten down screw (2).
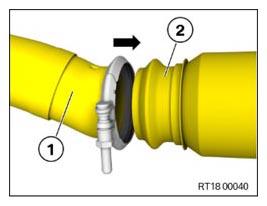
TIGHTENING TORQUE SPECIFICATIONS
| V-ribbon clip to catalytic converter | ||
| V-ribbon clip Replace V-ribbon clip. |
Tightening torque | 25 Nm |
