Installing both front-end struts
NOTE:
Description is for right component only. The procedure on the left side is identical.
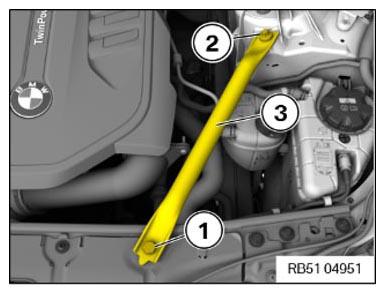
Installing the front-end strut
- Install the front-end strut (3).
NOTE:
RISK OF DAMAGE
Use of an incorrect tool (impact screwdriver) to release and tighten the screws.
Damaged thread.
Use of an incorrect tool (impact screwdriver) to release and tighten the screws.
Damaged thread.
- Only use a standard tool (e.g. reversible ratchet) to release/tighten the screws.
- Clean the thread at shock tower.
- Replace the screw (1).
Parts: Screw
- Tighten down screw (1).
TIGHTENING TORQUE SPECIFICATIONS
| Front-end strut to cross connection | ||
| Hexagon screw Replace screw. |
Joining torque | 28 Nm |
| Angle of rotation | 90° | |
- Replace the screw (2).
Parts: Screw
- Tighten down screw (2).
TIGHTENING TORQUE SPECIFICATIONS
| Front-end strut/strut brace | ||
| Screw Replace screw. |
Tightening torque | 56 Nm |
| Angle of rotation | 90° | |
- Repair the damaged thread on the shock tower with a Helicoil insert.
CONSUMABLE SPECIFICATIONS
| Helicoil thread insert | M10x30 mm 07129909659 |