Removing coolant expansion tank of high-temperature coolant circuit
Preliminary work
- Refer to REMOVING THE UNDERBODY PROTECTION OF THE STEERING GEAR AND THRUST FIELD RESPECTIVELY .
- Refer to REMOVING THE COVER ON LEFT AND RIGHT IN THE ENGINE COMPARTMENT AT THE TOP .
- Refer to REMOVE LEFT FRONT-END STRUT .
WARNING:
Hot surfaces.
Risk of burning!
Risk of burning!
- Perform all work only on components that have cooled down.
NOTE:
TECHNICAL INFORMATION
Use commercially available pinch-off tools to pinch off the coolant hoses.
Use commercially available pinch-off tools to pinch off the coolant hoses.
NOTE:
TECHNICAL INFORMATION
Immobilization period-long fill of coolant!
Do not reuse used coolant.
When replacing and removing components which rely on the corrosion protection effect of the coolant, it is essential to change the coolant. The cooling system must therefore be emptied and refilled.
In the case of other removal work involving the draining of part quantities of coolant, the coolant level must be topped up with new coolant.
NOTE:
TECHNICAL INFORMATION
Collect and dispose of emerging fluids. Observe country-specific waste disposal regulations.
Collect and dispose of emerging fluids. Observe country-specific waste disposal regulations.
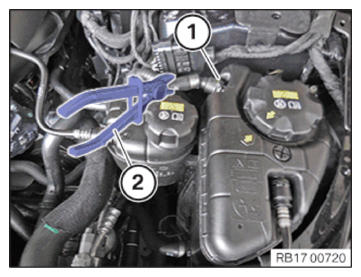
- Thread in clamping pliers (2) and install.
- Unlock and loosen coolant line (1).
- Catch and dispose of leakage coolant.
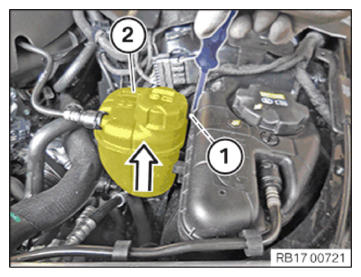
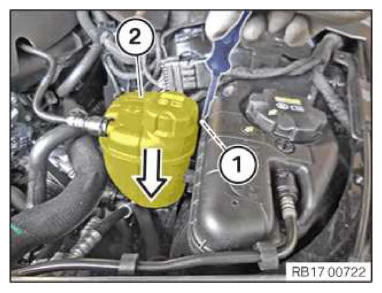
- Unlock and loosen lock (1).
- Loosen the coolant expansion tank (2) in the direction of the arrow.
- Feed out coolant expansion tank (2) and set it aside.
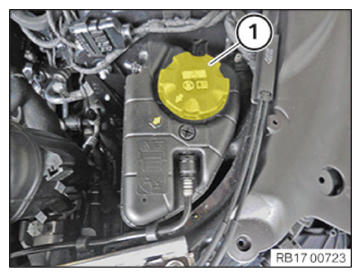
- Loosen sealing cap (1).
- Draw the coolant off with a conventional pump.
- Unlock and loosen coolant line (1).
- Catch and dispose of leakage coolant.
- Unlock lock (2).
- Remove coolant expansion tank (3) from guide (4).
- Guide the coolant expansion tank (3) out of the rubber mount (5) and lift.
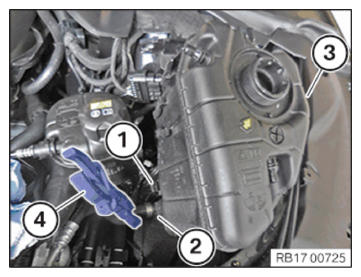
- Thread in clamping pliers (4) and install.
- Unlock and loosen the connector (1) on the coolant level switch.
- Unlock and loosen coolant line (2).
- Catch and dispose of leakage coolant.
- Remove the coolant expansion tank (3) upwards.

Further information is available.
NOTE:
TECHNICAL INFORMATION
Make sure that the connections are locked correctly. The locks must engage audibly.
Make sure that the connections are locked correctly. The locks must engage audibly.
- Insert the coolant expansion tank (3).
- Connect and lock the connector (1) to the coolant level switch.
The connector (1) must engage audibly.
- Connect and lock coolant line (2).
The coolant line (2) must audibly engage.
- Feed out clamping pliers (4) and remove.
- Feed the coolant expansion tank (3) into the guide (4) and install.
The coolant expansion tank (3) must engage audibly in the rubber mount (5).
The lock (2) must audibly engage.
- Connect and lock coolant line (1).
The coolant line (1) must audibly engage.
NOTE: TECHNICAL INFORMATION
Follow notes for repair work on the cooling system.
For additional information see:
17 00... INSTRUCTIONS FOR REPAIR WORK ON COOLING SYSTEM - Top up coolant to maximum mark.
- Close the sealing cap (1) until the arrows are flush.
- Feed in and install the coolant expansion tank (2) in the direction of the arrow.
The lock (1) must audibly engage.
Follow-up work