Installing the boost pressure sensor on the intake plenum
WARNING:
Hot surfaces.
Risk of burning!
Risk of burning!
- Perform all work only on components that have cooled down.
NOTE:
RISK OF DAMAGE
Electrostatic discharge.
Damage to or destruction of electrical components.
Electrostatic discharge.
Damage to or destruction of electrical components.
- Leave the electrical components in their original packaging until they are being installed. Only use the original packaging for returning the product. Always package removed components straight away.
- Read and comply with user information on using the associated special tool 12 7 060.
- Only tap the housings of electrical components. Do not tap pins or multi-pin connectors directly.
- Wear electrically conductive clothing and antistatic shoes (with ESD symbol).
- For additional information see: 61 35... NOTES ON ESD (ELECTROSTATIC DISCHARGE) PROTECTION
Prepare the boost pressure sensor for installation
- Check sealing ring (1) for damage, replace if necessary.
Parts: Sealing ring
- Apply a thin coat of lubricant to the sealing ring (1) of the boost pressure sensor.
- Install and lock the boost pressure sensor (3).
The boost pressure sensor (3) must latch audibly into the locks (arrows).
- Tighten down screw (2).

TIGHTENING TORQUES SPECIFICATION
| Boost pressure sensor to intake plenum | ||
| TS6X20 | Tightening torque | 5 Nm |
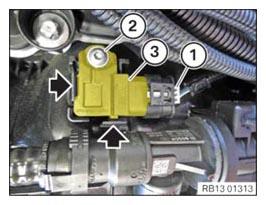
- Connect and lock the connector (1).
The connector (1) must engage audibly.
Follow-up work
- Refer to INSTALL ACOUSTIC COVER .