Removing the servomotor for the eccentric shaft
WARNING:
Hot surfaces.
Risk of burning!
Risk of burning!
- Perform all work only on components that have cooled down. Contaminant or foreign body.
NOTE:
RISK OF DAMAGE
Contamination can result in malfunctions, loss of function or leaks.
Adhere to the utmost cleanliness.
Contamination can result in malfunctions, loss of function or leaks.
Adhere to the utmost cleanliness.
- Protect components from contamination e.g. by covering.
- Close off line connections with seal plugs.
NOTE:
Collect and dispose of emerging fluids. Observe country-specific waste disposal regulations.
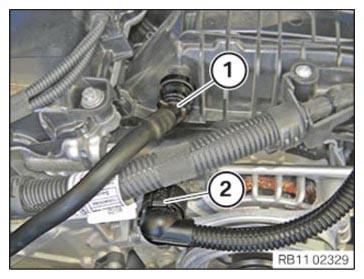
- Unlock ventilation line (1) and detach from intake plenum.
- Unlock connector (2) and detach.
- Motor oil may leak when detaching the servomotor, keep cleaning cloth ready.
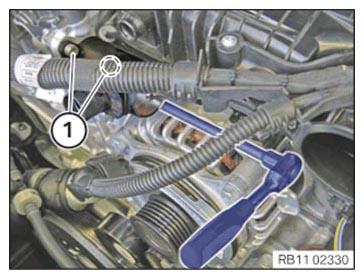
- Loosen screws (1).
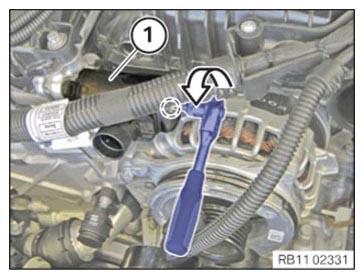
- Turn servomotor (1) on the screw in marked area towards the left in order to release the eccentric shaft.
- Detach the servomotor (1) from the cylinder head simultaneously.
- Turn wave maximum up to the end stop towards the left.
Follow-up work
- Refer to INSTALLING CYLINDER HEAD COVER .
- Refer to PREPARING THE INJECTORS FOR INSTALLATION .
- Refer to INSTALLING THE INJECTORS FOR THE CYLINDERS 4 TO 6 .
- Refer to INSTALLING THE INJECTORS FOR THE CYLINDERS 1 TO 3 .
- Refer to PREPARING FOR THE INSTALLATION OF THE HIGH PRESSURE PUMP .
- Refer to INSTALLING HIGH PRESSURE PUMP .
- Refer to INSTALLING THE HIGH-PRESSURE LINE BETWEEN THE HIGH-PRESSURE RAIL AND THE HIGH-PRESSURE PUMP .
- Refer to INSTALLING THE IGNITION COILS .
- Refer to INSTALLING FRONT ENGINE ENCAPSULATION .
- Refer to INSTALLING BOTH ACTUATORS .
- Refer to INSTALLING CENTER BULKHEAD LOWER PART .
- Refer to INSTALLING THE SEALING FRAME ON LEFT AND RIGHT .
- Refer to INSTALLING THE INTAKE PLENUM .
- Refer to CONNECTING THE COOLANT LINES FOR THE LOW-TEMPERATURE COOLANT CIRCUIT .
- Refer to FILLING THE LOW-TEMPERATURE COOLING SYSTEM WITH THE VACUUM FILLING EQUIPMENT .
- Refer to INSTALLING CONTROL UNIT BRACKET .
- Refer to INSTALLING THE DME CONTROL UNIT .
- Refer to INSTALLING THE TANK VENT VALVE .
- Refer to FASTENING CHARGE AIR LINE TO THE THROTTLE BODY .
- Refer to INSTALLING THE CENTER COWL UPPER PART .
- Refer to INSTALLING TENSION STRUT ON SHOCK TOWER .
- Refer to INSTALLING WINDSHIELD PANEL COVER .
- Refer to INSTALLING LEFT AND RIGHT WIPER ARM .
- Refer to INSTALLING THE COVER OF THE ENGINE COMPARTMENT ON THE REAR LEFT .
- Refer to INSTALLING ACOUSTIC COVER AT REAR .
- Refer to INSTALLING THE FRONT HOOD SEAL AT THE REAR .
- Refer to INSTALLING FAN COWL .
- Refer to INSTALLING THE REAR TOP CROSS CONNECTION .
- Refer to INSTALLING FRONT CROSS CONNECTION .
- Refer to INSTALLING FRONT-END STRUT ON LEFT AND RIGHT .
- Refer to INSTALLING THE COVER ON THE LEFT AND RIGHT IN THE ENGINE COMPARTMENT AT THE TOP .
- Refer to INSTALLING THE RESONATOR WITH THE TOP CLEAN AIR PIPE .
- Refer to INSTALLING INTAKE SILENCER HOUSING .
- Refer to INSTALLING ACOUSTIC COVER .
- Refer to INSTALLING FRONT STIFFENING PLATE .
- Refer to INSTALLING THE FRONT UNDERBODY PROTECTION OR FRONT THRUST FIELD .
- Refer to CONNECTING NEGATIVE BATTERY CABLE .
- Refer to VENTING THE LOW-TEMPERATURE COOLING SYSTEM .