Installing the support for instrument panel
NOTE:
TECHNICAL INFORMATION
Conduct the following operation with the assistance of a second person.
Conduct the following operation with the assistance of a second person.
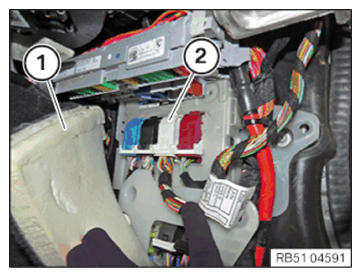
- Carefully insert the support for the instrument panel and connect all connectors at the same time.
- Tighten nuts (1) and (2) .
TIGHTENING TORQUES SPECIFICATION
| Support for instrument panel | ||
|---|---|---|
| Nut M8 | Tightening torque | 21 Nm |
| M8 screw | Tightening torque | 21 Nm |
| Nut M6 | Tightening torque | 8 Nm |
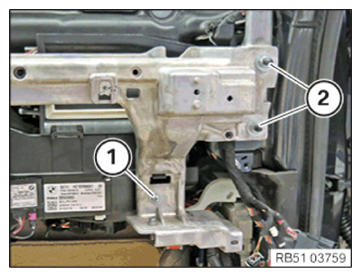
- Install the retaining bracket on the left and right and tighten the nuts (1) .
TIGHTENING TORQUES SPECIFICATION
| Support for lower instrument panel | ||
|---|---|---|
| Nut M8 | Tightening torque | 19 Nm |
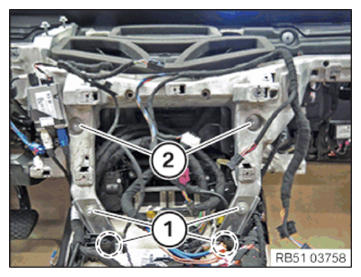
- Tighten nuts (2) .
TIGHTENING TORQUES SPECIFICATION
| Support for instrument panel | ||
|---|---|---|
| Nut M8 | Tightening torque | 21 Nm |
| M8 screw | Tightening torque | 21 Nm |
| Nut M6 | Tightening torque | 8 Nm |
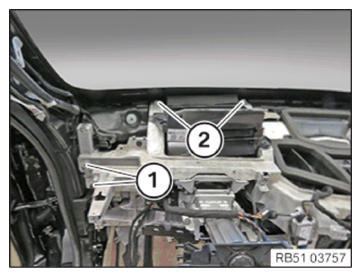
- Tighten nuts (1) .
- Tighten the screws (2) .
TIGHTENING TORQUES SPECIFICATION
| Support for instrument panel | ||
|---|---|---|
| Nut M8 | Tightening torque | 21 Nm |
| M8 screw | Tightening torque | 21 Nm |
| Nut M6 | Tightening torque | 8 Nm |
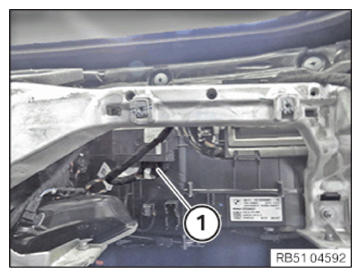
- Tighten nut (1) .
TIGHTENING TORQUES SPECIFICATION
| Support for instrument panel | ||
|---|---|---|
| Nut M8 | Tightening torque | 21 Nm |
| M8 screw | Tightening torque | 21 Nm |
| Nut M6 | Tightening torque | 8 Nm |
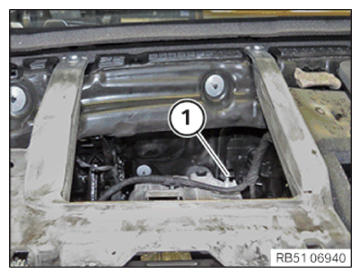
- Connect connector (1)
.
- Push the carpet (1) in the area of the B-pillar to the side.
- Connect connector (2) .
Installing the bottom steering shaft on the steering column
NOTE:
TECHNICAL INFORMATION
The bottom steering shaft and the steering column are not encoded in relation to each other. Always mark the positioning of the steering shaft in relation to the steering column for removals, installations and replacements. Non-compliance will lead to inclination of the steering wheel.
The bottom steering shaft and the steering column are not encoded in relation to each other. Always mark the positioning of the steering shaft in relation to the steering column for removals, installations and replacements. Non-compliance will lead to inclination of the steering wheel.
- When removing, note the mark to position the lower section of the steering shaft (1)
on the steering column (2)
.
- Slide the steering shaft bottom (2) onto the steering column.
- Replace the clamping bolt (1)
.
Parts: Clamping bolt
- Tighten the clamping bolt (1) .
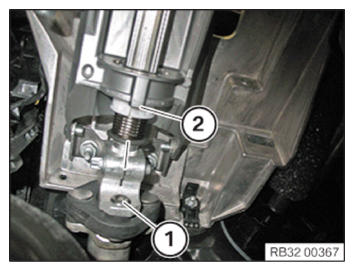
TIGHTENING TORQUES SPECIFICATION
| Lower steering shaft to steering column | ||
|---|---|---|
| Clamping bolt M8 Recut screw thread. Replace clamping bolt. No retorquing permitted! |
Tightening torque | 28 Nm |
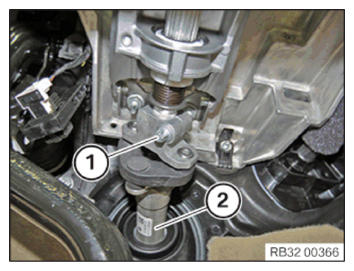
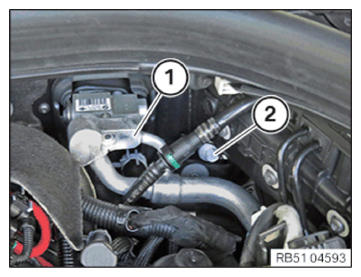
- Slightly push the refrigerant line (1) to one side.
- Tighten down screw (2) .
TIGHTENING TORQUES SPECIFICATION
| Support for instrument panel | ||
|---|---|---|
| Nut M8 | Tightening torque | 21 Nm |
| M8 screw | Tightening torque | 21 Nm |
| Nut M6 | Tightening torque | 8 Nm |
Follow-up Work
- Connect the expansion valve REFRIGERANT LINE .
- Install instrument panel TRIM .
- Install the INSTRUMENT CLUSTER (KOMBI).
- Install the steering column SWITCH CLUSTER (SZL).
- Install steering column lower section SHROUD .
- Fit steering column upper section SHROUD .
- Install the STEERING WHEEL .
- Install the steering wheel or sports steering wheel AIRBAG UNIT .
- Install the M sports steering wheel AIRBAG UNIT .
- Install the left fold-down COMPARTMENT .
- Install the CENTRAL INFORMATION DISPLAY (CID).
- Install the left instrument panel FINISHER .
- Install the light OPERATING UNIT .
- Install the left instrument panel SIDE PANEL .
- Install the left and right a-pillar TRIM PANEL .
- Install right a-pillar footwell side TRIM PANEL .
- Install the left a-pillar footwell side TRIM PANEL .
- Install both inner front door sill COVER STRIPS .
- Install the instrument panel MID-RANGE SPEAKERS .
- Install the instrument panel speaker TRIM .
- Install the HEAD UNIT HIGH (HU-H).
- Install radio operating unit and air conditioning CONTROL PANEL .
- Install the right instrument panel FINISHER .
- Install the right instrument panel SIDE PANEL .
- Install the CENTER CONSOLE .
- Install the right footwell TRIM PANEL .
- Install the pedal mechanism TRIM PANEL .
- Install the CUP HOLDER .
- Install the center console TRIM .
- Install front storage compartment TRIM .
- Install the center ARMREST .
- Install the center armrest STORAGE COMPARTMENT .
- Install the rear center console TRIM .
- Install rear VENTILATION GRILLE .
- Install the rear VENTILATION GRILLE (air conditioning with 4-zone control).
- Install the rear passenger compartment air conditioning CONTROL PANEL (integrated automatic heating/air conditioning system with 4-zone control).
- Connect all battery EARTH LEADS .
- Activate the 48 v ELECTRICAL SYSTEM .