Installing the flexible disc for the front propeller shaft
NOTE:
TECHNICAL INFORMATION
For all-wheel drive vehicles from the 5 Series and 7 Series, the aluminum flexible discs have been eliminated and replaced with elastic flexible discs made of rubber as of production date 09/2015.
For all-wheel drive vehicles from the 5 Series and 7 Series, the aluminum flexible discs have been eliminated and replaced with elastic flexible discs made of rubber as of production date 09/2015.
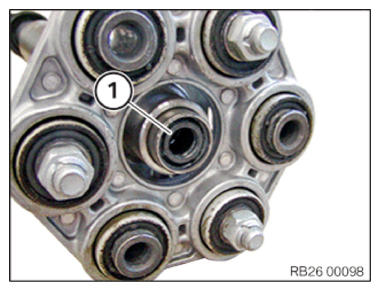
- Check centering (1) for damage and replace centering, if necessary.
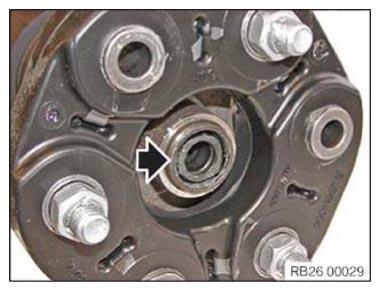
- Check centering (arrow) for damage and replace centering if necessary.
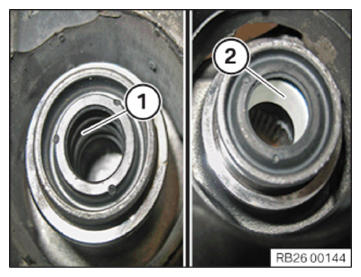
- Apply a thin coat of grease to the soft centering (1), if necessary.CONSUMABLE - LUBRICATING GREASE DESCRIPTION
Lubricating grease 100 g, 83 19 0 447 Olistamoly 2 LN 584 LO Tube 919 - Hard centering must (2) not be greased.
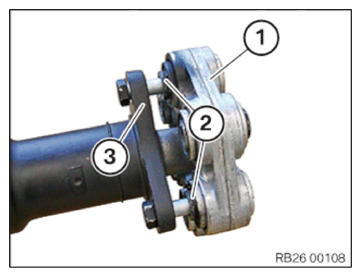
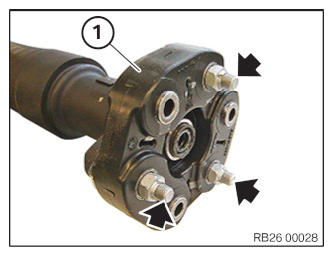
- If applicable, position the flexible disc (rubber) (1) including the guides (2) in the recesses of the three-hole flange (3).
- Install the flexible disc (1) on the prop shaft.
- Replace screws and self-locking nuts (arrows).
Parts: Self-locking nuts and bolts
- Insert screws and tighten.
TIGHTENING TORQUES SPECIFICATION
| Front flexible disc to prop shaft | ||
|---|---|---|
| M12 Replace screws. Jointing torque and angle rotation must be adhered to. Tightening via screw. |
Joining torque | 55 Nm |
| Angle of rotation | 90° | |
Follow-up work
- Install the PROP SHAFT on the transmission.
- Install transmission CROSS MEMBER .
- Install the HEAT SHIELDS .
- If installed: install the right, and on the left TORSION STRUT where required.
- Install the CONNECTING SUPPORTS on the tunnel.
- Install the UNDERBODY PLANKING of the transmission on the side.
- Install rear UNDERBODY PROTECTION .
NOTE:
TECHNICAL INFORMATION
For all-wheel drive vehicles from the 5 Series and 7 Series, the aluminum flexible discs have been eliminated and replaced with elastic flexible discs made of rubber as of production date 09/2015.
For all-wheel drive vehicles from the 5 Series and 7 Series, the aluminum flexible discs have been eliminated and replaced with elastic flexible discs made of rubber as of production date 09/2015.
- Check centering (1) for damage and replace centering, if necessary.
- Check centering (arrow) for damage and replace centering if necessary.
- Apply a thin coat of grease to the soft centering (1), if necessary.CONSUMABLE - LUBRICATING GREASE DESCRIPTION
Lubricating grease Olistamoly 2 LN 584 LO 100 g, Tube 83 19 0 447 919 - Hard centering must (2) not
be greased.
- If applicable, position the flexible disc (rubber) (1) including the guides (2) in the recesses of the three-hole flange (3).
- Install the flexible disc (1) on the prop shaft.
- Replace screws and self-locking nuts (arrows).
Parts: Self-locking nuts and bolts
- Insert screws and tighten.
TIGHTENING TORQUES SPECIFICATION
| Front flexible disc to prop shaft | ||
|---|---|---|
| M12 Replace screws. Jointing torque and angle rotation must be adhered to. Tightening via screw. |
Joining torque | 55 Nm |
| Angle of rotation | 90° | |
Follow-up work
- Install the PROP SHAFT on the transmission.
- Install the HEAT SHIELDS .
- If installed: install the right, and on the left TORSION STRUT where required.
- Install the CONNECTING SUPPORTS on the tunnel.
- Install the UNDERBODY PLANKING of the transmission on the side.
- Install rear UNDERBODY PROTECTION .