Installing the alternator
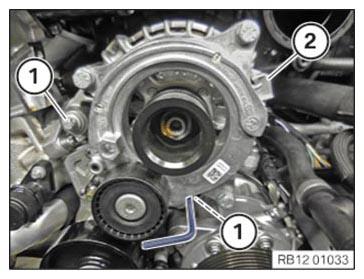
- Slightly push back the threaded support sleeve (2) in the direction of arrow to facilitate the installation of the alternator.
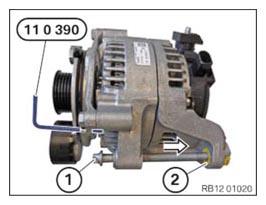
- Screw the screw (1) into the threaded support sleeve (2).
- Press back the threaded support bushing (2) using the bolt (1).
- Unscrew the screw (1) from the threaded support bushing (2).
- Insert and install the alternator (2).
- Tighten the screws (1).TIGHTENING TORQUES SPECIFICATION
Alternator on component carrier M10x75 tightening torque 38 Nm M10x125 tightening torque 38 Nm M10x90 tightening torque 38 Nm - Tighten nut (1).TIGHTENING TORQUES SPECIFICATION
Positive battery cable to the alternator M8 Tightening torque 19 Nm - Connect connectors (2) and lock.
The connector (2) must engage audibly.

Follow-up work
- Refer to INSTALLING THE DRIVE BELT FOR ALTERNATOR .
- Refer to INSTALLING THE THROTTLE BODY .
- Refer to INSTALLING CHARGE AIR LINE .
- Refer to INSTALLING BOTTOM CLEAN AIR PIPE .
- Refer to INSTALLING CLEAN AIR PIPE, TOP .
- Refer to INSTALLING THE INTAKE FILTER HOUSING (TENSION STRUT REMOVED ON SHOCK TOWER) .
- Refer to INSTALLING ACOUSTIC COVER .
- Refer to INSTALLING FAN COWL .
- Refer to INSTALLING THE REAR TOP CROSS CONNECTION .
- Refer to INSTALLING FRONT CROSS CONNECTION .
- Refer to INSTALLING BOTH FRONT-END STRUTS .
- Refer to INSTALLING THE COVER ON THE LEFT AND RIGHT IN THE ENGINE COMPARTMENT AT THE TOP .
- Refer to CONNECTING NEGATIVE BATTERY CABLE .