Replacing the alternator speed governor
NOTE:
TECHNICAL INFORMATION
Make sure that the radiator is not damaged when removing the alternator. Cover the radiator with suitable materials (e.g. cardboard).
Make sure that the radiator is not damaged when removing the alternator. Cover the radiator with suitable materials (e.g. cardboard).
Preliminary work
- Refer to DISCONNECTING ALL BATTERY GROUND LEADS .
- Refer to REMOVING THE COVER ON LEFT AND RIGHT IN THE ENGINE COMPARTMENT AT THE TOP .
- Refer to REMOVING THE LEFT AND RIGHT FRONT-END STRUT .
- Refer to REMOVING FRONT CROSS CONNECTION .
- Refer to REMOVING THE REAR TOP CROSS CONNECTION .
- Refer to REMOVING FAN COWL .
- Refer to REMOVING THE COOLANT EXPANSION TANK FOR THE LOW-TEMPERATURE COOLANT CIRCUIT .
- Refer to PARTIALLY REMOVING THE CHARGE AIR COOLER .
- Refer to REMOVING THE DRIVE BELT .
- Refer to REMOVING THE ALTERNATOR .
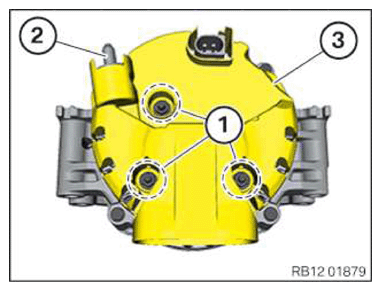
- Loosen nuts (1).
- Pull the cover (3) up over the stud (2) and off.
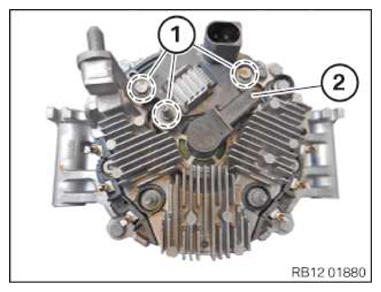
- Unscrew the thread connections (1).
- Pull the alternator speed governor (2) up and off.
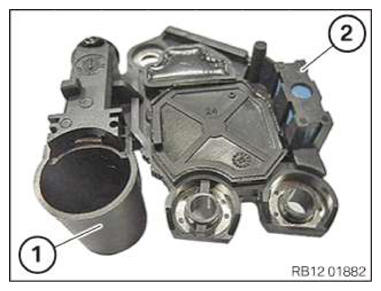
- Release safety catch of the transportation retainer (1) on the alternator regulator (2) only after installation.
The alternator speed governor (2) can only be installed once.
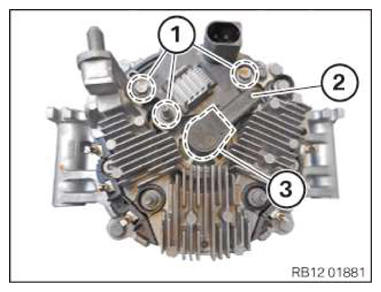
- Position the alternator speed governor (2).
- Tighten the thread connections (1).TIGHTENING TORQUES SPECIFICATION
Alternator regulator screw Tightening torque 7 Nm - Make sure the alternator speed governor (2) is sitting on the alternator properly.
- Press the transportation retainer (3) down and release.
The transportation retainer (3) should lock in place audibly.
- Insert the cover (3) down over the stud (2).
- Tighten nuts (1).
TIGHTENING TORQUES SPECIFICATION
| Alternator cover | ||
| Nuts | Tightening torque | 7 Nm |
Follow-up work
- Refer to INSTALLING THE ALTERNATOR .
- Refer to PUTTING ON THE DRIVE BELT .
- Refer to MOUNTING THE CHARGE AIR COOLER .
- Refer to INSTALLING THE COOLANT EXPANSION TANK FOR THE LOW-TEMPERATURE COOLANT CIRCUIT .
- Refer to INSTALLING FAN COWL .
- Refer to INSTALLING THE REAR TOP CROSS CONNECTION .
- Refer to INSTALLING FRONT CROSS CONNECTION .
- Refer to INSTALLING FRONT-END STRUT ON LEFT AND RIGHT .
- Refer to INSTALLING THE COVER ON THE LEFT AND RIGHT IN THE ENGINE COMPARTMENT AT THE TOP .
- Refer to CONNECTING NEGATIVE BATTERY CABLE .
- Refer to CHECKING THE COOLANT LEVEL IN THE LOW-TEMPERATURE COOLANT CIRCUIT AND TOP UP, IF NEEDED .
- Refer to WHEN REPLACING THE ALTERNATOR/ALTERNATOR REGULATOR: RESET GENERATOR STATISTICAL DATA .