Remove exhaust turbocharger
WARNING:
High-voltage system.
The high-voltage system operates on the basis of hazardous, electrical voltage and high currents. Mortal hazard through electric shock!
The high-voltage system operates on the basis of hazardous, electrical voltage and high currents. Mortal hazard through electric shock!
- All work on the high-voltage system may only be carried out by specially trained and technically experienced personnel.
- For additional information see:
- For additional Information see:
WARNING:
Hot surfaces.
Risk of burning!
Risk of burning!
- Perform all work only on components that have cooled down.
NOTE:
RISK OF DAMAGE
Electrostatic discharge.
Damage to or destruction of electrical components.
Electrostatic discharge.
Damage to or destruction of electrical components.
- Leave the electrical components in their original packaging until they are being Installed. Only use the original packaging for returning the product. Always package removed components straight away.
- Read and comply with user Information on using the associated special tool 12 7 060.
- Only tap the housings of electrical components. Do not tap pins or multi-pin connectors directly.
- Wear electrically conductive clothing and antistatic shoes (with ESD symbol).
- For additional Information see: NOTES ON ESD (ELECTROSTATIC DISCHARGE) PROTECTION
NOTE:
TECHNICAL INFORMATION
Prior to replacing the exhaust turbocharger: Observe the notes on troubleshooting on the exhaust turbocharger.
Prior to replacing the exhaust turbocharger: Observe the notes on troubleshooting on the exhaust turbocharger.
NOTE:
TECHNICAL INFORMATION
For exhaust turbocharger damage: Check the pressure pipes, charge air cooler and Intake plenum for foreign matter, damage and correct functionality.
For exhaust turbocharger damage: Check the pressure pipes, charge air cooler and Intake plenum for foreign matter, damage and correct functionality.
If the oil return line is exchanged, then the connecting pipe to the oil sump must ALWAYS be cleaned, as the connecting pipe can coke.
Preliminary work
- Refer to BRINGING FRONT COMPARTMENT LID IN THE SERVICE POSITION .
- Refer to REMOVING THE ACOUSTIC COVER .
- Refer to REMOVING THE SEAL FOR THE HOOD REAR .
- Refer to REMOVING ACOUSTIC COVER AT REAR .
- Refer to REMOVING RESONATOR .
- Refer to REMOVING CLEAN AIR PIPE .
- Refer to REMOVING CHARGE AIR LINE .
- Refer to REMOVING THE ACOUSTIC COVER FOR THE ENGINE AT THE FRONT .
- Refer to REMOVING THE LAMBDA OXYGEN SENSOR .
- Refer to REMOVING THE FRONT UNDERBODY PROTECTION OR FRONT THRUST FIELD .
- Refer to REMOVING THE UNDERBODY PROTECTION OF THE STEERING GEAR AND THRUST FIELD RESPECTIVELY .
- Refer to REMOVING REAR THRUST FIELD .
- Refer to REMOVING THE CONNECTING SUPPORT FROM THE TUNNEL .
- Refer to IF INSTALLED: REMOVE THE TORSION STRUT ON THE RIGHT AND LEFT WHERE REQUIRED .
- Refer to REMOVING THE REAR AXLE COVER .
- Refer to REMOVING COMPLETE EXHAUST SYSTEM .
- Refer to REMOVING CATALYTIC CONVERTER .
- Refer to DRAINING THE COOLANT FROM THE HIGH-TEMPERATURE COOLING SYSTEM .
- Refer to CONNECTING THE COOLANT LINES FOR THE HIGH-TEMPERATURE COOLANT CIRCUIT .
- Refer to REMOVING THE COOLANT FEED LINE FOR THE EXHAUST GAS TURBOCHARGER .
- Refer to REMOVING THE COOLANT RETURNING LINE FOR THE EXHAUST TURBOCHARGER .
- Refer to REMOVING THE OIL RETURNING LINE FOR THE EXHAUST TURBOCHARGER .
Exhaust turbocharger
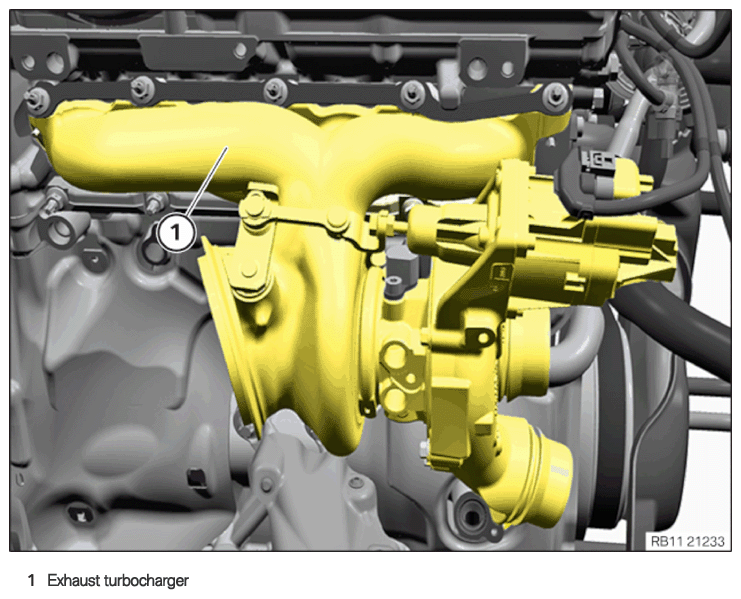
- Exhaust turbocharger
NOTE:
RISK OF DAMAGE
Damage of the electric wastegate valve controller.
Excessive force when removing and installing a jammed exhaust turbocharger may damage the electric wastegate valve controller.
Damage of the electric wastegate valve controller.
Excessive force when removing and installing a jammed exhaust turbocharger may damage the electric wastegate valve controller.
- Do not pull on the electric wastegate valve controller.
- Apply force only at the turbine housing and exhaust manifold.
- Do not pull on the compressor housing.
NOTE:
TECHNICAL INFORMATION
Collect and dispose of emerging fluids. Observe country-specific waste disposal regulations.
Collect and dispose of emerging fluids. Observe country-specific waste disposal regulations.
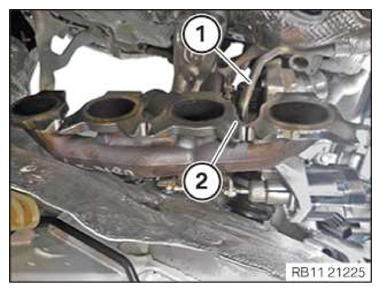
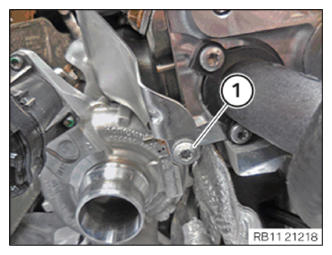
- Loosen screw (1).
- Loosen screw (1).
- Guide out the heat shield (2) out of the marked
area and remove.
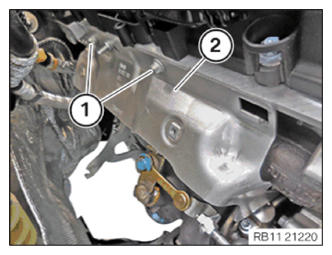
- Loosen screws (1).
- Feed out and remove the heat shield (2).
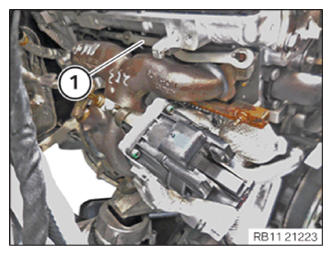
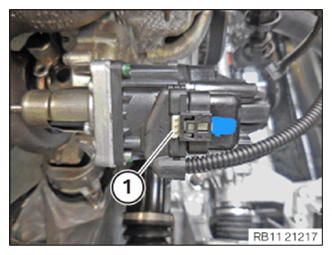
- Unlock and loosen connector (1).
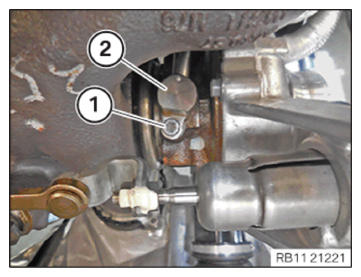
- Loosen screw (1).
- Feed out the oil feed line (2) for the exhaust turbocharger and set it aside.
- Protect the exhaust turbocharger (A) from falling.

NOTE:
TECHNICAL INFORMATION
Exhaust manifold/exhaust turbocharger is not bolted to the underside, but clamped instead. When removing/replacing the exhaust manifold/exhaust turbocharger, the trim strip remains screwed on.
Exhaust manifold/exhaust turbocharger is not bolted to the underside, but clamped instead. When removing/replacing the exhaust manifold/exhaust turbocharger, the trim strip remains screwed on.
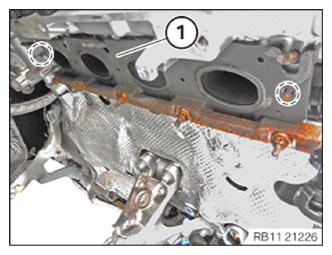
- Release the nut in the sequence (5) to (1).
- Remove reinforcement plate (1).CAUTION: Heavy component.
Heavy components can lead to injury or damage.- Remove and install heavy components with the aid of another person/other persons.
- Feed out the exhaust turbocharger (1) and set it aside.
- Feed out the oil feed line (1) for the exhaust turbocharger and set it aside.
- Guide out and remove the exhaust turbocharger (2).
- Guide the seal (1) out of the marked
area and remove.