Installing the oil coolant heat exchanger
NOTE:
RISK OF DAMAGE
Damage to the surface.
The use of metal-cutting tools (e.g., emery cloths) for cleaning surfaces can damage them and lead to leaks and/or engine damage.
Damage to the surface.
The use of metal-cutting tools (e.g., emery cloths) for cleaning surfaces can damage them and lead to leaks and/or engine damage.
- Do not use any metal-cutting tools.
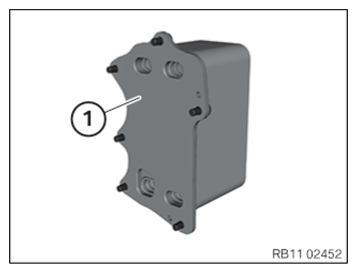
- Clean sealing surface (1).
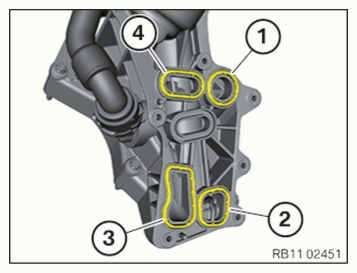
- Replace gaskets (1), (2), (3) and (4).
Parts: Seals
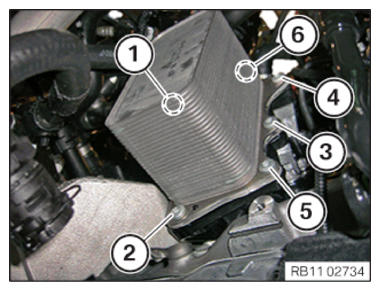
- Position the oil coolant heat exchanger on the full-flow oil filter.
- Tighten the screws (1), (2), (3), (4), (5) and (6).TIGHTENING TORQUES SPECIFICATION
Oil-to-water heat exchanger to full-flow oil filter Tightening torque 10 Nm - Tighten the lid on the full-flow oil filter.TIGHTENING TORQUES SPECIFICATION
Oil filter cover to oil filter module O-ring lightly oiled. Tightening torque 25 Nm TIGHTENING TORQUES SPECIFICATIONOil filter cover to oil filter module Apply light coating of oil to O-ring. Initial tightening torque 25 Nm Release 180° Tightening torque 25 Nm
Follow-up work
- Refer to PREPARING THE THERMOSTAT FOR INSTALLATION .
- Refer to INSTALLING THE THERMOSTAT ON THE TRANSMISSION OIL LINES .
- Refer to CONNECTING THE COOLANT LINE OF HIGH-TEMPERATURE COOLANT CIRCUIT .
- Refer to INSTALLING RESONATOR .
- Refer to FILLING THE HIGH-TEMPERATURE COOLING SYSTEM WITH THE VACUUM FILLING EQUIPMENT .
- Refer to TIGHTENING THE OIL DRAIN PLUG .
- Refer to TIGHTENING THE OIL FILTER CAP .
- Refer to TOPPING UP THE MOTOR OIL .
- Refer to CHECKING/TOPPING UP THE OIL LEVEL IN THE AUTOMATIC TRANSMISSION .
- Refer to INSTALLING THE REAR THRUST FIELD .
- Refer to INSTALLING REAR UNDERBODY PROTECTION .
- Refer to INSTALLING THE UNDERBODY PROTECTION OF THE STEERING GEAR OR THE FRONT THRUST FIELD .
- Refer to INSTALLING THE FRONT UNDERBODY PROTECTION OR FRONT THRUST FIELD .
- Refer to CHECKING ENGINE OIL LEVEL .
- Refer to VENTING THE HIGH-TEMPERATURE COOLANT SYSTEM .
- Refer to INSTALLING ACOUSTIC COVER .