Replacing the front crankshaft seal
NOTE:
DANGER
High-voltage system.
The high-voltage system operates on the basis of hazardous, electrical voltage and high currents. Danger to life through electric shock!
High-voltage system.
The high-voltage system operates on the basis of hazardous, electrical voltage and high currents. Danger to life through electric shock!
- All work on the high-voltage system may only be carried out by specially trained and technically experienced personnel.
- For additional information see:
- For additional information see:
WARNING:
Hot surfaces.
Risk of burning!
Risk of burning!
- Perform all work only on components that have cooled down.
Preliminary work
- Refer to REMOVING THE ACOUSTIC COVER .
- Refer to REMOVE RESONATOR .
- Refer to REMOVING CLEAN AIR PIPE .
- Refer to REMOVE CHARGE AIR LINE .
- Refer to REMOVING THE ACOUSTIC COVER FOR THE ENGINE AT THE FRONT .
- Refer to REMOVING THE DRIVE BELT FOR COOLANT PUMP .
- Refer to REMOVE THE FRONT UNDERBODY PROTECTION OR FRONT THRUST FIELD .
- Refer to REMOVING THE UNDERBODY PROTECTION OF THE STEERING GEAR AND FRONT STIFFENING PLATE RESPECTIVELY .
- Refer to REMOVING REAR STIFFENING PLATE .
- Refer to REMOVING STARTER MOTOR .
- Refer to REMOVING THE VIBRATION DAMPER .
Removing the front crankshaft seal
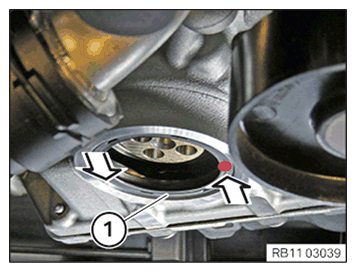
- Drive in the crankshaft seal (1) in the marked area with a punch to approx. 1 cm deep.
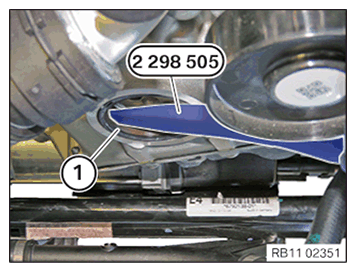
- Lever out the crankshaft seal (1) with a suitable tool.
- Make sure that the sealing surface on the engine block is not scratched.
Installing the front crankshaft seal
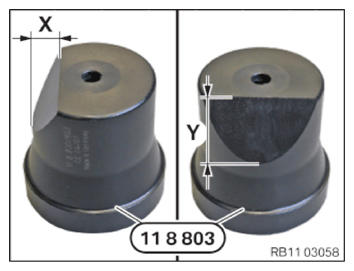
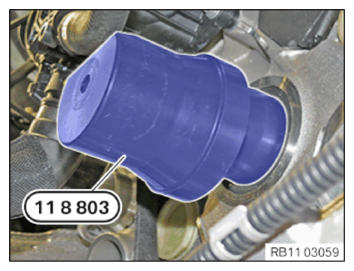
- If required, cut special tool 0496 130 (11 8 803)
from the set of special tools 0496 127 (11 8 800)
using a suitable tool as shown.
Dimension (X) = 16 mm
Dimension (Y) = 31 mm
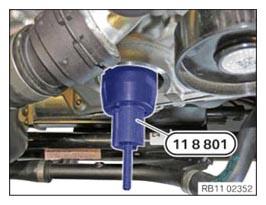
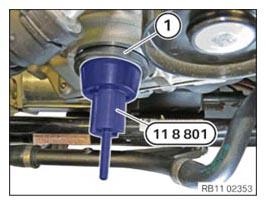
- Clean the special tool 0496 128 (11 8 801) from the set of special tools 0496 127 (11 8 800) and coat it with fresh engine oil.
- Secure special tool 0496 128 (11 8 801)
using special tool 0496 129 (11 8 802)
from the set of special tools 0496 127 (11 8 800)
to the crankshaft.NOTE: RISK OF DAMAGE
Radial shaft seal damage.
Touching the sealing lip (inner) and applying oil to the radial shaft seal will lead to its destruction.- Do not touch the sealing lip (inner) of the radial shaft seal.
- Do not apply oil to the radial shaft seal.
- Install the radial shaft seal dry.
- Carefully slide the crankshaft seal (1) straight in a rotational movement onto the special tool 0496 128 (11 8 801) from the set of special tools 0496 127 (11 8 800) until the crankshaft seal is positioned flush against the crankcase.
- Mount special tool 0496 130 (11 8 803)
onto special tool 0496 128 (11 8 801)
of the set of special tools 496 127 (11 8 800).
- Screw in special tool (sleeve) 0496 130 (11 8 803)
using the special tool 0496 131 (11 8 804)
from the set of special tools 0496 127 (11 8 800)
and a suitable tool until the sleeve is positioned flush against the crankcase.

Follow-up Work
- Refer to INSTALLING THE VIBRATION DAMPER .
- Refer to INSTALLING STARTER MOTOR .
- Refer to INSTALLING THE REAR STIFFENING PLATE .
- Refer to INSTALLING THE UNDERBODY PROTECTION OF THE STEERING GEAR OR THE FRONT STIFFENING PLATE .
- Refer to INSTALL THE FRONT UNDERBODY PROTECTION OR FRONT THRUST FIELD .
- Refer to INSTALLING THE DRIVE BELT FOR THE COOLANT PUMP .
- Refer to INSTALL THE ACOUSTIC COVER FOR THE ENGINE AT THE FRONT .
- Refer to INSTALL CHARGE AIR LINE .
- Refer to INSTALLING CLEAN AIR PIPE .
- Refer to INSTALL RESONATOR .
- Refer to INSTALL ACOUSTIC COVER .