Remove oil vacuum pump
WARNING:
Car may slip off the vehicle hoist where components are supported.
Danger! Immobilization period-threatening injuries!
Danger! Immobilization period-threatening injuries!
- Secure the vehicle hoist against lowering and lifting.
WARNING:
Vehicle may slip off the vehicle hoist if the vehicle hoist is handled incorrectly.
Danger! Immobilization period-threatening injuries!
Danger! Immobilization period-threatening injuries!
- Observe safety instructions on raising the vehicle using a vehicle hoist.
- For additional information see: RAISE THE VEHICLE USING A VEHICLE LIFT .
WARNING:
Car may slip off the vehicle hoist if the weight is distributed unevenly.
Danger! Immobilization period-threatening injuries!
Danger! Immobilization period-threatening injuries!
- Ensure there is a specific weight compensation on the car.
WARNING:
Working on 12 V electrical system.
Risk of short circuits! Risk of fire!
Risk of short circuits! Risk of fire!
- Make sure that there is no charger connected to the jump start terminal in the engine compartment.
- Detach battery ground lead from battery.
- For auxiliary batteries: Detach battery minus cables from all auxiliary batteries.
NOTE:
RISK OF DAMAGE
Damage to battery terminal, the safety battery terminal or the intelligent battery sensor (IBS).
Damaged battery terminals can lead to malfunctions or vehicle electrical system faults.
Damage to battery terminal, the safety battery terminal or the intelligent battery sensor (IBS).
Damaged battery terminals can lead to malfunctions or vehicle electrical system faults.
- Detach battery terminal from battery pole by carefully shifting to and fro. Do not pry off using a tool.
Preliminary work
- Refer to BRINGING FRONT COMPARTMENT LID IN THE SERVICE POSITION .
- Refer to DEACTIVATING THE 48 V ELECTRICAL SYSTEM .
- Refer to DISCONNECTING ALL BATTERY GROUND LEADS .
- Refer to REMOVING THE COVER OF THE ENGINE COMPARTMENT AT THE REAR LEFT .
- Refer to REMOVING THE COVER OF THE REAR RIGHT ENGINE COMPARTMENT .
- Refer to REMOVING THE RIGHT AND LEFT SIDE HOOD SEALS .
- Refer to REMOVING THE ACOUSTIC COVER .
- Refer to REMOVING INTAKE SILENCER HOUSING .
- Refer to REMOVING TOP CLEAN AIR PIPE .
- Refer to REMOVING THE COVER ON LEFT AND RIGHT IN THE ENGINE COMPARTMENT AT THE TOP .
- Refer to REMOVING THE OIL FILLER CAP .
- Refer to REMOVING THE FRONT LEFT AND RIGHT WHEELS .
- Refer to REMOVING THE REAR SECTION OF THE WHEEL ARCH COVER ON THE FRONT LEFT AND RIGHT .
- Refer to REMOVING THE COVER OF THE STEERING ASSEMBLY ON THE LEFT AND RIGHT .
- Refer to REMOVING THE FRONT UNDERBODY PROTECTION OR FRONT THRUST FIELD .
- Refer to REMOVING THE UNDERBODY PROTECTION OF THE STEERING GEAR AND THRUST FIELD RESPECTIVELY .
- Refer to REMOVING THE CENTER UNDERBODY PROTECTION .
- Refer to REMOVING REAR UNDERBODY PROTECTION .
- Refer to RELEASING THE OIL DRAINING PLUG (540i 2017-2020) , or RELEASING THE OIL DRAINING PLUG (540i 2021-2022) .
- Refer to TIGHTENING THE OIL DRAINING PLUG (540i 2017-2020) , or TIGHTENING THE OIL DRAINING PLUG (540i 2021-2022) .
- Refer to REMOVING THE WHEEL ARCH COVER ON THE FRONT LEFT AND BOTTOM RIGHT .
- Refer to REMOVING THE UNIVERSAL JOINT ON THE STEERING GEAR .
- Refer to MOVE THE ENGINE TO THE INSTALLATION POSITION .
- Refer to REMOVING THE REINFORCEMENT STRUT FROM THE ENGINE MOUNT ON THE LEFT AND RIGHT .
- Refer to DETACHING THE WIRING HARNESS OF THE EPS FROM THE FRONT AXLE SUPPORT .
- Refer to IF INSTALLED: REMOVE THE SILENCER OF THE STATIONARY HEATING (ADDITIONAL WORK FRU NO.: 31 11 905) .
- Refer to REMOVING LEFT AND RIGHT BRAKE VENTILATION DUCT .
- Refer to LOOSENING THE ANTI-ROLL BAR LINK ON THE LEFT AND RIGHT FROM THE ANTI-ROLL BAR .
- Refer to RELEASING THE FRONT LEFT AND RIGHT BRAKE CALIPERS .
- Refer to IF INSTALLED: DISCONNECT THE PLUG CONNECTIONS OF THE ACTIVE STABILIZER .
- Refer to PREPARING THE MOBILE TABLE LIFT .
- Refer to POSITIONING THE MOBILE LIFTING TABLE .
- Refer to DETACH THE TOP LEFT AND RIGHT WISHBONE FROM THE SWIVEL BEARING .
- Refer to DETACH THE SPRING STRUT ON THE WISHBONE ON THE BOTTOM LEFT AND RIGHT .
- Refer to RELEASING THE SCREWS ON THE LEFT AND RIGHT FRONT AXLE SUPPORT .
- Refer to COMPLETELY REMOVING FRONT AXLE .
- Refer to REMOVING THE ACOUSTIC COVER OF THE OIL SUMP .
- Refer to REMOVING STARTER MOTOR .
- Refer to REMOVING OIL SUMP .
NOTE:
RISK OF DAMAGE
Contaminant or foreign body.
Contamination can result in malfunctions, loss of function or leaks.
Contaminant or foreign body.
Contamination can result in malfunctions, loss of function or leaks.
- Adhere to the utmost cleanliness.
- Protect components from contamination e.g. by covering.
- Close off line connections with seal plugs.
NOTE:
TECHNICAL INFORMATION
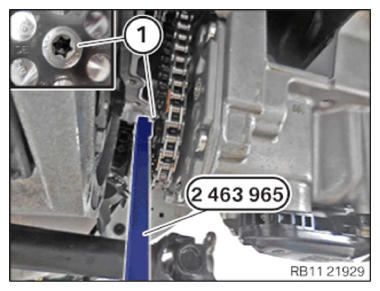
The thread is a left-hand thread.
The thread is a left-hand thread.
- Release screw (1) using special tool 2 463 965 .
- Guide out and remove the screw (1).
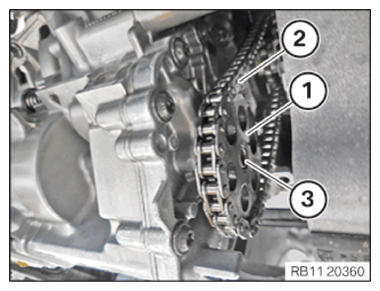
- Release the sprocket wheel (1) from the oil vacuum pump (3).
- Guide the sprocket wheel (1) out of the drive chain (2) and remove.NOTE: TECHNICAL INFORMATION
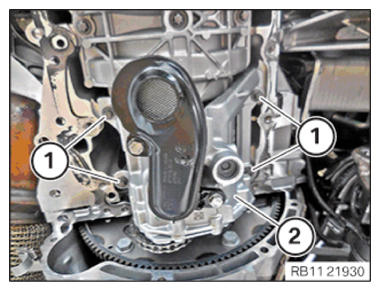
Collect and dispose of emerging fluids. Observe country-specific waste disposal regulations. - Release the screws (1) on the oil vacuum pump (2).
- Guide out and remove the oil vacuum pump (2).
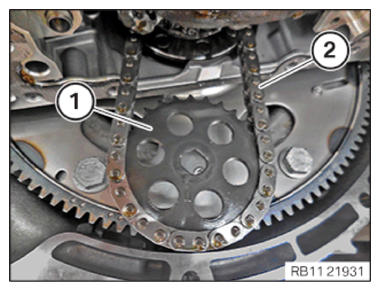
- Guide the sprocket wheel (1) out of the drive chain (2) and remove.