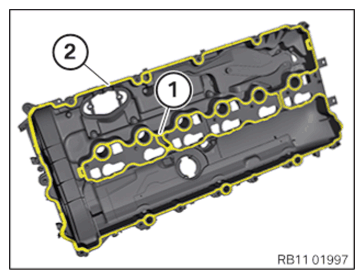
Installing cylinder head cover
- Replace gaskets (1) and (2).
Parts: Seals
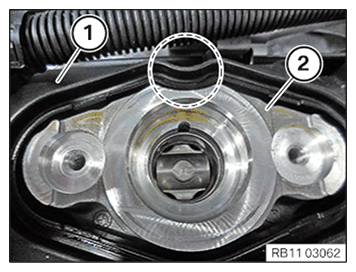
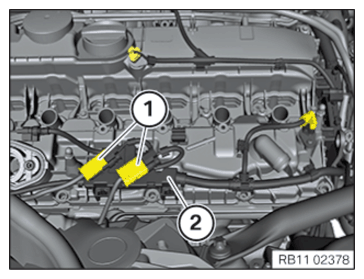
- Make sure that the cylinder head cover (1) is correctly installed in the marked area on the high pressure pump bracket (2).
The cylinder head cover (1) must not tap the high pressure pump bracket (2) in the marked area.
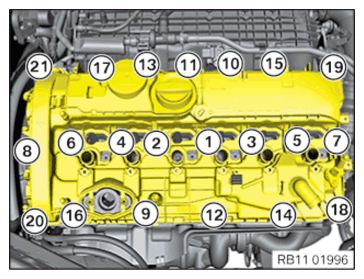
- Position cylinder head cover.
- Make sure that the cylinder head cover does not tap the high pressure pump bracket!
- Tighten all screws in a sequence from (1) to (21).TIGHTENING TORQUES SPECIFICATION
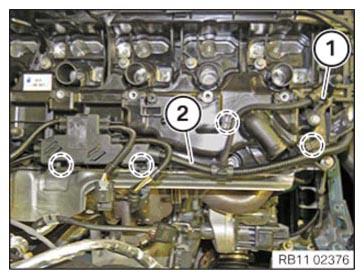
Cylinder head cover to cylinder head M6 x 27 Joining torque: 8 Nm Tightening torque: 11 Nm - Clip in wiring harnesses (2) and (3) in the marked regions.
- Connect connector (1).
- Clip in wiring harness (2) in marked areas.
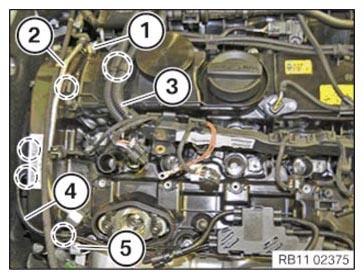
- Connect connector (1).
- Position the holder of the positive battery cable and tighten with the screw (5).TIGHTENING TORQUES SPECIFICATION
Holder, positive battery cable to cylinder head cover Self-tapping plastic screw 6 x 18 Tightening torque: 6.5 Nm - Clip in wiring harness (4) in marked areas.
- Clip in the wiring harness (3) in the marked area.
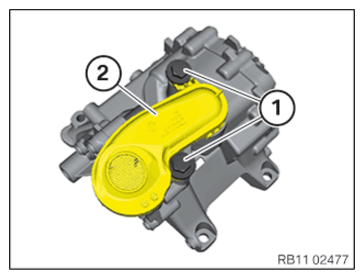
- Correctly route the fuel supply line (2) and tighten with the screw (1).TIGHTENING TORQUES SPECIFICATION
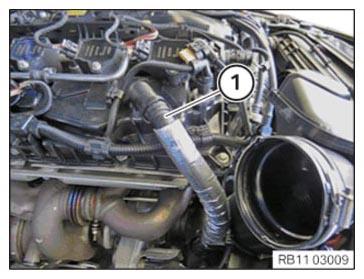
Fuel delivery line to cylinder head cover Self-tapping plastic screw 6 x 18 Tightening torque: 6.5 Nm - Connect connector (1) and attach to the wiring harness (2).NOTE: TECHNICAL INFORMATION
Detents, guides and mounting elements must not be damaged or missing. - Clip the engine ventilation line (1) in.
Follow-up work:
- Refer to PREPARING THE INJECTORS FOR INSTALLATION .
- Refer to INSTALLING THE HIGH-PRESSURE RAIL WITH INJECTORS OF THE CYLINDERS 4 TO 6 .
- Refer to INSTALLING THE INJECTORS FOR THE CYLINDERS 1 TO 3 .
- Refer to PREPARING FOR THE INSTALLATION OF THE HIGH PRESSURE PUMP .
- Refer to INSTALLING HIGH PRESSURE PUMP .
- Refer to INSTALLING THE HIGH-PRESSURE LINE BETWEEN THE HIGH-PRESSURE RAIL AND THE HIGH-PRESSURE PUMP .
- Refer to INSTALLING THE IGNITION COILS .
- Refer to INSTALLING FRONT ENGINE ENCAPSULATION .
- Refer to INSTALLING BOTH ACTUATORS .
- Refer to INSTALLING CENTER BULKHEAD LOWER PART .
- Refer to INSTALLING THE SEALING FRAME ON LEFT AND RIGHT .
- Refer to INSTALLING THE CENTER COWL UPPER PART .
- Refer to INSTALLING TENSION STRUT ON SPRING STRUT DOME .
- Refer to INSTALLING WINDSHIELD PANEL COVER .
- Refer to INSTALLING LEFT AND RIGHT WIPER ARM .
- Refer to INSTALLING THE COVER OF THE ENGINE COMPARTMENT ON THE REAR LEFT .
- Refer to INSTALLING ACOUSTIC COVER AT REAR .
- Refer to INSTALLING THE FRONT HOOD SEAL AT THE REAR .
- Refer to INSTALLING ACOUSTIC COVER .
- Refer to INSTALLING THE RESONATOR WITH THE TOP CLEAN AIR PIPE .
- Refer to INSTALLING INTAKE SILENCER HOUSING .
- Refer to CONNECTING ALL BATTERY GROUND LEADS .