Installing the vibration damper
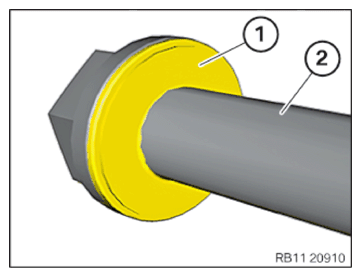
- Clean the contact surface of the central bolt (7).
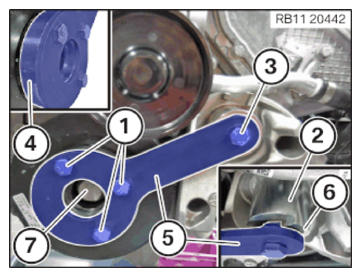
- Align and position vibration damper for the Woodruff key of the sprocket wheel.
- Position shim (4).
- Position fitting sleeve (2).
The notches (6) of the fitting sleeve (2) must point to the counter support (5).
- Position counter support (5).
- Tighten the screws (1) and (3) hand-tight.
- Replace central bolt (2).
Parts : Central bolt
- Treat the contact surface (1) of the central bolt (2) with lubricating grease.CONSUMABLE - LUBRICATING GREASE DESCRIPTION
Lubricating grease SYNTHESO GLEP 1 100 g, Tube 83239407778 - Tighten central bolt (7).TIGHTENING TORQUES SPECIFICATION
Central bolt Screw M18x1.5x122
Replace screw.
Replace screws
grease screw head see Consumables 4.8Joining torque
1. Angle of rotation
2. Angle of rotation
3. Angle of rotation100 Nm
60°
60°
60° - Release the counter support (5) and shim (4) with the screws (1).
- Release the fitting sleeve (2) and counter support (5) with the screw (3).
- Remove the counter support (5) from the vibration damper.
- Remove the fitting sleeve (2).
Follow-up work
- Refer to INSTALLING THE BELT PULLEY ON THE TORSIONAL VIBRATION DAMPER .
- Refer to INSTALLING THE BELT TENSIONER .
- Refer to INSTALL DRIVE BELT .
- Refer to PARTLY FASTENING THE COOLANT EXPANSION TANK FOR THE LOW-TEMPERATURE COOLANT CIRCUIT .
- Refer to INSTALLING FAN COWL .
- Refer to INSTALL THE REAR TOP CROSS CONNECTION .
- Refer to INSTALL FRONT CROSS CONNECTION .
- Refer to INSTALLING THE RIGHT INTAKE FILTER HOUSING WITH THE RIGHT FRONT-END STRUT .
- Refer to INSTALLING LEFT INTAKE FILTER HOUSING WITH LEFT FRONT-END STRUT .
- Refer to INSTALLING THE COVER ON THE LEFT AND RIGHT IN THE ENGINE COMPARTMENT AT THE TOP