Overview - A/C Compressor, Condenser And Under Fender
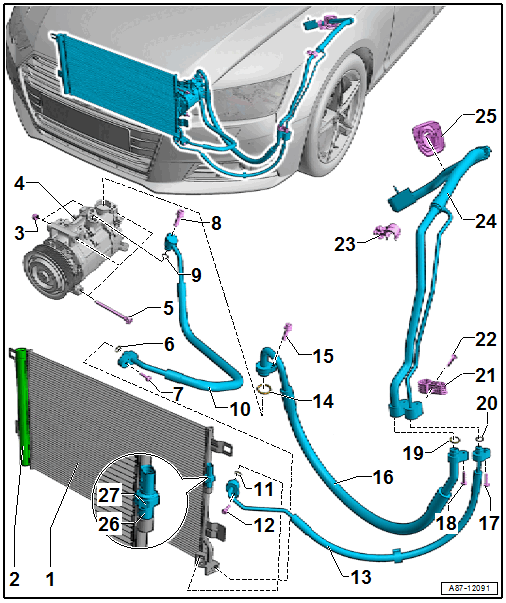
- Condenser (with Receiver/Dryer)
- There are different versions. Refer to the Parts Information.
- Refrigerant lines, disconnecting and reconnecting. Refer to REFRIGERANT LINES, DISCONNECTING AND CONNECTING AT CONDENSER .
- Removing and Installing. Refer to CONDENSER, REMOVING AND INSTALLING .
- The receiver/dryer is a component of the condenser. Refer to OVERVIEW - CONDENSER .
- Different versions of the receiver/dryer. Refer to the Parts Information.
- Receiver/Dryer with Dryer
- The receiver/dryer is a component of the condenser. Refer to OVERVIEW - CONDENSER .
- Dryer from the receiver/dryer, removing and installing. Refer to DESICCANT BAG/DRYER CARTRIDGE, REMOVING AND INSTALLING .
- Alignment Sleeve
- Overview. Refer to OVERVIEW - A/C COMPRESSOR POWER UNIT .
- A/C Compressor
- Overview. Refer to OVERVIEW - A/C COMPRESSOR POWER UNIT .
- There are different versions. Refer to the Parts Information.
- The illustration shows the installation position on a vehicle with a 6-cylinder engine.
- Screw
- Version. Refer to the Parts Information
- Tightening specification. Refer to OVERVIEW - A/C COMPRESSOR POWER UNIT .
- O-Ring
- To replace. Refer to REFRIGERANT CIRCUIT SEALS and to the Parts Information for the correct version.
- Lubricate lightly with refrigerant oil before installing
- Screw
- "M6" 8 Nm
- "M8" 20 Nm
- Depending on the version of the condenser the bolts -item 7- and -item 12- can be connected to one another, the tightening specifications do not change from this
- Screw
- M6 - 9 Nm
- M8 - 25 Nm
- O-Ring
- To replace. Refer to REFRIGERANT CIRCUIT SEALS and to the Parts Information for the correct version.
- Lubricate lightly with refrigerant oil before installing
- High Pressure Side Refrigerant Line
- From A/C compressor to condenser
- There are different versions. Refer to the Parts Information.
- Removing and installing from the A/C compressor. Refer to REFRIGERANT LINES, REMOVING AND INSTALLING AT A/C COMPRESSOR .
- Removing and installing from the condenser. Refer to REFRIGERANT LINES, DISCONNECTING AND CONNECTING AT CONDENSER .
- O-Ring
- To replace. Refer to REFRIGERANT CIRCUIT SEALS and to the Parts Information for the correct version.
- Lubricate lightly with refrigerant oil before installing
- Screw
- "M6" 8 Nm
- "M8" 20 Nm
- Depending on the version of the condenser the bolts -item 7- and -item 12- can be connected to one another, the tightening specifications do not change from this
- High Pressure Side Refrigerant Line
- From the condenser to the inner heat exchanger
- There are different versions. Refer to the Parts Information.
- Removing and Installing. Refer to REFRIGERANT LINES, DISCONNECTING AND CONNECTING AT CONDENSER .
- Removing and installing from inner heat exchanger. Refer to REFRIGERANT LINES WITH INNER HEAT EXCHANGER, REMOVING AND INSTALLING .
- O-Ring
- To replace. Refer to REFRIGERANT CIRCUIT SEALS and to the Parts Information for the correct version.
- Lubricate lightly with refrigerant oil before installing
- Screw
- M6 - 9 Nm
- M8 - 25 Nm
- Tightening specification of bolts with a "M6" thread 9 Nm.
- Tightening specification of bolts with a "M8" thread 20 Nm.
- Low Pressure Side Refrigerant Line
- From the inner heat exchanger to the A/C compressor
- There are different versions. Refer to the Parts Information.
- Removing and installing from the A/C compressor. Refer to REFRIGERANT LINES, REMOVING AND INSTALLING AT A/C COMPRESSOR .
- Removing and installing from inner heat exchanger. Refer to REFRIGERANT LINES, DISCONNECTING AND CONNECTING .
- Screw
- Tightening specification: 9 Nm
- Screw
- Tightening specification: 9 Nm
- O-Ring
- To replace. Refer to REFRIGERANT CIRCUIT SEALS and to the Parts Information for the correct version.
- Lubricate lightly with refrigerant oil before installing
- O-Ring
- To replace. Refer to REFRIGERANT CIRCUIT SEALS and to the Parts Information for the correct version.
- Lubricate lightly with refrigerant oil before installing
- Inner Heat Exchanger Bracket
- There are different versions. Refer to the Parts Information.
- Screw
- Tightening specification of bolts with a "M3" thread 3 Nm.
- Bracket
- There are different versions. Refer to the Parts Information.
- Not always present
- Refrigerant Line with Inner Heat Exchanger
- Additional attachments. Refer to OVERVIEW - COMPONENTS UNDER FENDER AND IN PLENUM CHAMBER .
- In this refrigerant line, the liquid warm refrigerant flowing on the high pressure side releases energy into the vaporous cold refrigerant flowing on the low pressure side. This increases the efficiency of the A/C system.
- Removing and Installing. Refer to REFRIGERANT LINES WITH INNER HEAT EXCHANGER, REMOVING AND INSTALLING .
- Bracket
- There are different versions. Refer to the Parts Information.
- Not always present
- Connection with Valve
- High Pressure Sensor -G65-
- Refer to High Pressure Sensor -G65-, REMOVING AND INSTALLING
- Tightening specification. Refer to OVERVIEW - CONDENSER .