Auxiliary Heater Heating Element -Z35-, Removing And Installing: Installing
Install in reverse order of removal and note the following:
-- Check the heater and A/C unit for contamination, via the installation slot -C- (with the cover -B- installed).
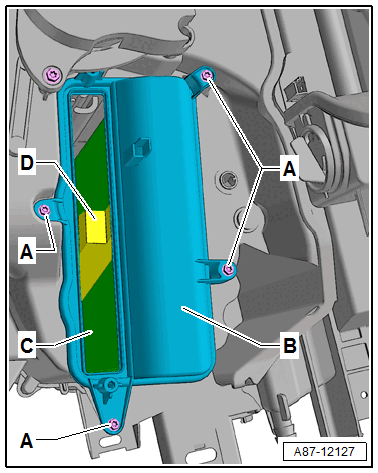
-- If cleaning the heater and A/C unit is required, remove the bolts -A- and remove the cover -B- for the right heat exchanger.
-- Check the foam seal -D- (if equipped) for damage and correct bonding via the installation slot -C- (with the cover -B- installed).
-- Depending on the version of the heat exchanger -A-, check the bonded foam seals -B and C- for damage and correct bonding via the installation slot.
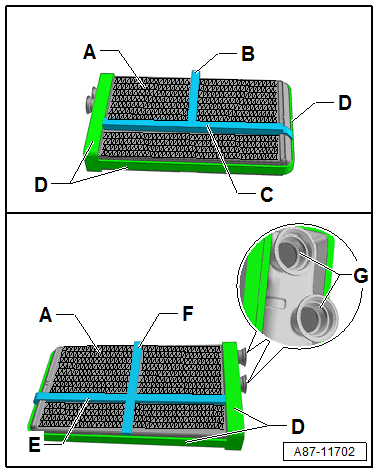
- The foam seals -B and C- from the manufacturer are only present on a heat exchanger -A- for a "High" A/C system. On a "Low" A/C system (or heater without an A/C system) there is no separation in the air duct between the left and right side as well as between the rear and front. For this reason on heat exchangers in these heater and A/C units the foam seals -B and C- are not always present. If they are bonded they must also be secured correctly in the heat exchanger.
- If the foam seals -B- and -C- are damaged are not bonded correctly, it can become loose when pushing in the Auxiliary Heater Heating Element -Z35- (with the Auxiliary Heater Heating Element -Z35-) and when operating the "High" A/C system can depending on the adjustment on the Front A/C Display Control Head -E87- lead to problems in the separation and regulation of the vent temperature sensor on the left and right side as well as between the rear and front. Noises can also result.
- If the foam seals present -B- or -C- on a "High" A/C system are not bonded correctly or are damaged, bond them securely or replace them. Refer to the Parts Information.
- If the foam seals present -B- or -C- on a "Low" A/C system (or a heater without an A/C system) are not bonded correctly, bond them securely or remove them. Refer to the Parts Information.
- Via the foam seal -B- the separation takes place on a "High" A/C system between the right and the left side on the heat exchanger -A-. The foam seal -C- serves as a separation for the front and rear air duct.
-- Check the foam seal -D- on the Auxiliary Heater Heating Element -Z35- -B- for damage and correct bonding.
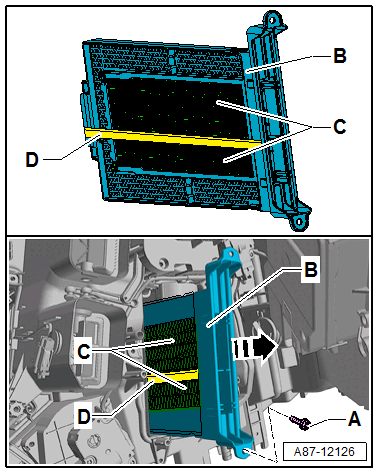
- The foam seal -D- is only necessary on a "High" A/C system and for this reason is only present from the factory on an Auxiliary Heater Heating Element -Z35- -B- for a "High" A/C system. On a "Low" A/C system (or heater without an A/C system) there is no separation in the air duct between the left and right side as well as between the rear and front. On an Auxiliary Heater Heating Element -Z35- -B- in these heater and A/C units the foam seals -D- are not always present for this reason. If they are bonded they must also be secured correctly in the Auxiliary Heater Heating Element -Z35- -B-.
- If the foam seal -D- is damaged or not bonded correctly it can come loose when pushing in the Auxiliary Heater Heating Element -Z35- and when operating the A/C system can depending on the version and adjustment of the Front A/C Display Control Head -E87- lead to problems with the separation and regulation of the exterior temperature for the rear and front. Noises can also result.
- If the foam seal -D- on a "High" A/C system is damaged or not correctly bonded, bond it securely or replace it. Refer to the Parts Information.
- If the foam seal -D- on a "Low" A/C system (or a heater without an A/C system) is damaged or are not bonded correctly, bond it securely or remove. Refer to the Parts Information.
-- Insert the Auxiliary Heater Heating Element -Z35- -B- into the installation slot on the heater and A/C unit.
-- Tighten the bolts -A-.
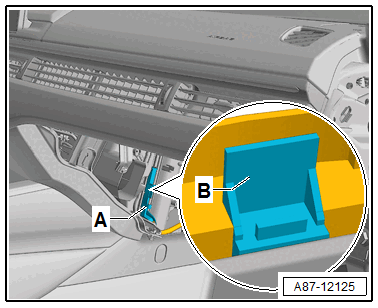
-- Mount the connector -A- on the Auxiliary Heater Heating Element -Z35-.
-- Install the remaining removed components.
-- Perform a basic setting for the A/C system. Refer to GENERAL INFORMATION AND PROCEDURES - ACTUATORS, REMOVING AND INSTALLING .
Tightening Specification