RIGHT ADJUSTMENT MOTOR BRACKET, REMOVING AND INSTALLING, "High" A/C SYSTEM: Installing
Install in reverse order of removal and note the following:
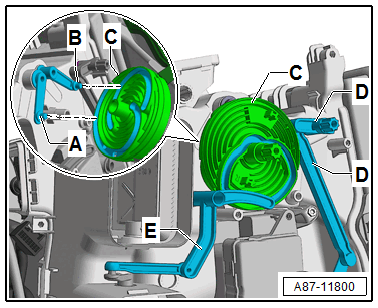
-- Check the relay lever to the different doors -A and B- for the correct position in the curved washer -C- as well as the function.
-- Insert the curved washer -C- and check the function.
-- Check the relay lever -E- for the correct position in the curved washer -C- as well as the function.
-- Check the relay lever -D- for the correct position and function.
TIP
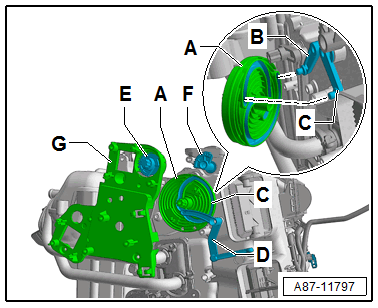
- On RHD vehicles remove the gear from the bracket -A- and install the bracket -A- without the gear. Then insert the gear -F- at the same time pay attention to the correct position to the gear -F- (insert the long and wide teeth on the gear -E- correctly in the gear -F-). Refer to LEFT ADJUSTMENT MOTOR BRACKET, REMOVING AND INSTALLING, "Low" A/C SYSTEM (OR A HEATHER WITHOUT A/C SYSTEM) .
-- Install the bracket -A-.
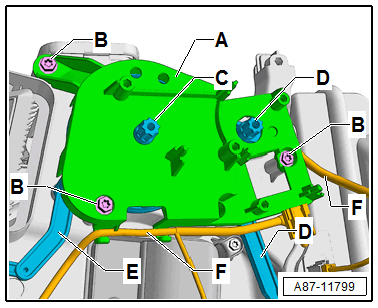
-- Tighten the bolts -B-.
-- Insert wiring harness -F- in bracket -A- so that it cannot come into contact with moving parts.
-- Check the function of the control elements -C, D and E-.
-- Reinstall the removed adjustment motors in the reverse order.
-- Install the wire connections for the various actuators in a position so that they cannot contact any moving components.
-- Perform a basic setting for the A/C system. Refer to GENERAL INFORMATION AND PROCEDURES - ACTUATORS, REMOVING AND INSTALLING .
Tightening Specification