Heater Core, Removing And Installing: Installing
Install in reverse order of removal and note the following:
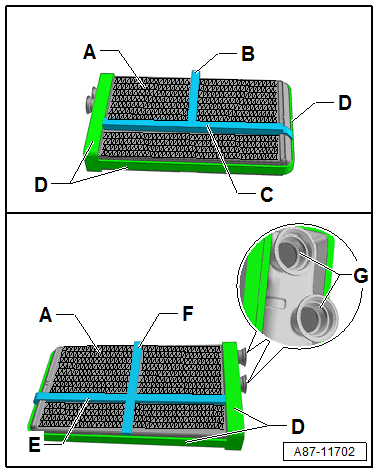
-- Check the foam seals -B-, -C-, -D- and -E- on the heat exchanger -A- for damage and the correct bonding; only install a heater core without damage and with securely bonded seals.
- The foam seals -B, C, E and F- are from the manufacturer only present on a heat exchanger -A- for a "High" A/C system. On a "Low" A/C system (or heater without an A/C system) there is no separation in the air duct between the left and right side as well as between the rear and front. For this reason on heat exchangers in these heater and A/C units the foam seals -B, C, E and F- are not always present. If they are bonded they must also be secured correctly in the heat exchanger.
- If the foam seals -B, C E and F- are damaged are not bonded correctly, they can become loose when pushing in the heat exchanger (or the Auxiliary Heater Heating Element -Z35-) and when operating the "High" A/C system can depending on the adjustment on the Front A/C Display Control Head -E87- lead to problems in the separation and regulation of the vent temperature sensor on the left and right side as well as between the rear and front. Noises can also result.
- The foam seals -D- seal the heat exchanger to the housing and outward. If the foam seals present -D- are not secure or damaged, secure or replace them. Refer to the Parts Information.
- The separation between the right and left side of the heater core -A- is created by the foam seal -B- and -F-.
- The foam seals -C- and -E- disconnect the air duct for the front and rear through the heater core.
- If the foam seals present -B, C, E and F- on a "High" A/C system are not bonded correctly or are damaged, bond them securely or replace them. Refer to the Parts Information.
- If the foam seals present -B, C, E and F- on a "Low" A/C system (or a heater without an A/C system) are not bonded correctly, bond them securely or remove them. Refer to the Parts Information.
-- Check the heater and A/C unit for contamination via the installation slot in the heat exchanger -C-.
-- Remove any dirt or coolant which has leaked out from the heater and A/C unit (for example, after removing a leaking heater core).
-- Check the installation slot for the upper and lower heat exchanger as well as on both sides of the heater and A/C unit for edges or protruding material.
-- Remove any material left on the tool separation points during production of the heater and A/C unit and round any edges.
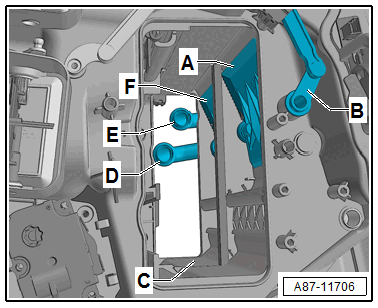
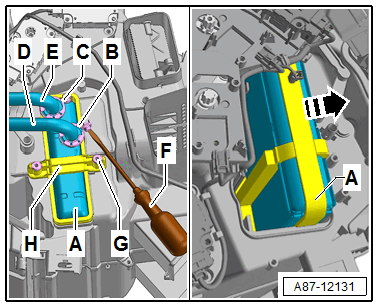
-- Check the position of the temperature control door -A- for the right side and -F- for the left side in the heater and A/C unit, set the temperature control door to the position shown "cold".
-- Check connections -G- on the heater core -A- for damage or contamination, then coat lightly with coolant.
-- Check the connection area -F- on both coolant pipes -D- and -E- to the heater core for damage or contamination.
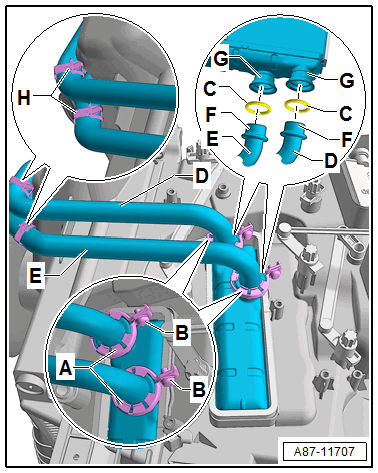
-- On both coolant pipes -D- and -E- respectively place a new screw-type clamp -A- with a cylinder bolt -B- (M 4 x 16) mm on the correct side.
TIP
- From the manufacturer M 4 x 10 mm cylinder bolts are installed in both screw-type clamps, only with these bolts can the screw-type clamp be placed on the heat exchanger connections. When using the M 4 x 16 mm cylinder bolts the screw-type clamp can also be mounted with the cylinder bolt -B- pre-installed on the heat exchanger connection.
-- Coat the new seals -C- lightly with coolant and mount on both coolant pipes -D- and -E-.
-- To prevent the heater core from being inserted too far, install the Rear Temperature Control Door Motor -V137-. Refer to Rear Temperature Control Door Motor .
-- With a second technician, insert the heater core and check if the connections -G- are not on the heater and A/C unit housing and may be damaged.
-- With a second technician, guide the coolant pipes -D- and -E- (with the O-rings -C-) when installing the heater core into the heater core connections -G-.
-- Insert the coolant pipes -D- and -E- one after the other in the heater core connections -G- until they click into place and install a screw-type clamp -B- as shown on the connection point to the heater core.
TIP
- The screw-type clamps -B- engage when pressed together.
- The bolts in the screw-type clamps -B- and -C- can be installed with a longer T15 Torx wrench -F-.
- If the screw-type clamps -B- and /or -C- are located unfavorably, these can be carefully turned before tightening (using slight force or a screwdriver).
-- Secure the screw-type clamps -A- by tightening the bolt -B-.
-- Check the screw-type clamps -A- for correct seating on the heater core connections and the coolant pipe connections.
-- Check the installation position of the screw-type clamps -A- and screws -B-. They must not be in contact with the heater and A/C unit or other components.
-- Check the bracket for the coolant pipes -H- for correct seating.
Continuation for vehicles with an auxiliary heater
-- Install the cover for the right heat exchanger (with the Auxiliary Heater Heating Element -Z35- in the heater and A/C unit. Refer to Auxiliary Heater Heating Element -Z35-, REMOVING AND INSTALLING .
Continuation for vehicles without an auxiliary heater with a "High" A/C system.
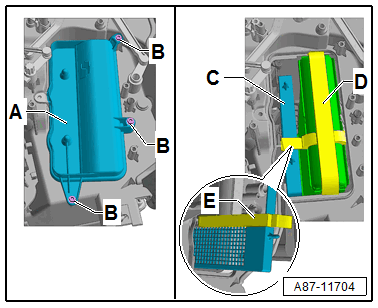
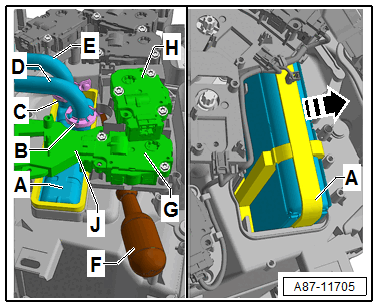
-- Check the foam seal -E- on the zone partition grille -C- for damage and proper adhesion.
- If the foam seals -E- are damaged or not bonded correctly, bond them firmly or replace them. Refer to Parts Information.
-- Install the zone partition grille -C- and right heat exchanger cover -A- on the heater and A/C unit.
Continuation for All Vehicles
-- Make sure the grommet -D- is seated correctly in the rear panel of the plenum chamber.
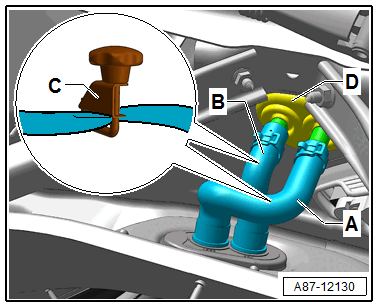
-- Connect the coolant hoses -A and B- to the heater core coolant pipes (pay attention to the marking) and secure them with a clamp.
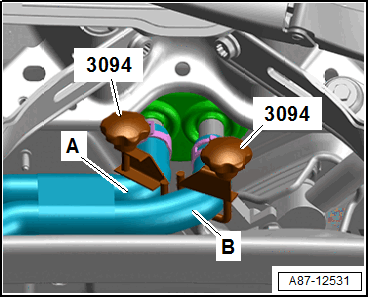
-- Remove the hose clamps -C-.
-- Drain and fill the coolant circuit. Refer to COOLANT, DRAINING AND FILLING .
-- If necessary, add more coolant to the coolant expansion tank. Refer to COOLANT, DRAINING AND FILLING .
Check the connections at the heater core for leaks as follows:
-- Check the coolant circuit for leaks, paying special attention to the connection between the coolant pipes -D- and -E- and the heater core. Refer to COOLING SYSTEM, CHECKING FOR LEAKS .
-- Reinstall all removed parts in the reverse order. Refer to HEATER CORE, PREPARING FOR REMOVAL .
-- Perform a basic setting for the A/C system. Refer to GENERAL INFORMATION AND PROCEDURES - ACTUATORS, REMOVING AND INSTALLING .