Turbocharger, Removing And Installing: Installing
WARNING: This page is about a different variant/trim than selected.
Install in the reverse order of removal while noting the following:
- Replace bolts that were tightened with an additional turn after removing them.
- Replace seals, gaskets, O-rings and self-locking nuts after disassembly.
- Check the O-ring in the Crankcase Pressure Sensor -G1068- for damage. Refer to OVERVIEW - CRANKCASE VENTILATION .
- Coat the turbocharger threaded pins with hot bolt paste. Refer to the Parts Information.
- Fill the turbocharger with engine oil at the oil supply line connection.
- Secure all hose connections with hose clamps that match the ones used in series production. Refer to the Parts Information.
- Used coolant cannot be used again.
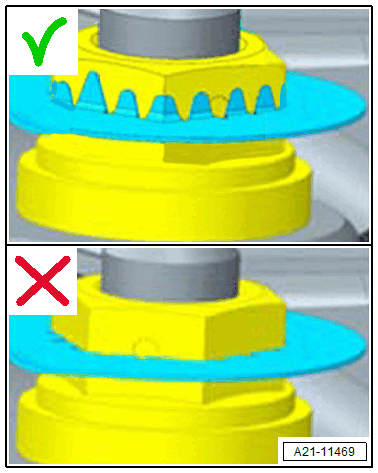
-- Install the locking plates. Refer to Figure.
-- Install the catalytic converter. Refer to CATALYTIC CONVERTER, REMOVING AND INSTALLING .
-- Check the oil level. Refer to ENGINE OIL .
-- Connections and wire routing. Refer to the appropriate Wiring Diagram.
- After installing the turbocharger, let the engine idle for approximately one minute without increasing the engine speed. This ensures adequate oil supply to the turbocharger.
- Used coolant cannot be used again.
-- Install the locking plates. Refer to Figure.
-- Fill with coolant. Refer to COOLANT, FILLING .
After replacing the turbocharger with the Charge Air Pressure Control Module -GX34-, adaptations must be performed. Refer to PERFORM ADAPTATIONS AFTER COMPONENT REPLACEMENT .